> ## Documentation Index
> Fetch the complete documentation index at: https://docs.inflection.io/llms.txt
> Use this file to discover all available pages before exploring further.
# Snowflake Setup and Configuration (using storage integration)
> Set up Snowflake as an Inflection data source and export destination.
## Prerequisites
### For Exporting Data from Inflection to Snowflake
* Admin access to your Inflection account
* Snowflake account credentials
* Service account with appropriate permissions
* Key-pair authentication credentials (recommended) or username and password
* The user running the SQL queries for the setup should have ACCOUNTADMIN role access
### For Importing Data from Snowflake to Inflection
* Admin access to your Inflection account
* Snowflake account with `ACCOUNTADMIN` role or `MANAGE GRANTS` privilege
* Database containing source tables that meet Inflection schema requirements
* Key-pair authentication credentials (recommended) or username and password
* The user running the SQL queries for the setup should have ACCOUNTADMIN role access
**Important:** Snowflake is deprecating single-factor password authentication for service users. By August-October 2026, all service users (TYPE=SERVICE) must use key-pair authentication. Learn more in [Snowflake's Password Deprecation Timeline](https://docs.snowflake.com/en/user-guide/security-mfa-rollout).
## Import Snowflake Data to Inflection
### Set Up Import Connection in Inflection
1. Navigate to **Connections → Data Connections**
2. Click **Add new connection**
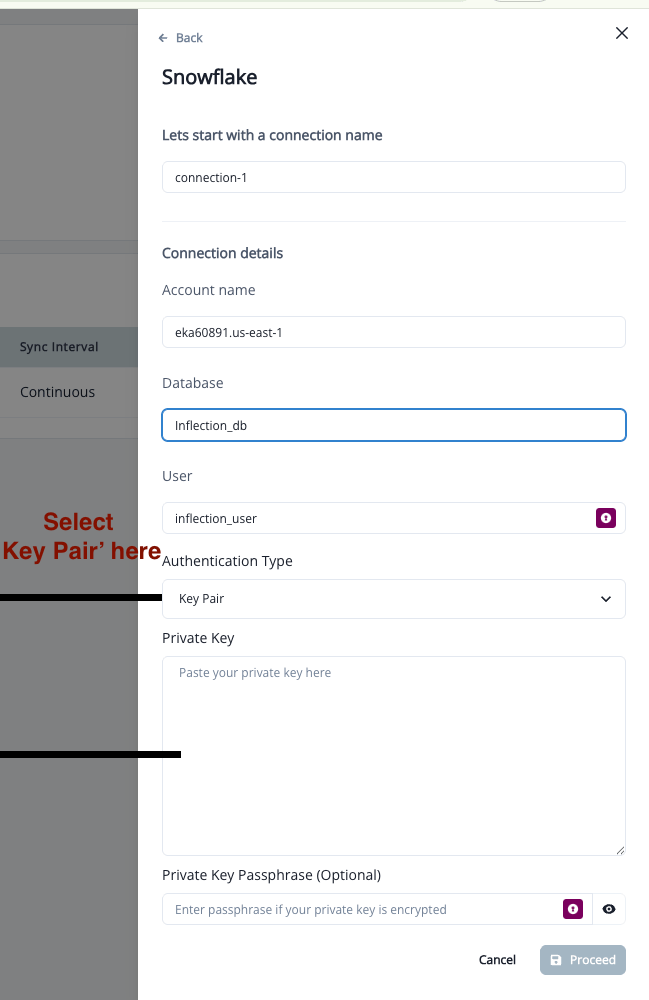
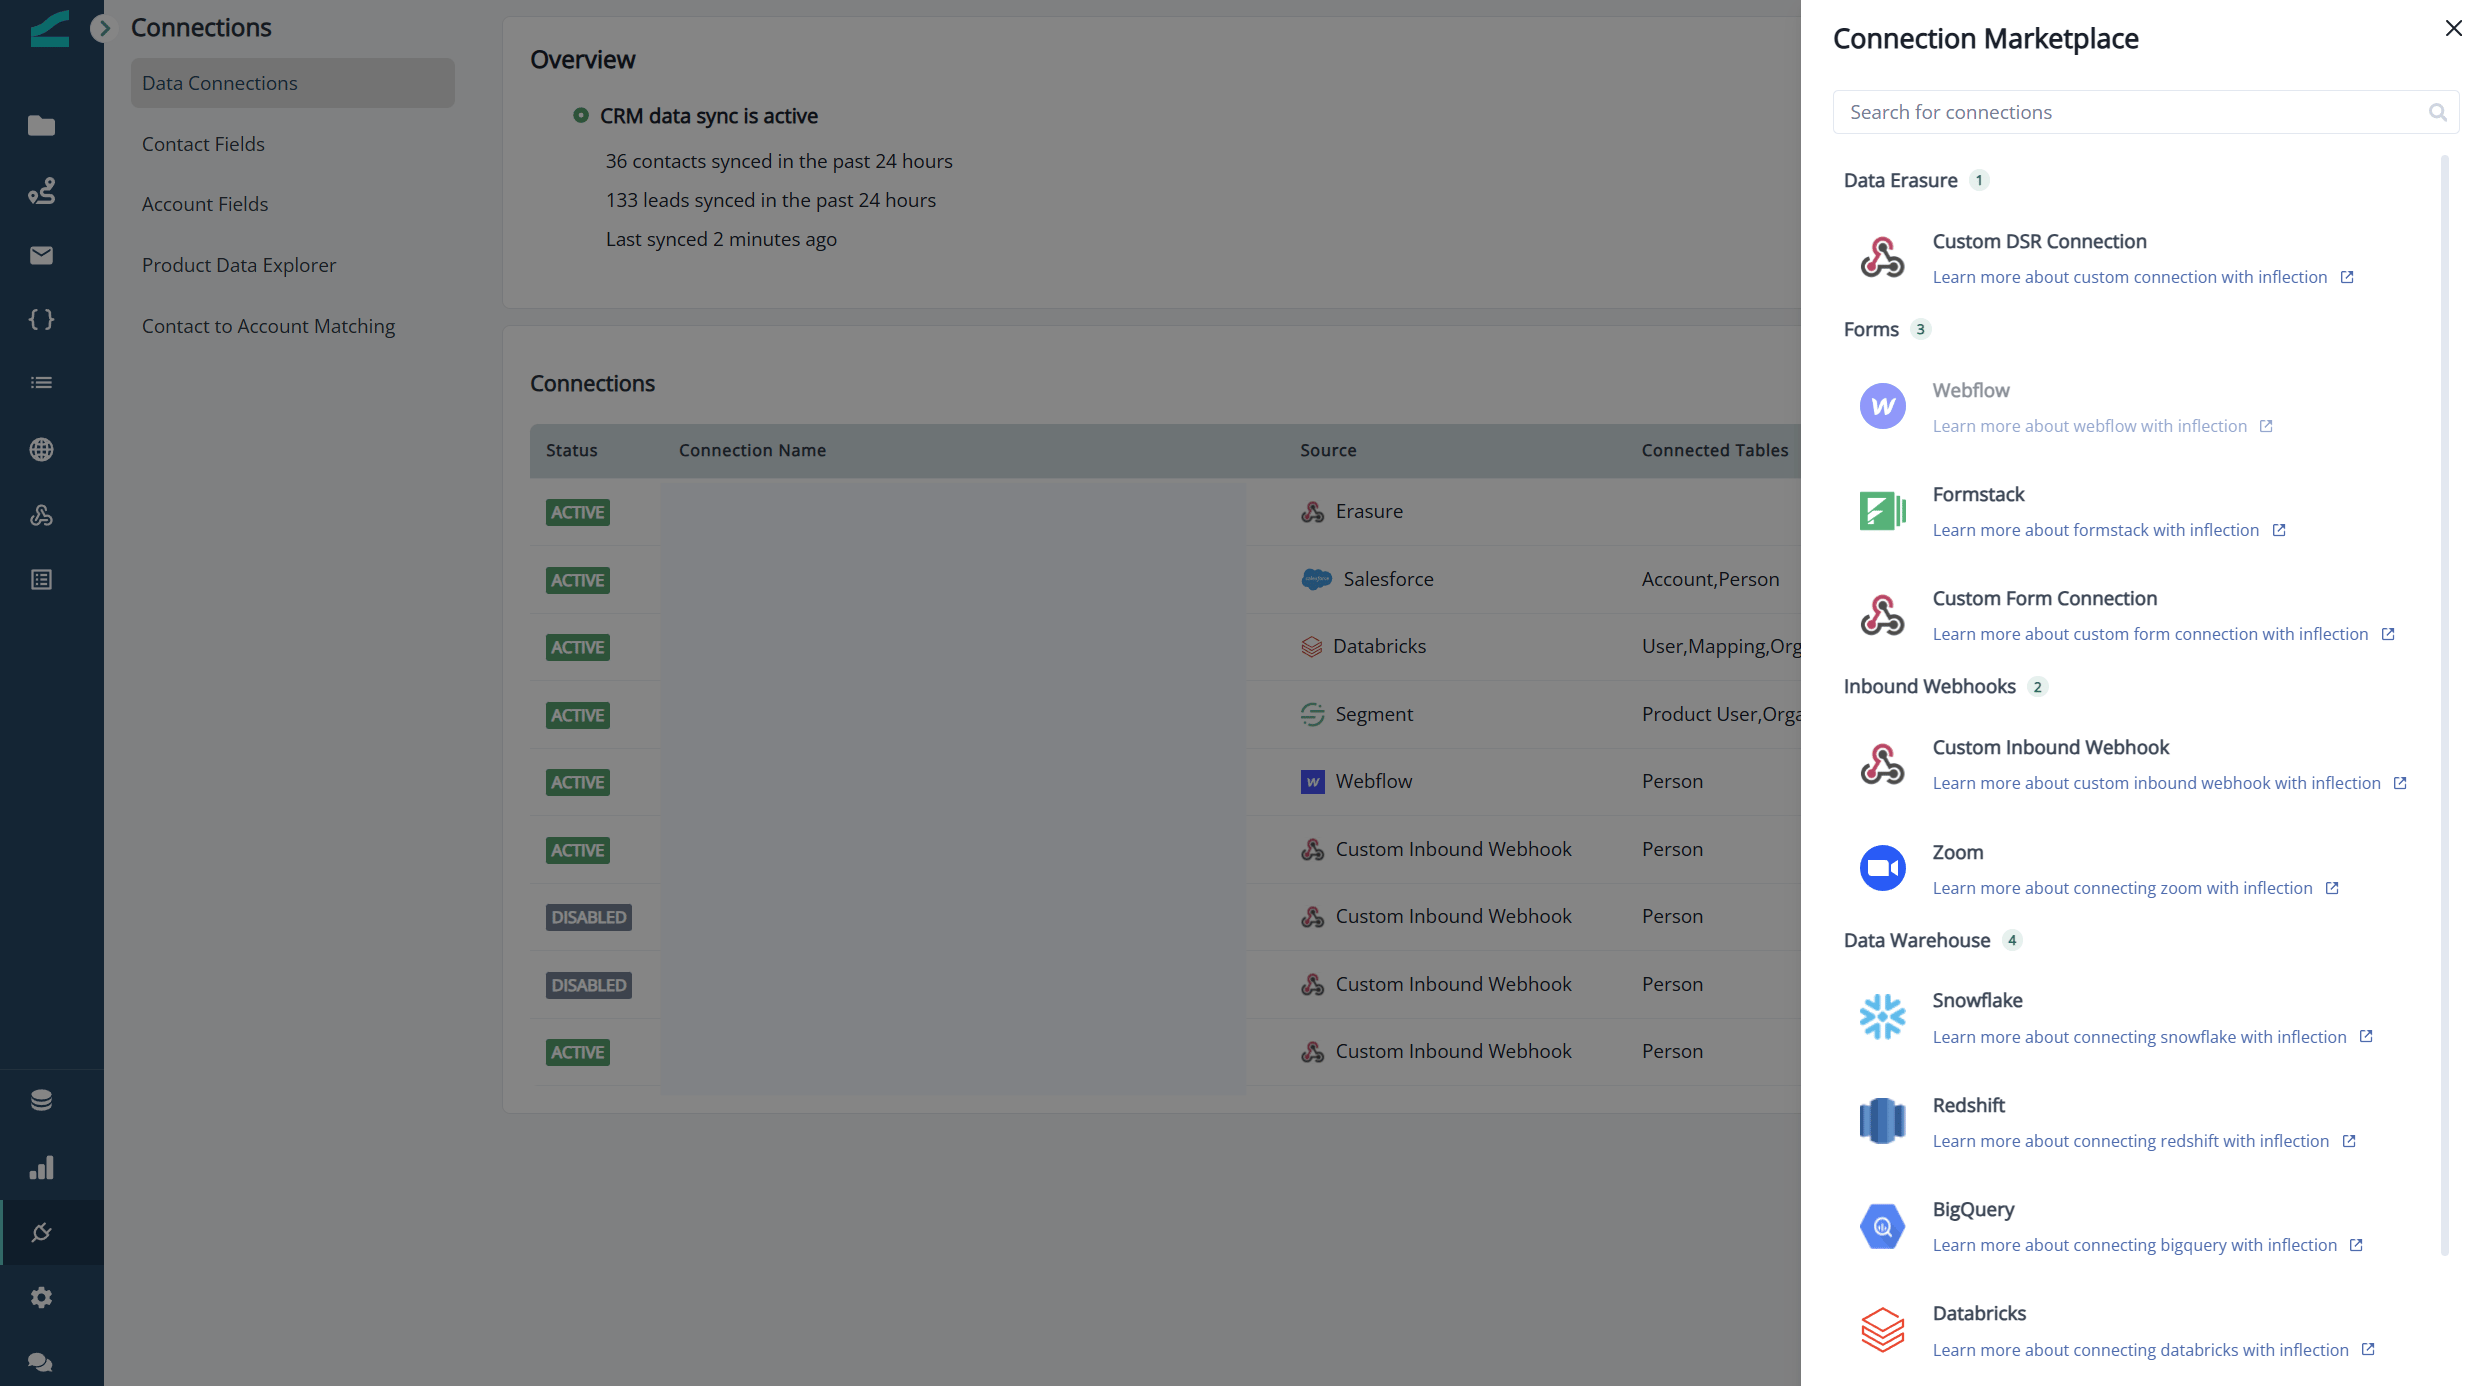 1. Enter connection details:
2. Choose your authentication method:
**Option A: Key-Pair Authentication (Recommended)**:
* **Account name** - a human-friendly name for this particular Snowflake import
* **Database** - name of the database where all the Inflection-ready tables are present
* **Username** - username of the service account
* **Private key** - RSA private key (2048-bit minimum) in PEM format
* **Private key passphrase** (if applicable) - for encrypted private keys
**Reference:** [Here](https://docs.snowflake.com/en/user-guide/key-pair-auth#generate-the-private-keys) is the document from Snowflake to generate your Private Key
1. Enter connection details:
2. Choose your authentication method:
**Option A: Key-Pair Authentication (Recommended)**:
* **Account name** - a human-friendly name for this particular Snowflake import
* **Database** - name of the database where all the Inflection-ready tables are present
* **Username** - username of the service account
* **Private key** - RSA private key (2048-bit minimum) in PEM format
* **Private key passphrase** (if applicable) - for encrypted private keys
**Reference:** [Here](https://docs.snowflake.com/en/user-guide/key-pair-auth#generate-the-private-keys) is the document from Snowflake to generate your Private Key
 **Option B: Username & Password Authentication**
* **Account name** - a human-friendly name for this particular Snowflake import
* **Database** - name of the database where all the Inflection-ready tables are present
* **Username, Password** - authentication credentials for the Snowflake service account
3. Integration setup
1. Run the SQL script provided, get the **STORAGE\_AWS\_IAM\_USER\_ARN** and **STORAGE\_AWS\_EXTERNAL\_ID** values from the query result, provide them in the corresponding text boxes and submit
**Option B: Username & Password Authentication**
* **Account name** - a human-friendly name for this particular Snowflake import
* **Database** - name of the database where all the Inflection-ready tables are present
* **Username, Password** - authentication credentials for the Snowflake service account
3. Integration setup
1. Run the SQL script provided, get the **STORAGE\_AWS\_IAM\_USER\_ARN** and **STORAGE\_AWS\_EXTERNAL\_ID** values from the query result, provide them in the corresponding text boxes and submit
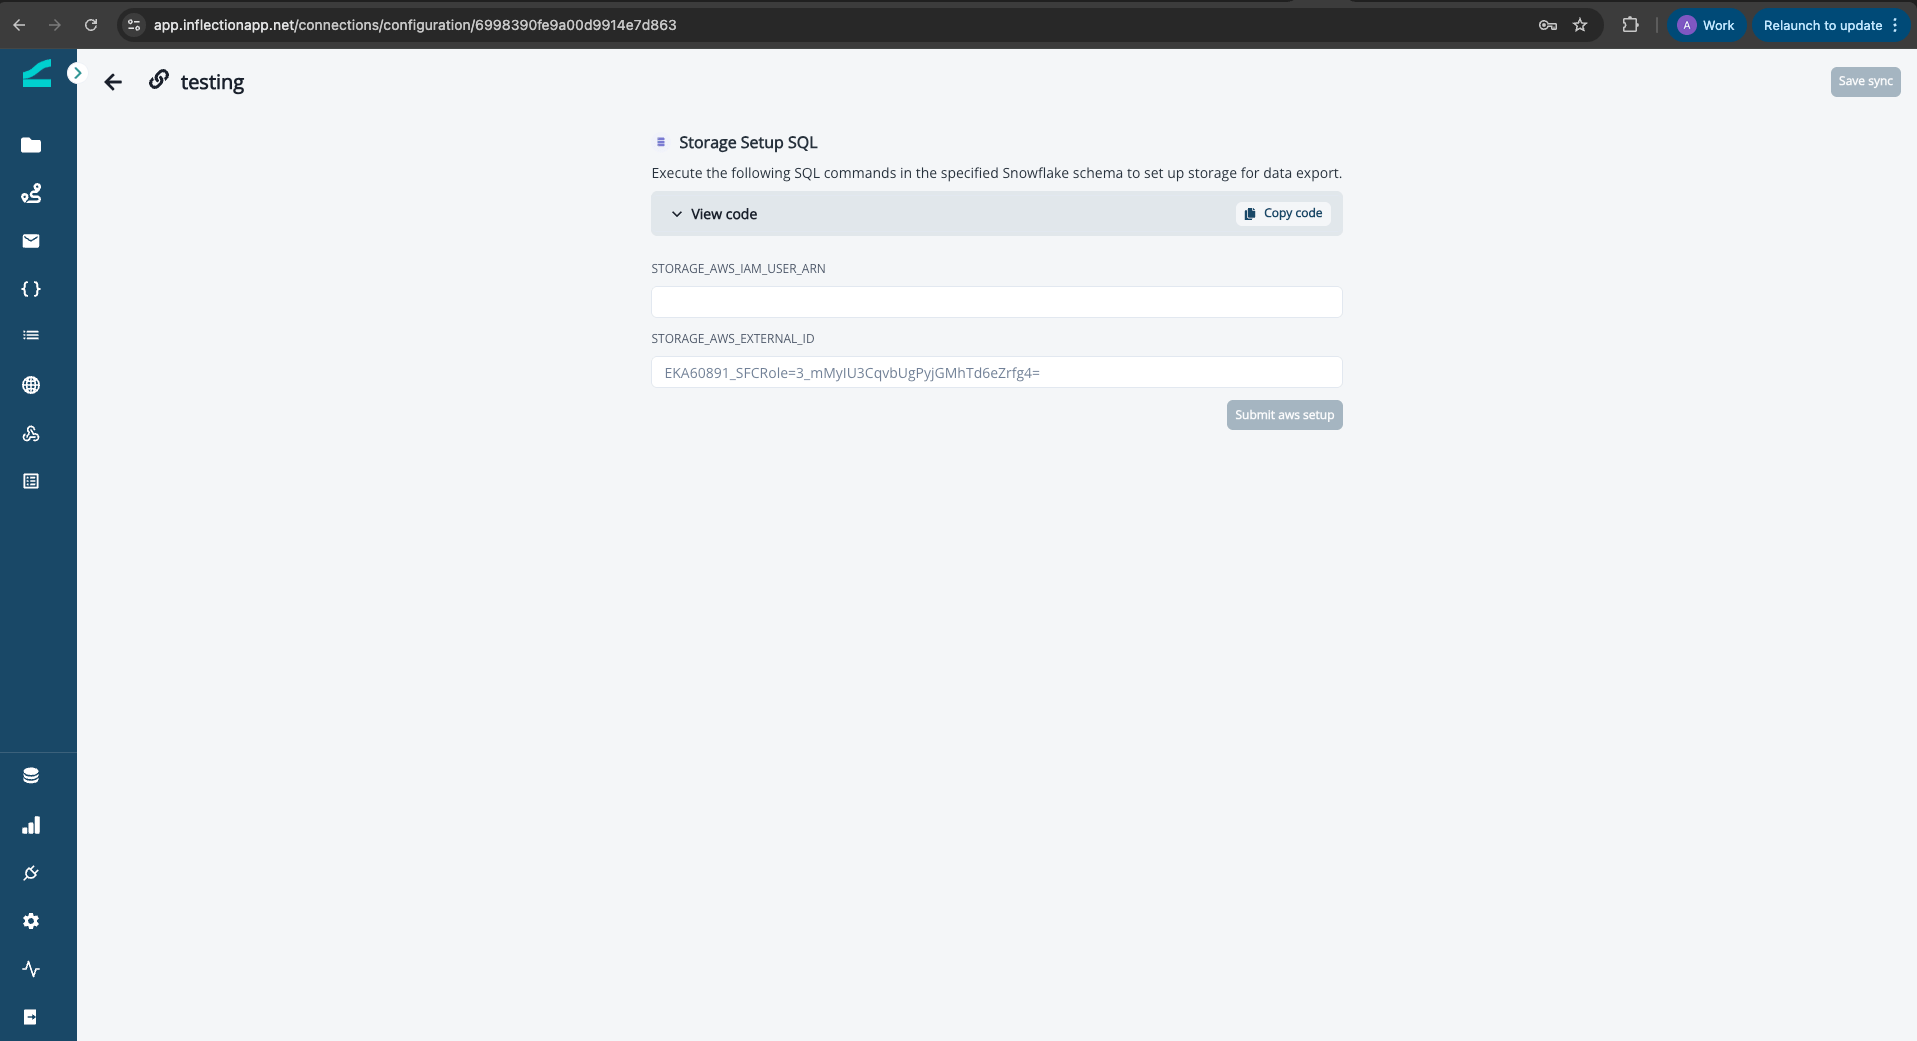 You'll need to be logged in as an `ACCOUNTADMIN` or an account that has `MANAGE GRANTS`. Inflection will need access to the Database, Schema, Tables, Views and Warehouse that the data is in. While the below steps defines default resources, you can define any user, role, warehouse you'd like.
1. Create warehouse
```sql theme={null}
CREATE WAREHOUSE "INFLECTION_WAREHOUSE"
WITH WAREHOUSE_SIZE = 'XSMALL'
WAREHOUSE_TYPE = 'STANDARD'
AUTO_RESUME = TRUE;
```
2. Create Role for Inflection
```sql theme={null}
CREATE ROLE INFLECTION_ROLE
COMMENT = 'Access on inflection schema to maintain state between syncs';
```
3. Create User for Inflection
Choose based on your authentication method:
**For Key-Pair Authentication (Recommended):**
```sql theme={null}
-- Step 1: Create user without password
CREATE USER INFLECTION_USER
DEFAULT_ROLE = INFLECTION_ROLE
DEFAULT_WAREHOUSE = "INFLECTION_WAREHOUSE"
COMMENT = 'User for inflection operations';
-- Step 2: Assign public key (replace with your actual public key)
ALTER USER INFLECTION_USER
SET RSA_PUBLIC_KEY='';
```
**Reference:** [Here](https://docs.snowflake.com/en/user-guide/key-pair-auth#generate-the-private-keys) is the document from Snowflake to generate your Key
**For Username & Password Authentication:**
```sql theme={null}
CREATE USER INFLECTION_USER
MUST_CHANGE_PASSWORD = FALSE
DEFAULT_ROLE = INFLECTION_ROLE
DEFAULT_WAREHOUSE = "INFLECTION_WAREHOUSE"
PASSWORD = "my_strong_password"
COMMENT = 'User for inflection operations';
```
4. Create an `inflection` schema in the database. The database refers to the database where the source data lives. Replace `` with the database name.
```sql theme={null}
CREATE SCHEMA .INFLECTION
COMMENT = 'Schema for Inflection operations';
```
5. Granting permissions and access.
1. Role to User
```sql theme={null}
GRANT ROLE INFLECTION_ROLE TO USER INFLECTION_USER;
```
2. Warehouse usage to Role
```sql theme={null}
GRANT USAGE ON WAREHOUSE "INFLECTION_WAREHOUSE" TO ROLE "INFLECTION_ROLE";
```
3. Grant access to the `inflection` schema
```sql theme={null}
GRANT USAGE, CREATE TABLE, CREATE VIEW
ON SCHEMA .INFLECTION
TO ROLE INFLECTION_ROLE;
GRANT ALL
ON FUTURE TABLES IN SCHEMA INFLECTION
TO ROLE INFLECTION_ROLE;
```
4. Grant access to the source data
```sql theme={null}
#Permission to list schemas in the database (USAGE: Access to USE and SHOW ops)
GRANT USAGE
ON DATABASE
TO ROLE INFLECTION_ROLE;
#Permission to list tables and views in the database
GRANT USAGE
ON SCHEMA .
TO ROLE INFLECTION_ROLE;
#Permission to read from the table
GRANT SELECT
ON TABLE ..
TO ROLE INFLECTION_ROLE;
```
### FAQ: My data is in multiple tables. Does Inflection support views?
**Certainly. You can create the view in any shape and provide access to it to the `inflection user` like any table.**
```sql theme={null}
#Create a view
CREATE VIEW .. AS
SELECT * FROM ..
#Permission to read from the view
GRANT SELECT
ON VIEW ..
TO ROLE INFLECTION_ROLE;
```
**Keep in mind that any breaking changes from the tables that the view is generated from i.e. deleting a column, will break the view which in turn will break the connection.**
## Export Inflection Data to Snowflake
### Set up Export Connection in Inflection
1. Navigate to **Connections → Data Connections**
2. Click **Add new connection**
1. Select **Snowflake** as your destination platform.
2. **Select connection type**: Choose **Export Data to Snowflake**.
You'll need to be logged in as an `ACCOUNTADMIN` or an account that has `MANAGE GRANTS`. Inflection will need access to the Database, Schema, Tables, Views and Warehouse that the data is in. While the below steps defines default resources, you can define any user, role, warehouse you'd like.
1. Create warehouse
```sql theme={null}
CREATE WAREHOUSE "INFLECTION_WAREHOUSE"
WITH WAREHOUSE_SIZE = 'XSMALL'
WAREHOUSE_TYPE = 'STANDARD'
AUTO_RESUME = TRUE;
```
2. Create Role for Inflection
```sql theme={null}
CREATE ROLE INFLECTION_ROLE
COMMENT = 'Access on inflection schema to maintain state between syncs';
```
3. Create User for Inflection
Choose based on your authentication method:
**For Key-Pair Authentication (Recommended):**
```sql theme={null}
-- Step 1: Create user without password
CREATE USER INFLECTION_USER
DEFAULT_ROLE = INFLECTION_ROLE
DEFAULT_WAREHOUSE = "INFLECTION_WAREHOUSE"
COMMENT = 'User for inflection operations';
-- Step 2: Assign public key (replace with your actual public key)
ALTER USER INFLECTION_USER
SET RSA_PUBLIC_KEY='';
```
**Reference:** [Here](https://docs.snowflake.com/en/user-guide/key-pair-auth#generate-the-private-keys) is the document from Snowflake to generate your Key
**For Username & Password Authentication:**
```sql theme={null}
CREATE USER INFLECTION_USER
MUST_CHANGE_PASSWORD = FALSE
DEFAULT_ROLE = INFLECTION_ROLE
DEFAULT_WAREHOUSE = "INFLECTION_WAREHOUSE"
PASSWORD = "my_strong_password"
COMMENT = 'User for inflection operations';
```
4. Create an `inflection` schema in the database. The database refers to the database where the source data lives. Replace `` with the database name.
```sql theme={null}
CREATE SCHEMA .INFLECTION
COMMENT = 'Schema for Inflection operations';
```
5. Granting permissions and access.
1. Role to User
```sql theme={null}
GRANT ROLE INFLECTION_ROLE TO USER INFLECTION_USER;
```
2. Warehouse usage to Role
```sql theme={null}
GRANT USAGE ON WAREHOUSE "INFLECTION_WAREHOUSE" TO ROLE "INFLECTION_ROLE";
```
3. Grant access to the `inflection` schema
```sql theme={null}
GRANT USAGE, CREATE TABLE, CREATE VIEW
ON SCHEMA .INFLECTION
TO ROLE INFLECTION_ROLE;
GRANT ALL
ON FUTURE TABLES IN SCHEMA INFLECTION
TO ROLE INFLECTION_ROLE;
```
4. Grant access to the source data
```sql theme={null}
#Permission to list schemas in the database (USAGE: Access to USE and SHOW ops)
GRANT USAGE
ON DATABASE
TO ROLE INFLECTION_ROLE;
#Permission to list tables and views in the database
GRANT USAGE
ON SCHEMA .
TO ROLE INFLECTION_ROLE;
#Permission to read from the table
GRANT SELECT
ON TABLE ..
TO ROLE INFLECTION_ROLE;
```
### FAQ: My data is in multiple tables. Does Inflection support views?
**Certainly. You can create the view in any shape and provide access to it to the `inflection user` like any table.**
```sql theme={null}
#Create a view
CREATE VIEW .. AS
SELECT * FROM ..
#Permission to read from the view
GRANT SELECT
ON VIEW ..
TO ROLE INFLECTION_ROLE;
```
**Keep in mind that any breaking changes from the tables that the view is generated from i.e. deleting a column, will break the view which in turn will break the connection.**
## Export Inflection Data to Snowflake
### Set up Export Connection in Inflection
1. Navigate to **Connections → Data Connections**
2. Click **Add new connection**
1. Select **Snowflake** as your destination platform.
2. **Select connection type**: Choose **Export Data to Snowflake**.
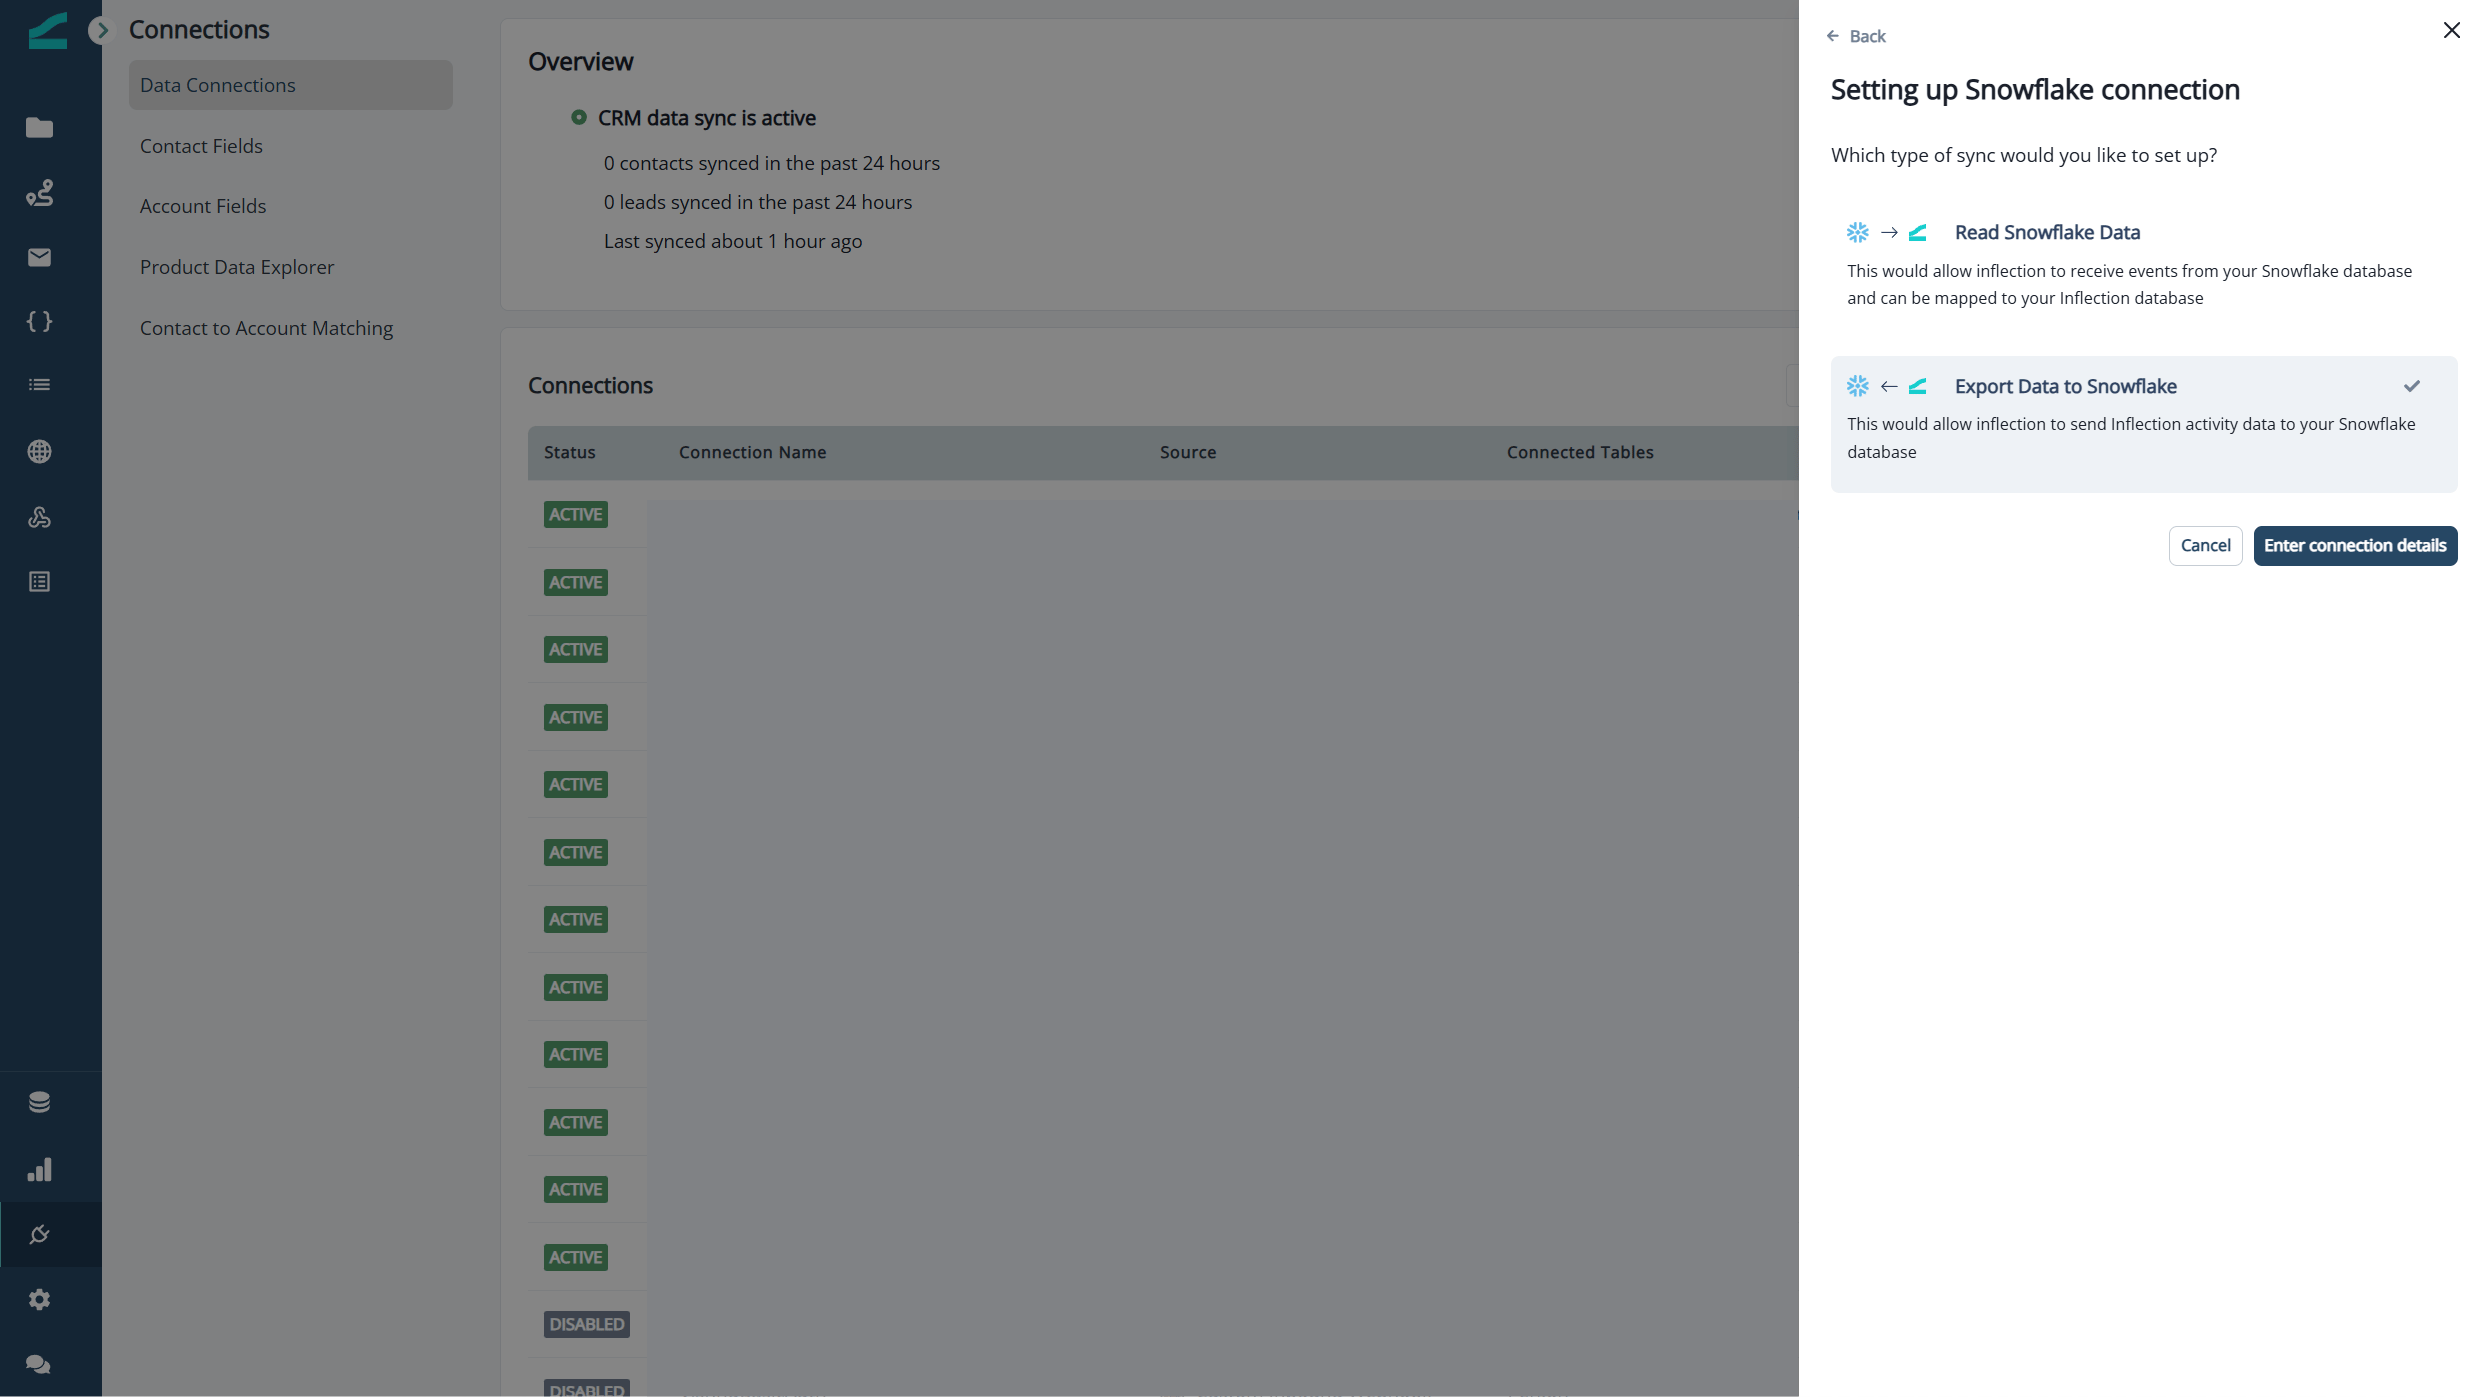 3. **Enter your Snowflake credentials**
* Choose your authentication method.
* **Key-Pair Authentication (Recommended):**
* **Connection name:**
* **Account name:** a human-friendly name for this Snowflake connection
* **Username**: username of the service account that connects to Snowflake
* **Private key:** RSA private key (2048-bit minimum) in PEM format
See [Snowflake's key-pair authentication guide](https://docs.snowflake.com/en/user-guide/key-pair-auth#generate-the-private-keys) to generate your private key.
* **Private key passphrase** (if applicable): for encrypted private keys
* **Database** and **Schema:** name of the database and schema where Inflection should write data
* **Option B: Username & Password Authentication**
Password authentication will be deprecated by August. Migrate to key-pair authentication before this deadline.
* **Connection name:**
* **Account name:** a human-friendly name for this Snowflake connection
* **Username, Password:** authentication credentials for a service account
* **Database** and **Schema:** name of the database and schema where Inflection should write data
4. Click **Create Connection**
5. Integration setup
1. Run the "Storage Setup SQL" script provided in Connection details, get the **STORAGE\_AWS\_IAM\_USER\_ARN** and **STORAGE\_AWS\_EXTERNAL\_ID** values from the query result, provide them in the corresponding text boxes and submit
3. **Enter your Snowflake credentials**
* Choose your authentication method.
* **Key-Pair Authentication (Recommended):**
* **Connection name:**
* **Account name:** a human-friendly name for this Snowflake connection
* **Username**: username of the service account that connects to Snowflake
* **Private key:** RSA private key (2048-bit minimum) in PEM format
See [Snowflake's key-pair authentication guide](https://docs.snowflake.com/en/user-guide/key-pair-auth#generate-the-private-keys) to generate your private key.
* **Private key passphrase** (if applicable): for encrypted private keys
* **Database** and **Schema:** name of the database and schema where Inflection should write data
* **Option B: Username & Password Authentication**
Password authentication will be deprecated by August. Migrate to key-pair authentication before this deadline.
* **Connection name:**
* **Account name:** a human-friendly name for this Snowflake connection
* **Username, Password:** authentication credentials for a service account
* **Database** and **Schema:** name of the database and schema where Inflection should write data
4. Click **Create Connection**
5. Integration setup
1. Run the "Storage Setup SQL" script provided in Connection details, get the **STORAGE\_AWS\_IAM\_USER\_ARN** and **STORAGE\_AWS\_EXTERNAL\_ID** values from the query result, provide them in the corresponding text boxes and submit
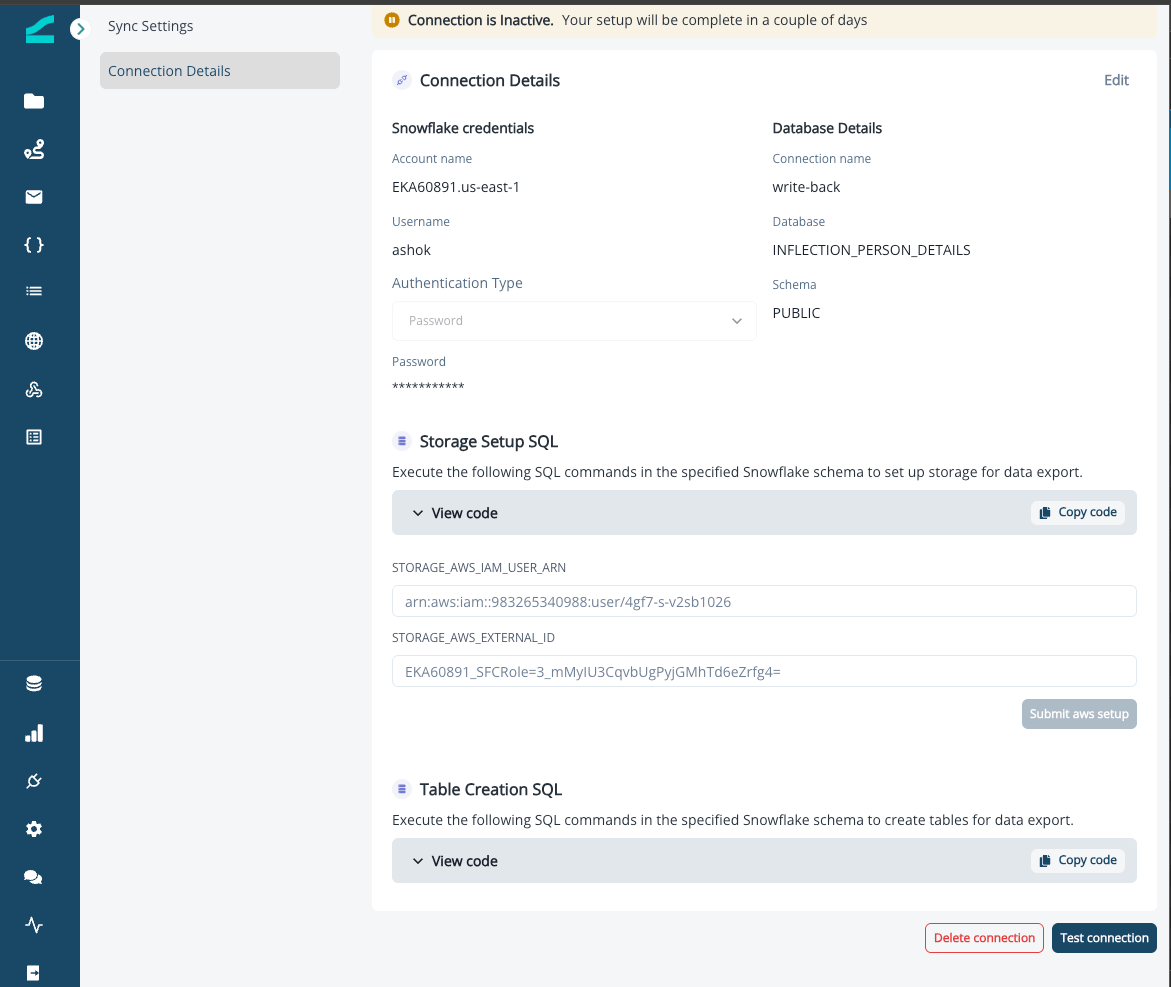 The connection will remain in **inactive** state until credentials and destination tables are validated by the Inflection team.
### Create Export Tables in Snowflake
Inflection provides a custom SQL script tailored to your configuration. Run this script to create the export tables in your data warehouse.
1. Navigate to **Connections** → Select the Snowflake Export connection
2. Click **Connection Details**
3. Click **Copy code** in the **Table Creation SQL** section
The connection will remain in **inactive** state until credentials and destination tables are validated by the Inflection team.
### Create Export Tables in Snowflake
Inflection provides a custom SQL script tailored to your configuration. Run this script to create the export tables in your data warehouse.
1. Navigate to **Connections** → Select the Snowflake Export connection
2. Click **Connection Details**
3. Click **Copy code** in the **Table Creation SQL** section
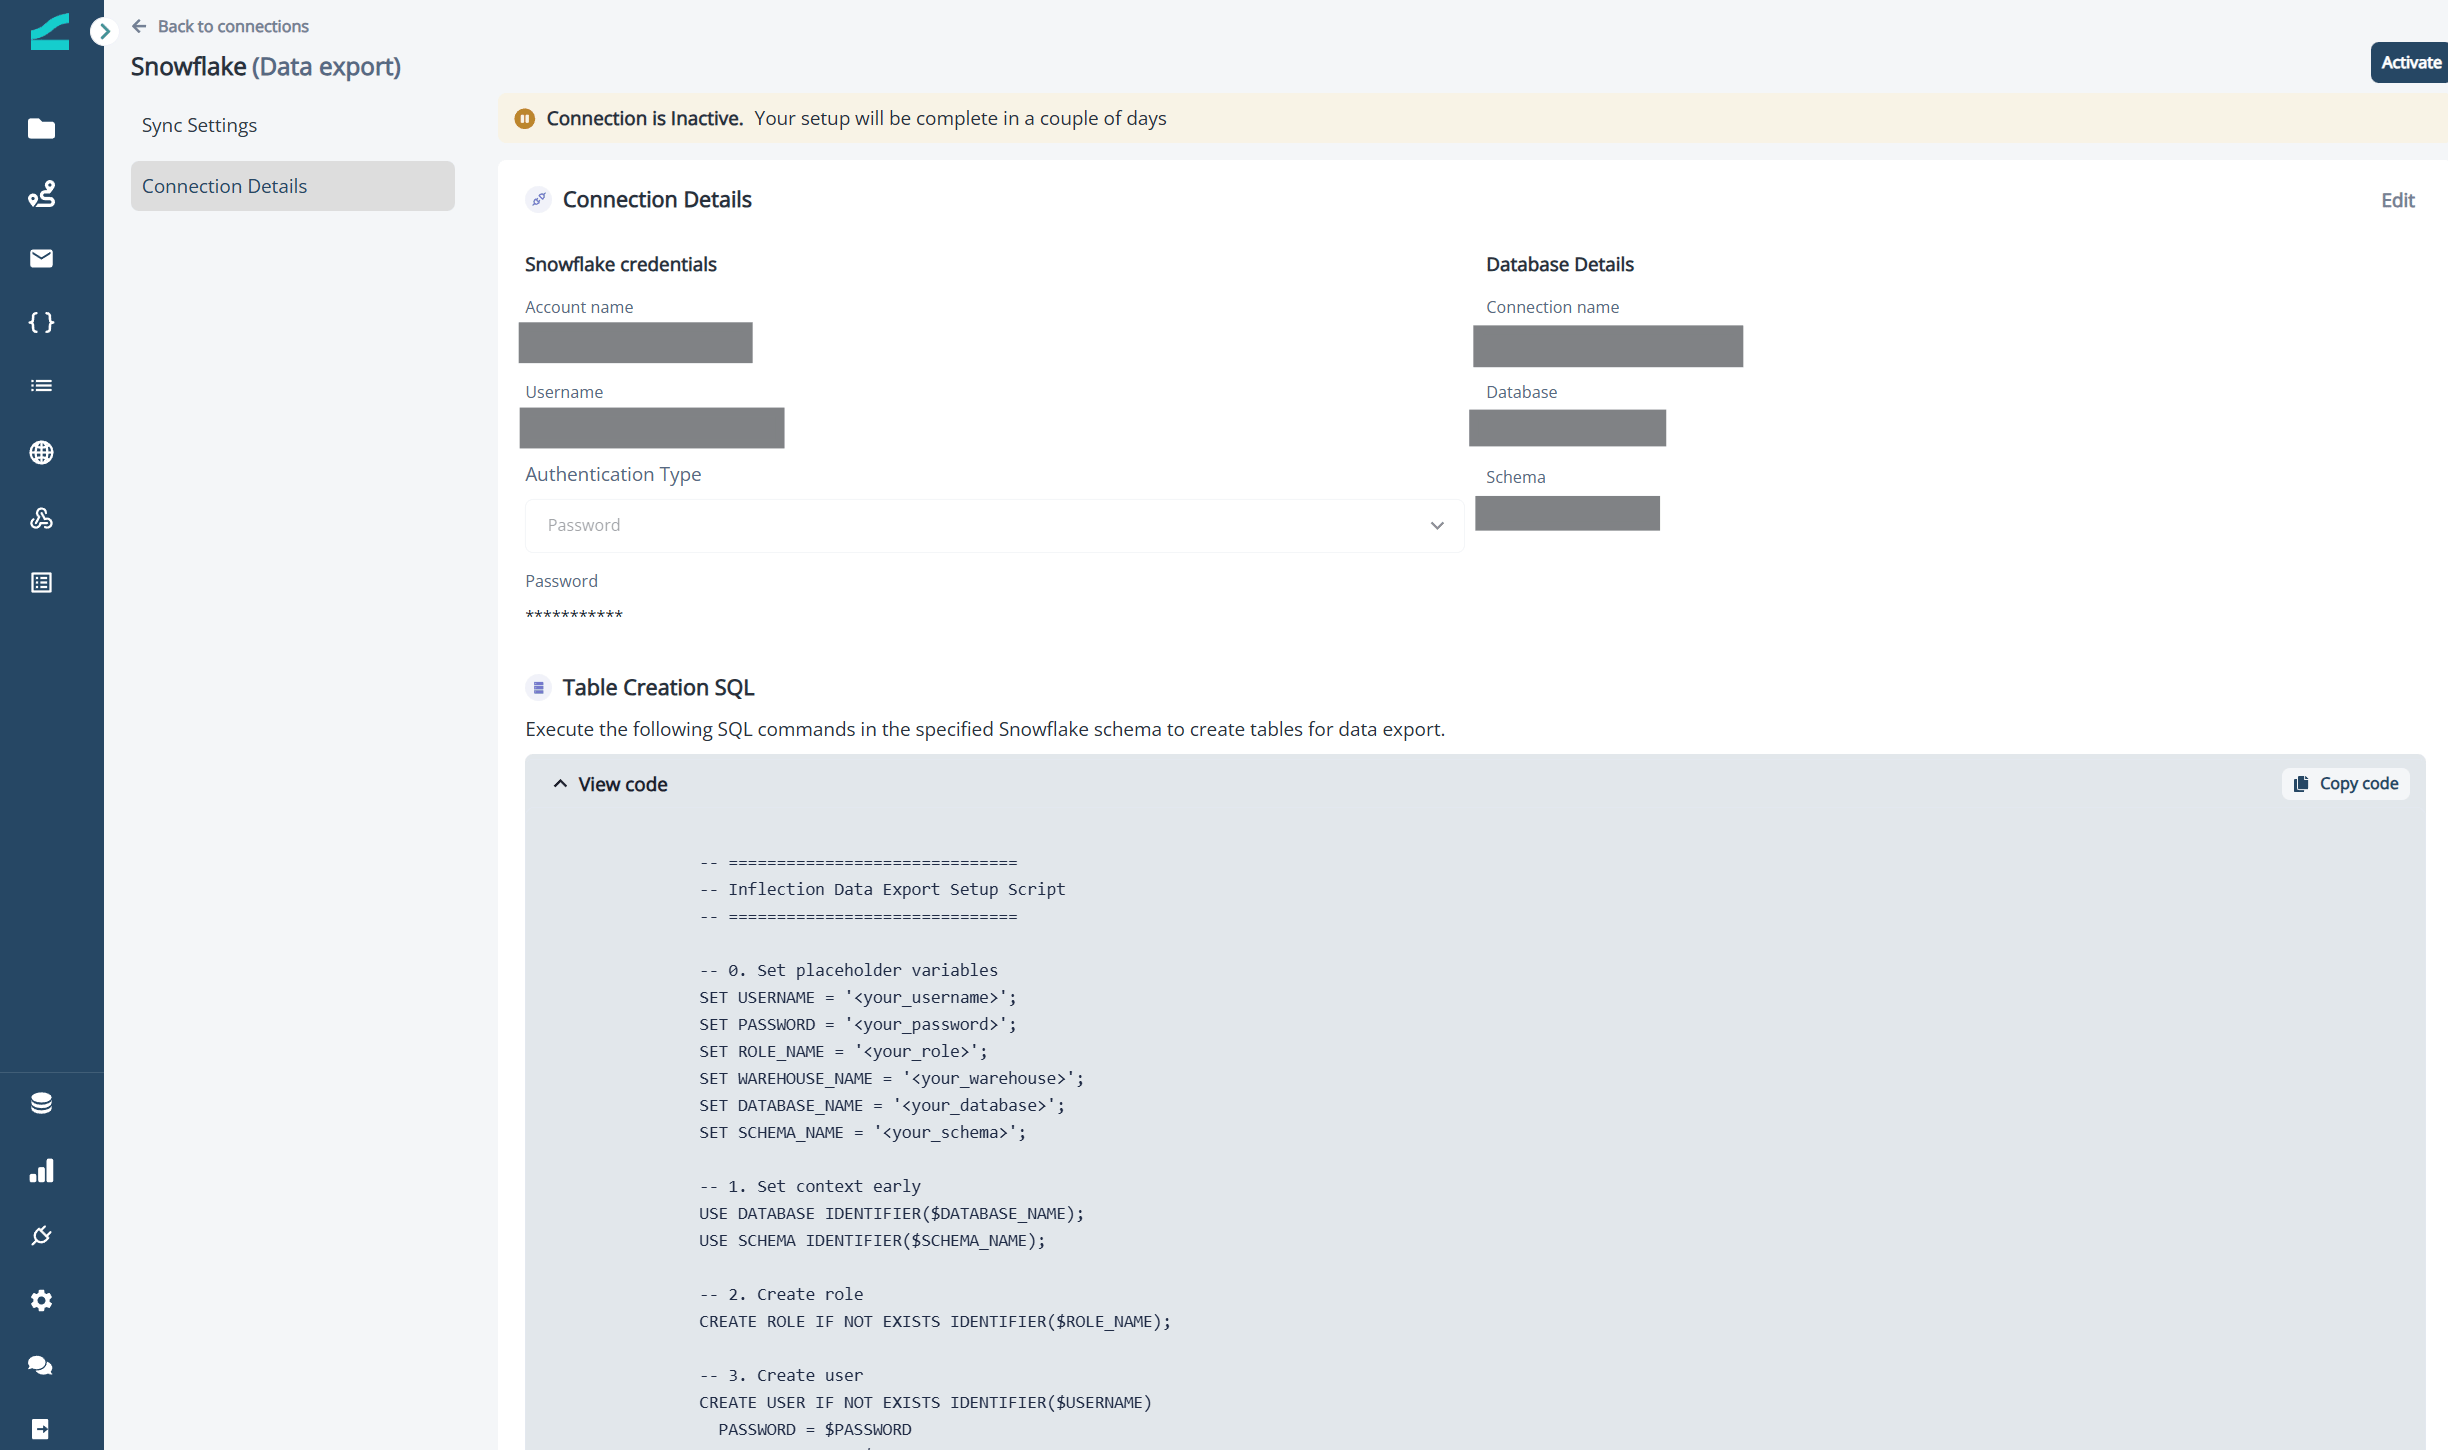 The script creates tables with the necessary structure and grants required permissions (INSERT, UPDATE, DELETE) for Inflection to write data.
### Activate the Export Connection
Once you have saved credentials and created required tables in Snowflake, your setup is complete.
The Inflection team will validate the setup and activate the sync. You will be notified once the sync has started and data is being sent.
Activation may take up to two business days. Please ensure your data team notifies you once your tables are set up in your data warehouse.
### Changing from Username Password to Key Pair Authentication
To change your connection :
1. Go to your snowflake connection (import or export)
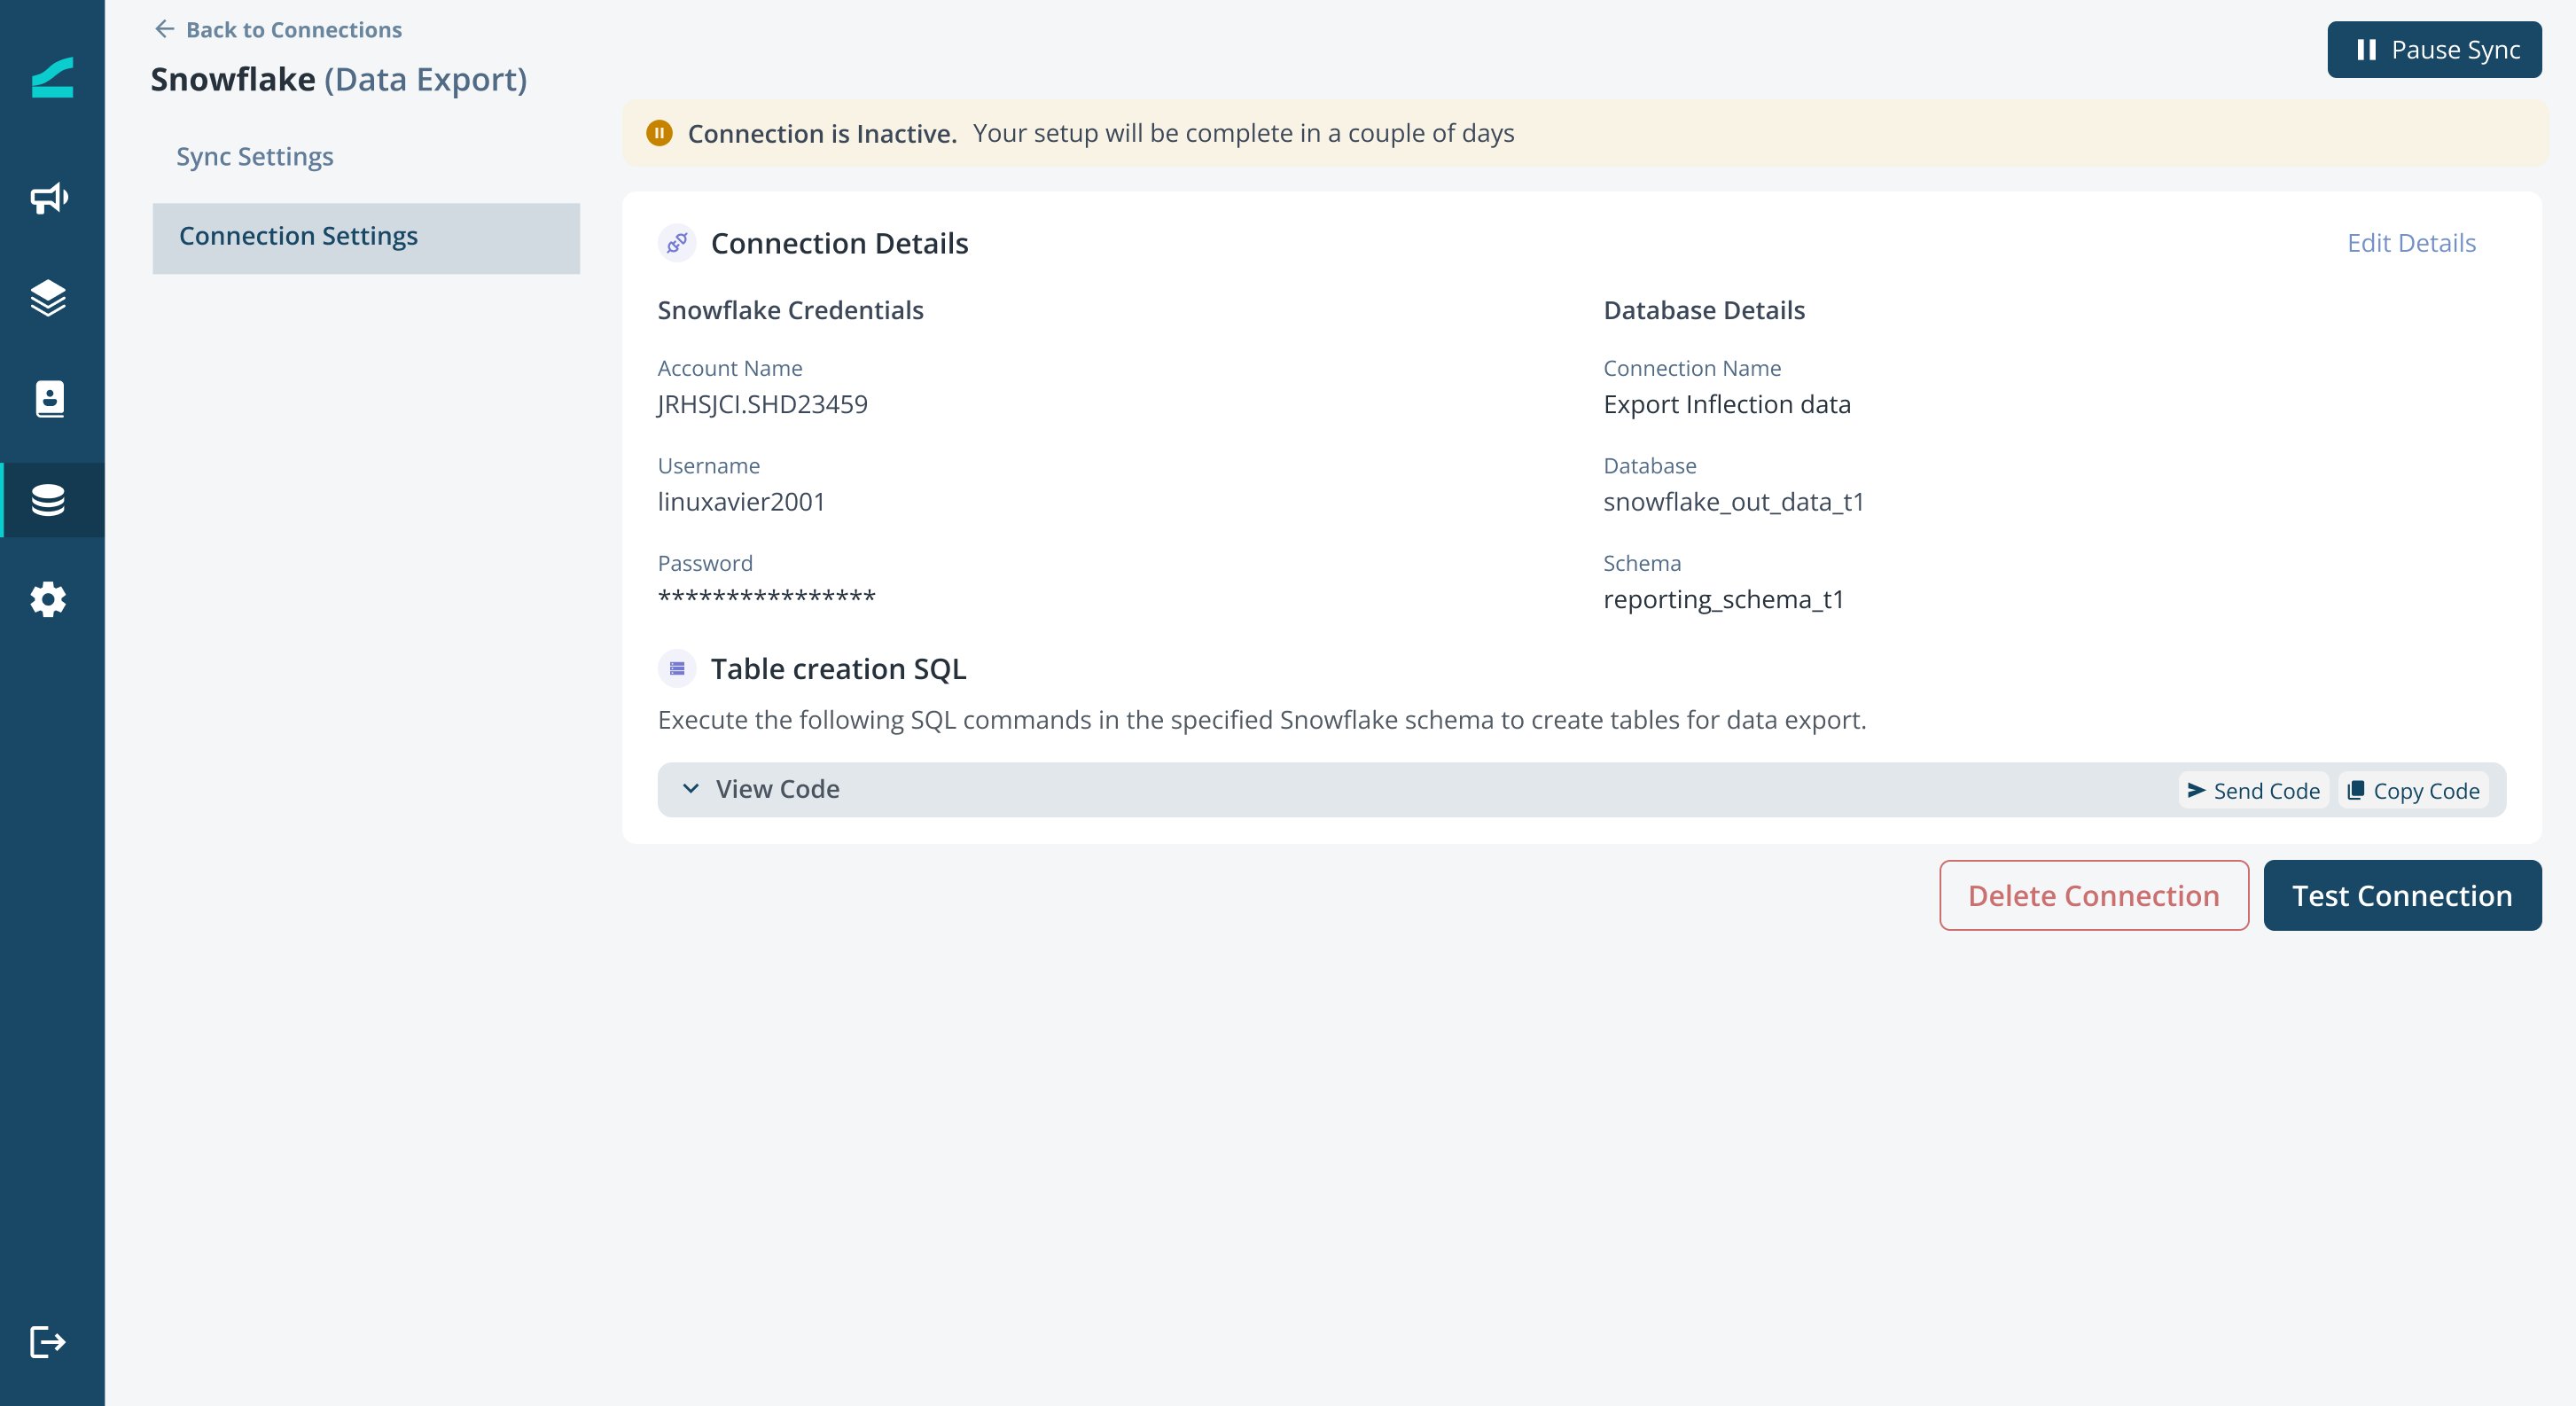
2. Go to "Connection Settings" tab
1. Snowflake Export
The script creates tables with the necessary structure and grants required permissions (INSERT, UPDATE, DELETE) for Inflection to write data.
### Activate the Export Connection
Once you have saved credentials and created required tables in Snowflake, your setup is complete.
The Inflection team will validate the setup and activate the sync. You will be notified once the sync has started and data is being sent.
Activation may take up to two business days. Please ensure your data team notifies you once your tables are set up in your data warehouse.
### Changing from Username Password to Key Pair Authentication
To change your connection :
1. Go to your snowflake connection (import or export)
2. Go to "Connection Settings" tab
1. Snowflake Export
 2. Snowflake Import
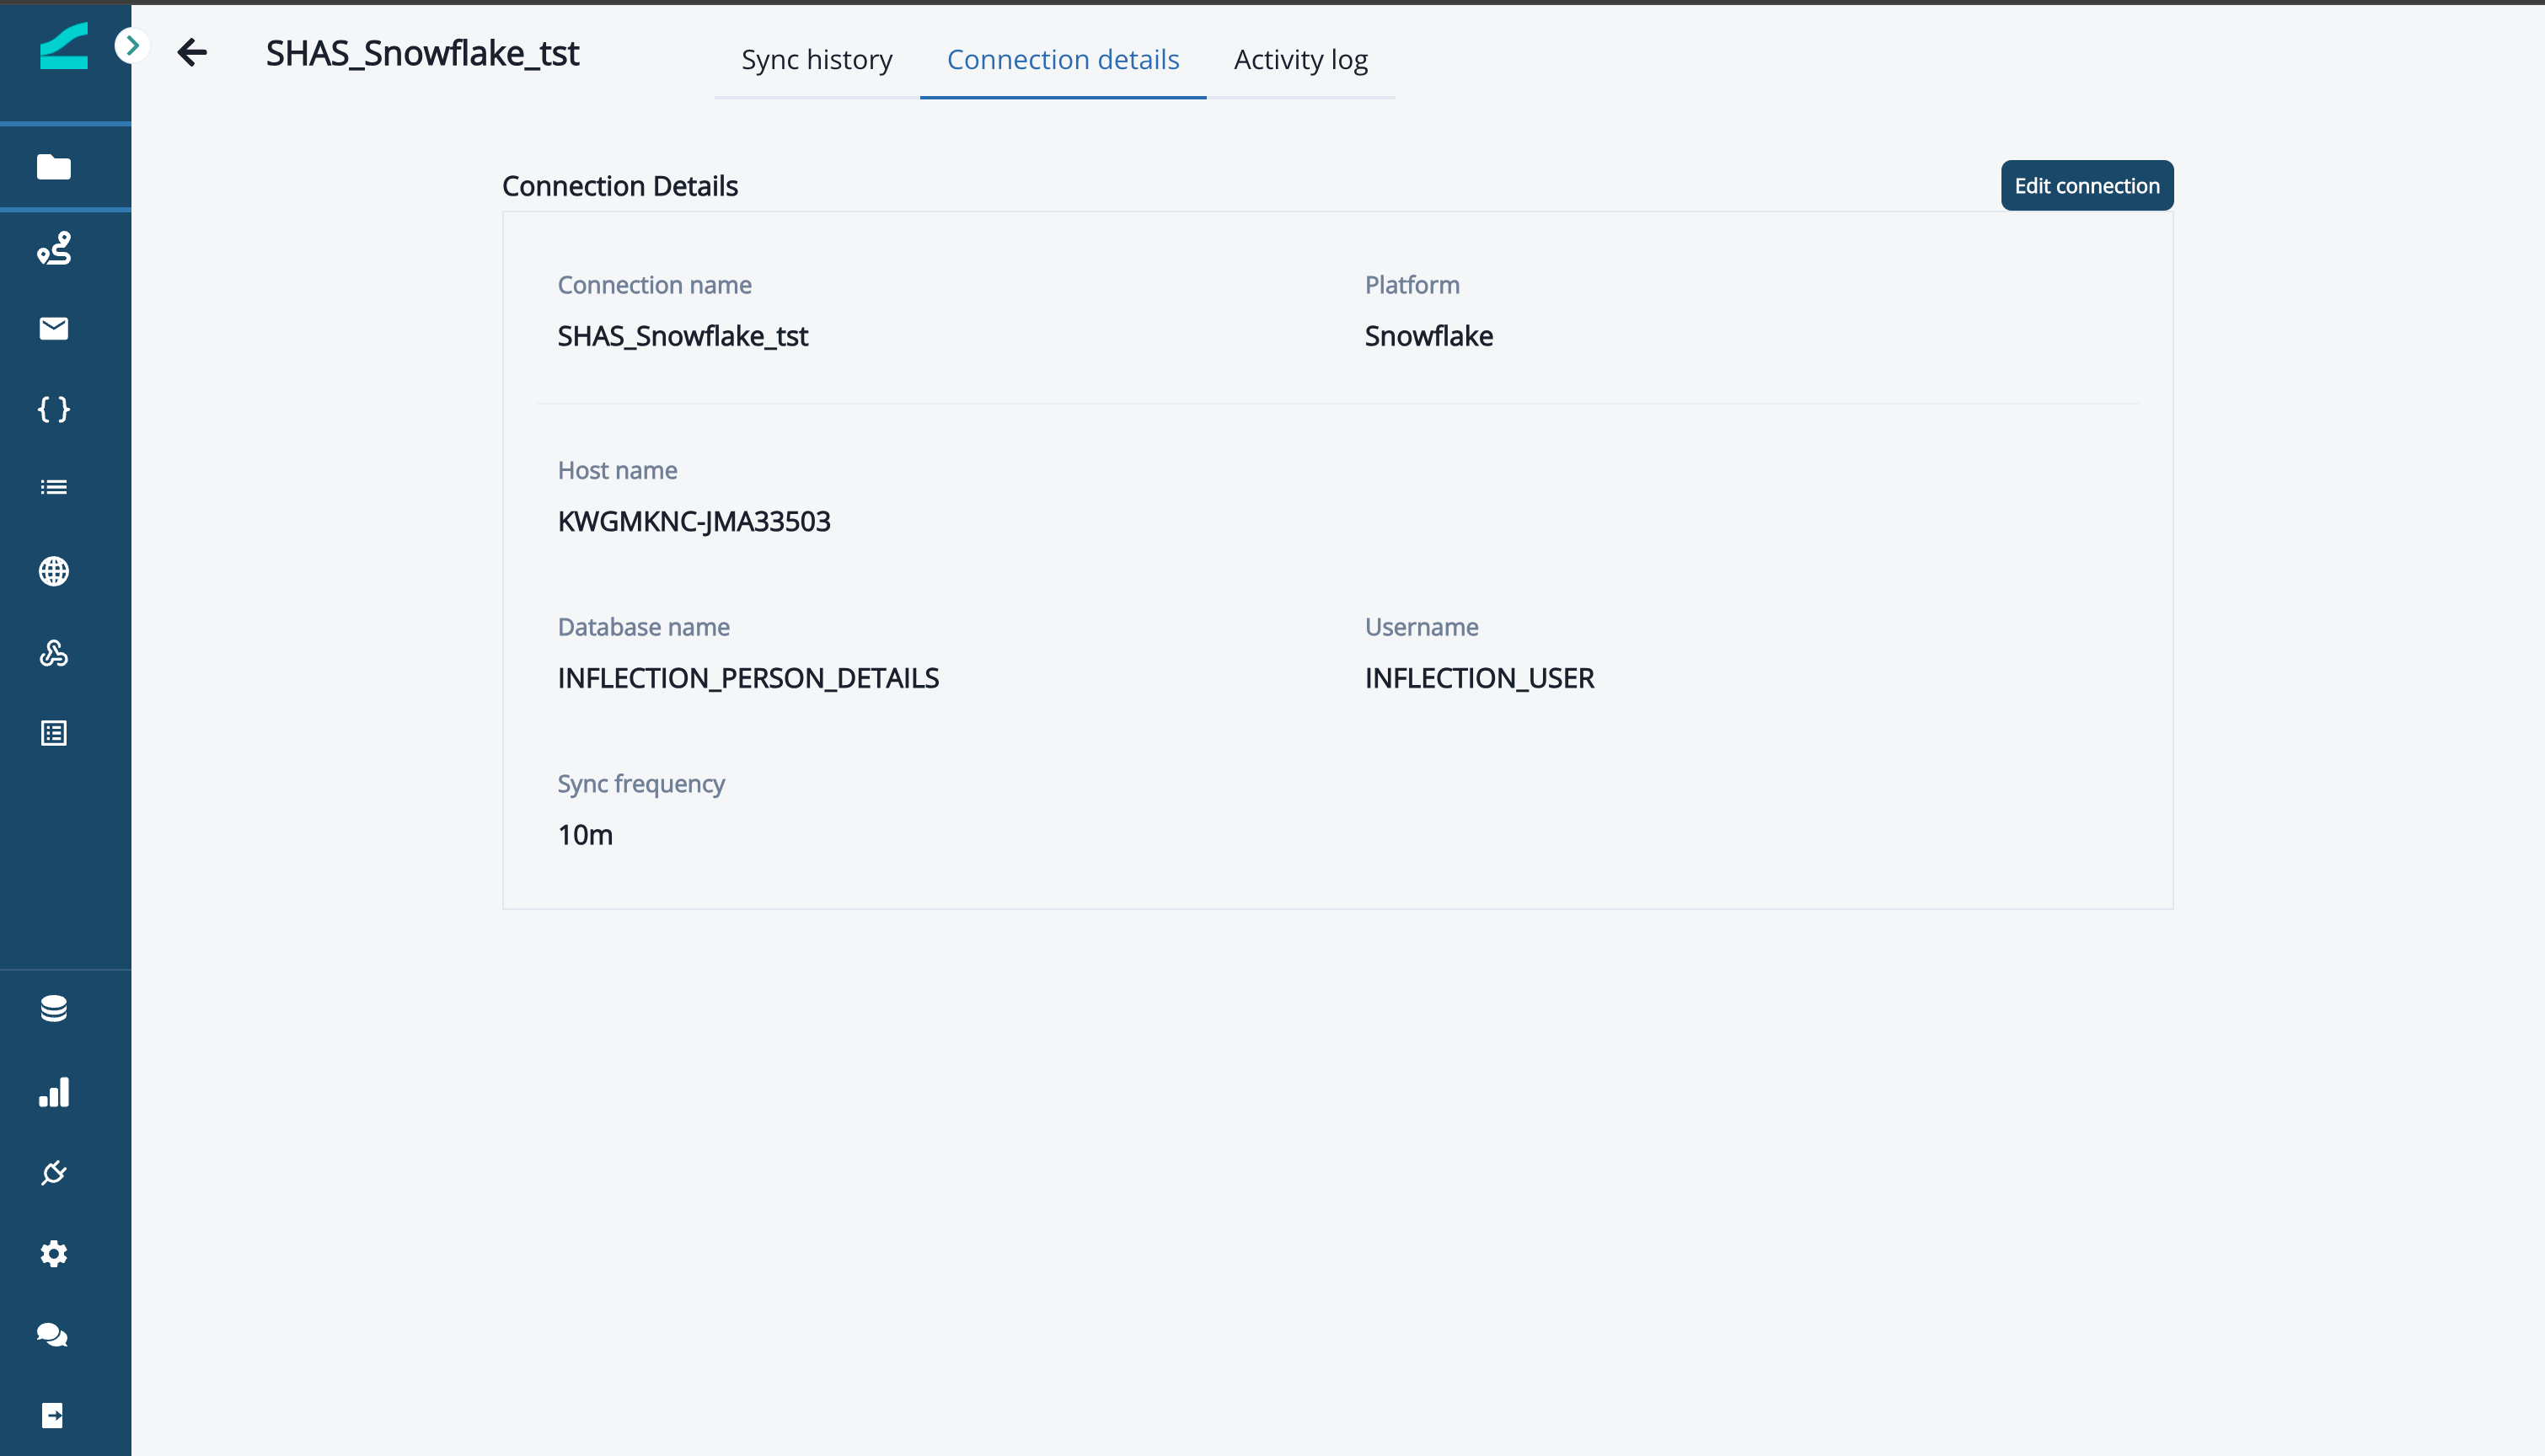 3. Click on the "Edit Details" button in top right
4. Change the "Authentication Type" to "Key "Pair."
3. Click on the "Edit Details" button in top right
4. Change the "Authentication Type" to "Key "Pair."
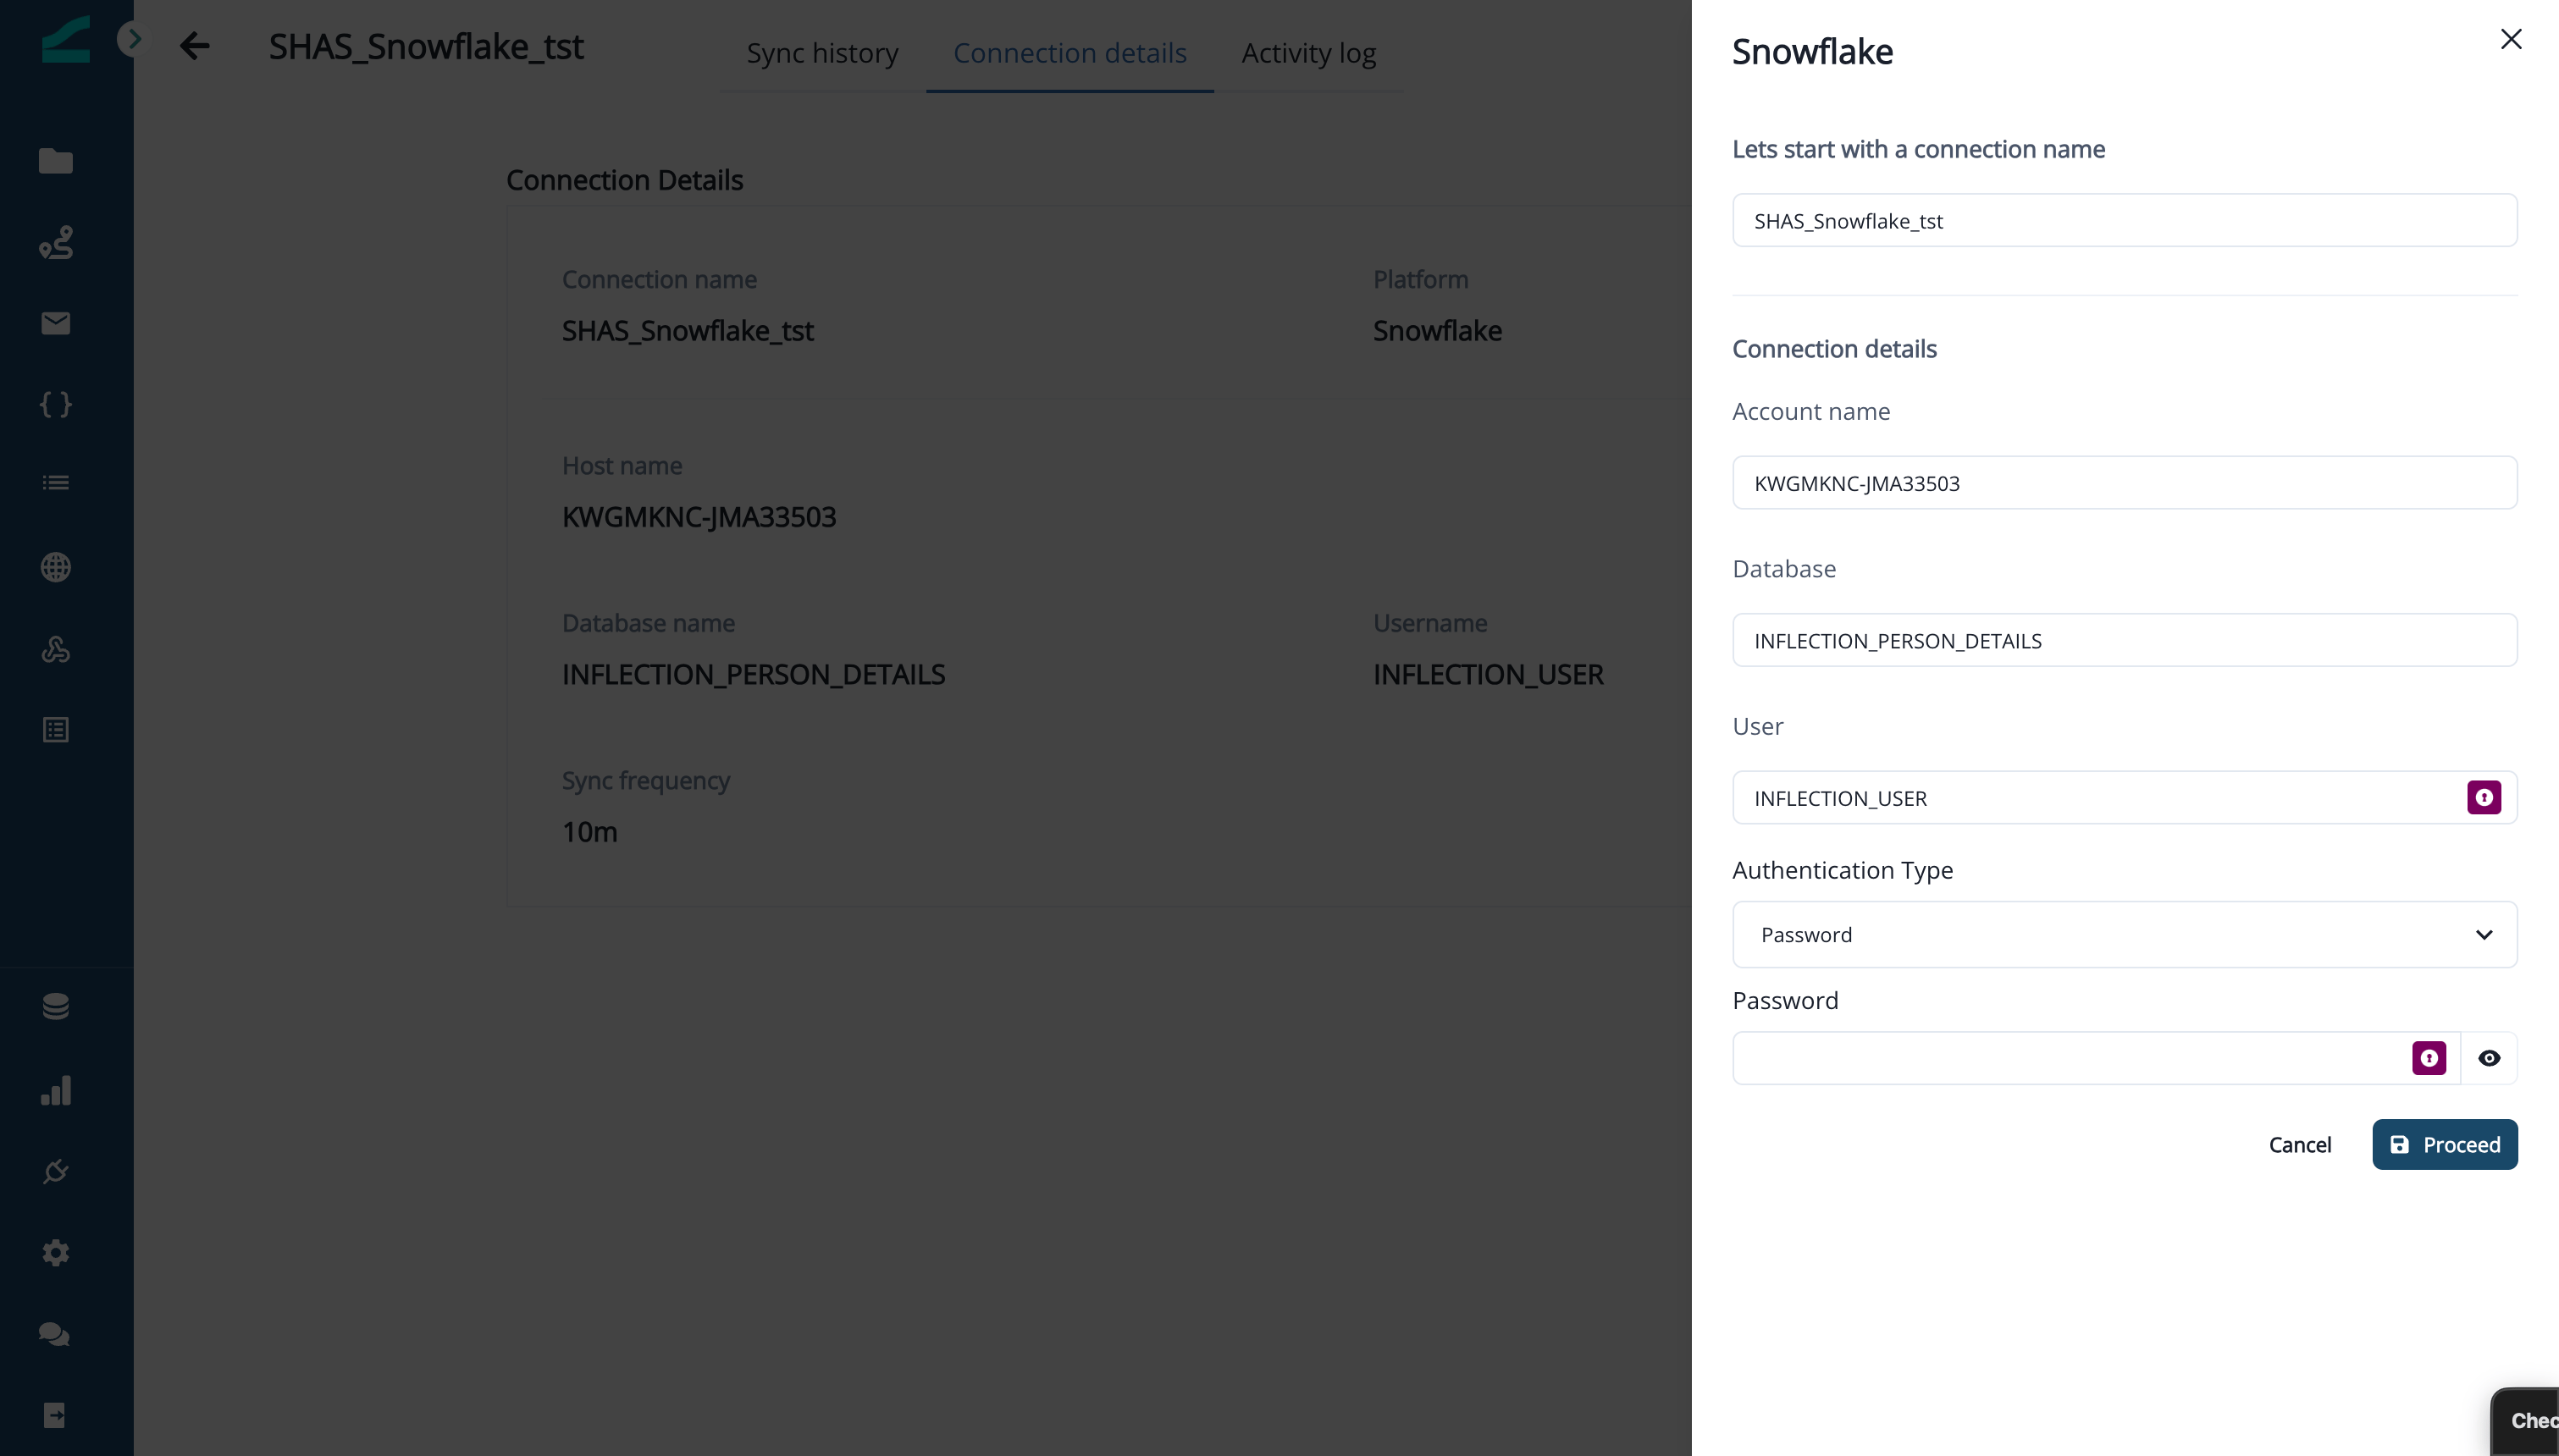 5. Update the following fields
1. **Private key** - RSA private key (2048-bit minimum) in PEM format
2. **Private key passphrase** (if applicable) - for encrypted private keys
3. **Database** and **Schema** - name of the database and schema where Inflection should write data
**Reference:** [Here](https://docs.snowflake.com/en/user-guide/key-pair-auth#generate-the-private-keys) is the document from Snowflake to generate your Private Key
6. Click on save
Your connection will now use key pair for authentication.
**Follow these steps for both IMPORT and EXPORT connections.**
5. Update the following fields
1. **Private key** - RSA private key (2048-bit minimum) in PEM format
2. **Private key passphrase** (if applicable) - for encrypted private keys
3. **Database** and **Schema** - name of the database and schema where Inflection should write data
**Reference:** [Here](https://docs.snowflake.com/en/user-guide/key-pair-auth#generate-the-private-keys) is the document from Snowflake to generate your Private Key
6. Click on save
Your connection will now use key pair for authentication.
**Follow these steps for both IMPORT and EXPORT connections.**