> ## Documentation Index
> Fetch the complete documentation index at: https://docs.inflection.io/llms.txt
> Use this file to discover all available pages before exploring further.
# The New Journey Canvas
> The journey canvas is where you build and arrange your customer journeys.
The journey canvas is where you build and arrange your customer journeys. This article covers how to work *on* the canvas itself: adding, connecting, moving, duplicating, and deleting steps. For what each individual flow step does, see the [Journey Canvas flow-steps reference](/journeys/journey-flow-steps).
## The Canvas at a Glance
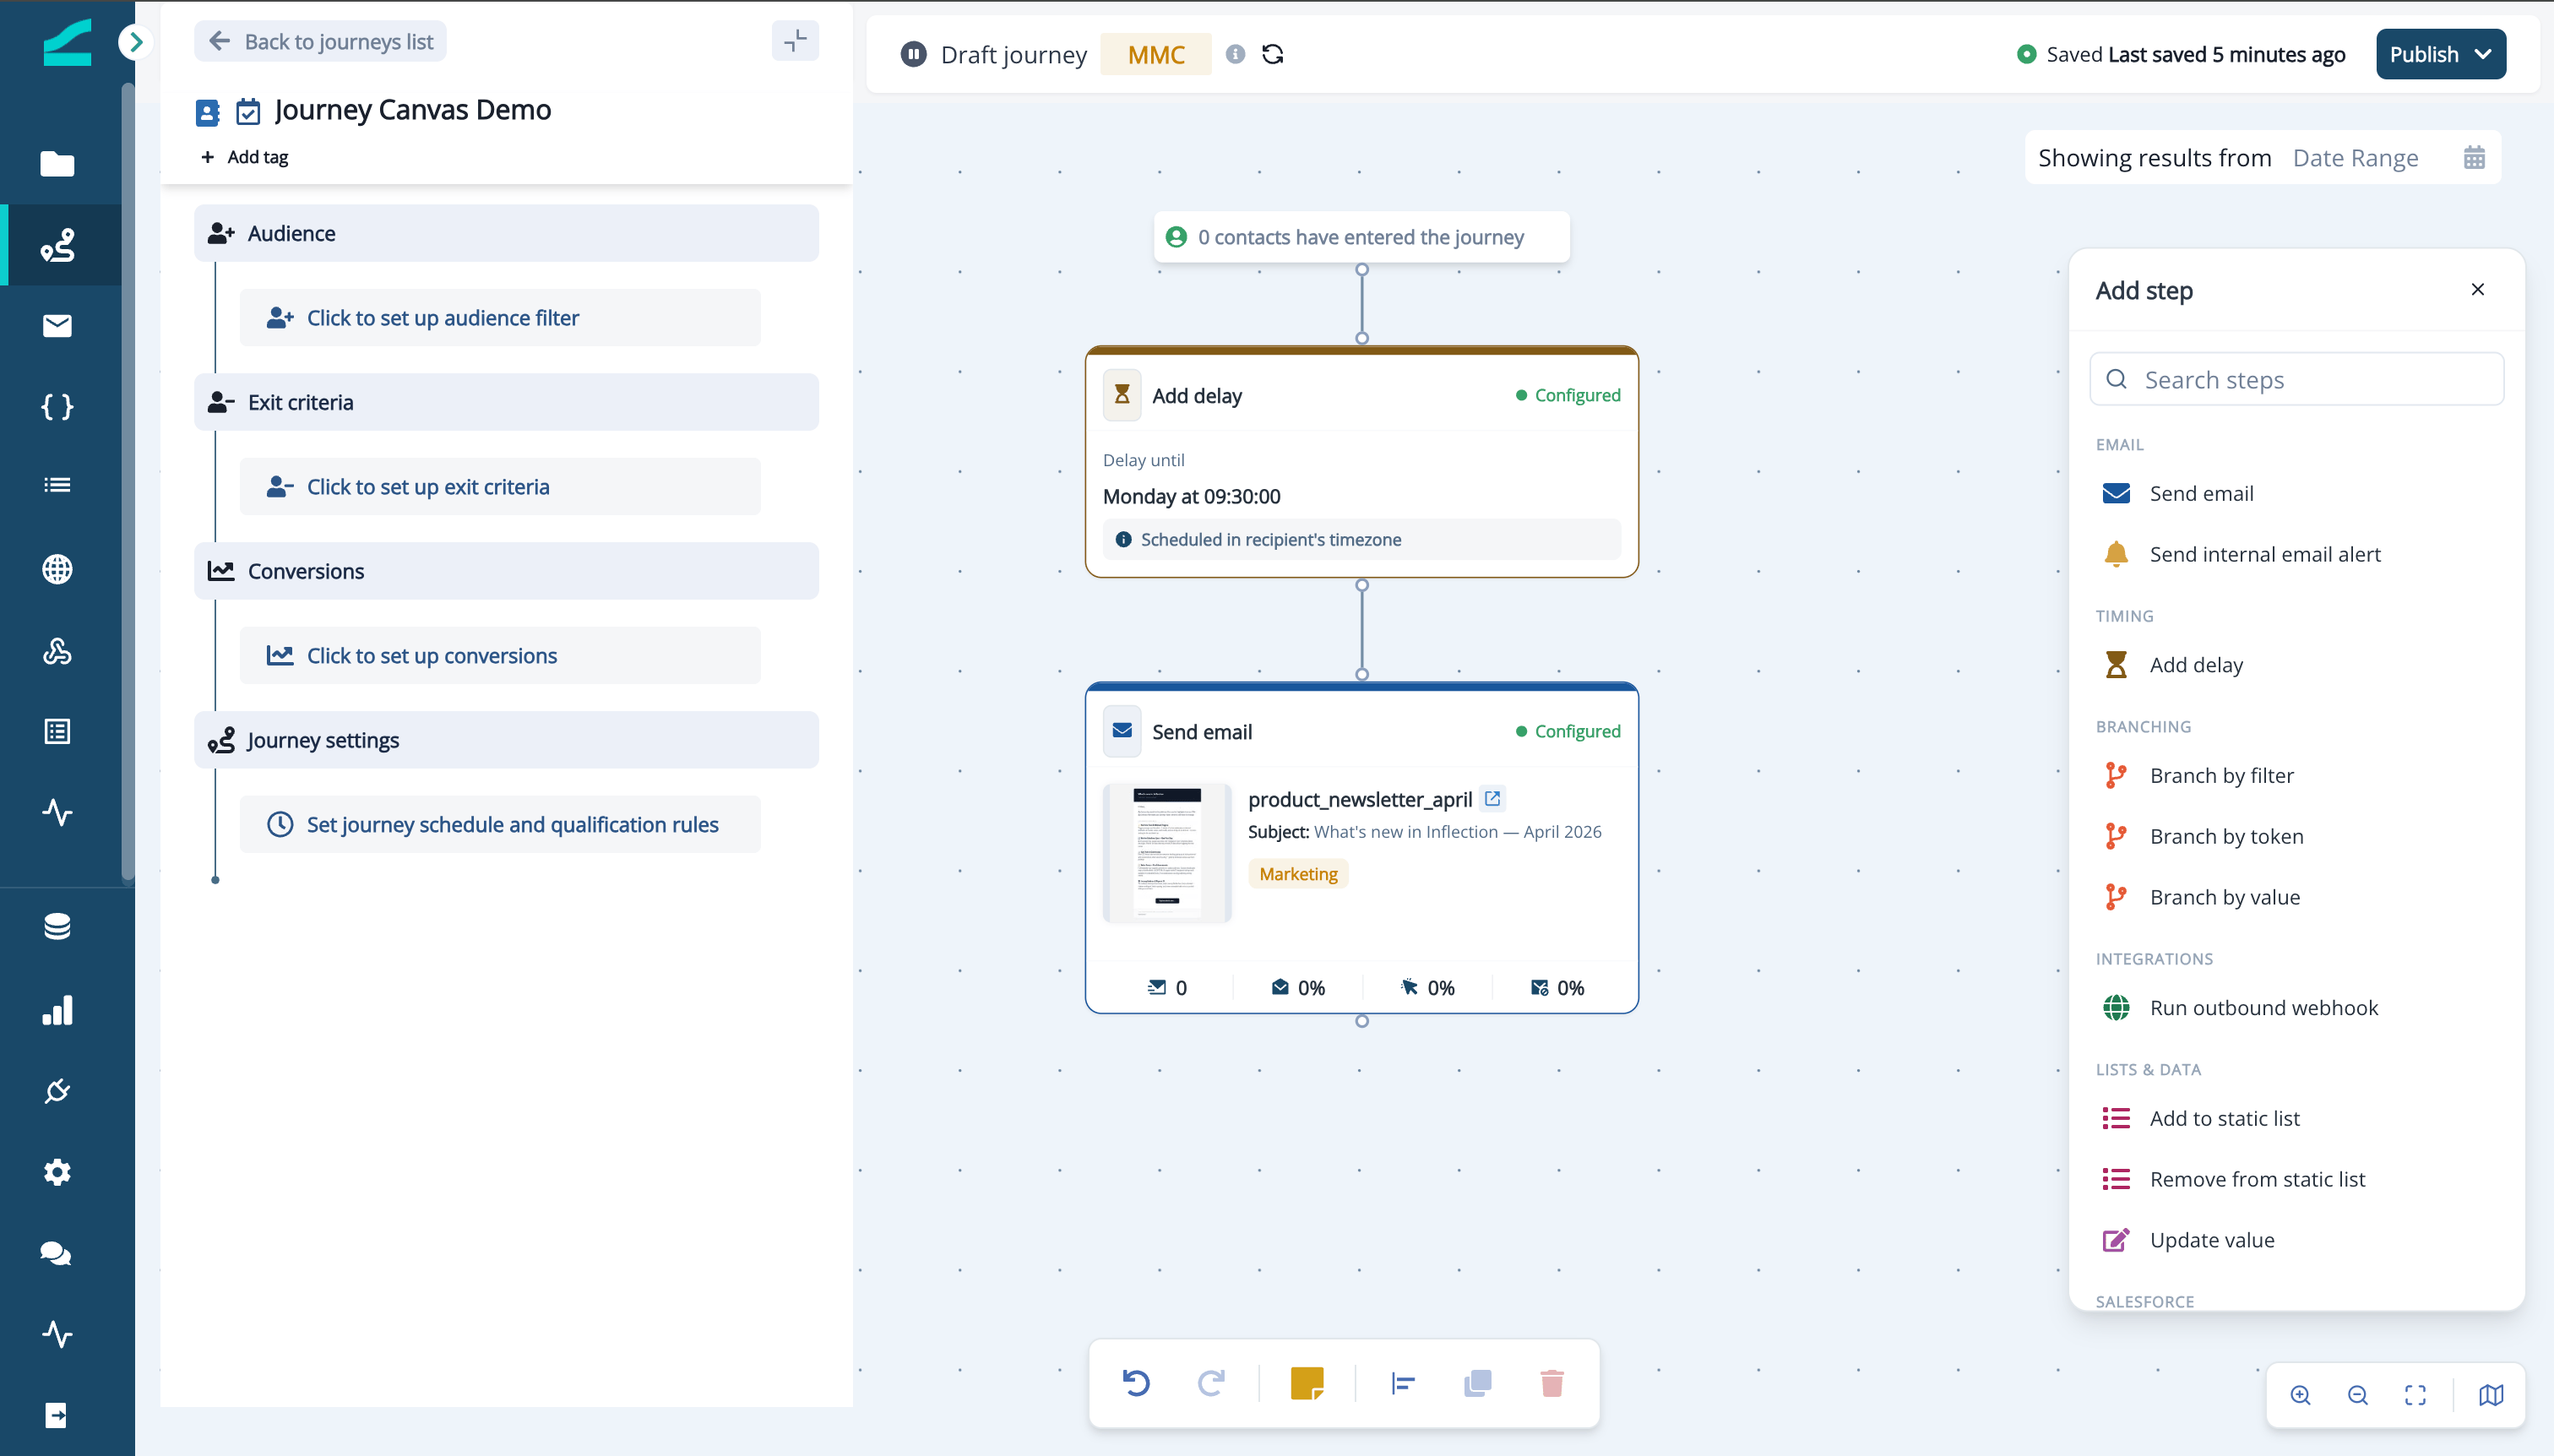
When you open a journey, you see the canvas with a few persistent controls:
* **Add step** panel (right) — the palette of flow steps, grouped by category (Email, Timing, Branching, Integrations, Lists, Data, Salesforce, Structure).
* **Canvas toolbar** (bottom center) — **Undo**, **Redo**, **Tidy Up**, **Add note**, and zoom controls.
* **Mini map** (bottom right) — a zoomed-out overview for navigating large journeys.
* **Step toolbar** — appears beside a step when you hover over it, with edit, duplicate, and delete actions.
 You can edit the canvas only while a journey is unpublished or paused. Published, running journeys open in read-only mode — you can pan, zoom, and copy steps, but not change them. To edit a live journey, pause it first (see **Pausing and Editing Active Journeys**).
## Add a Flow Step
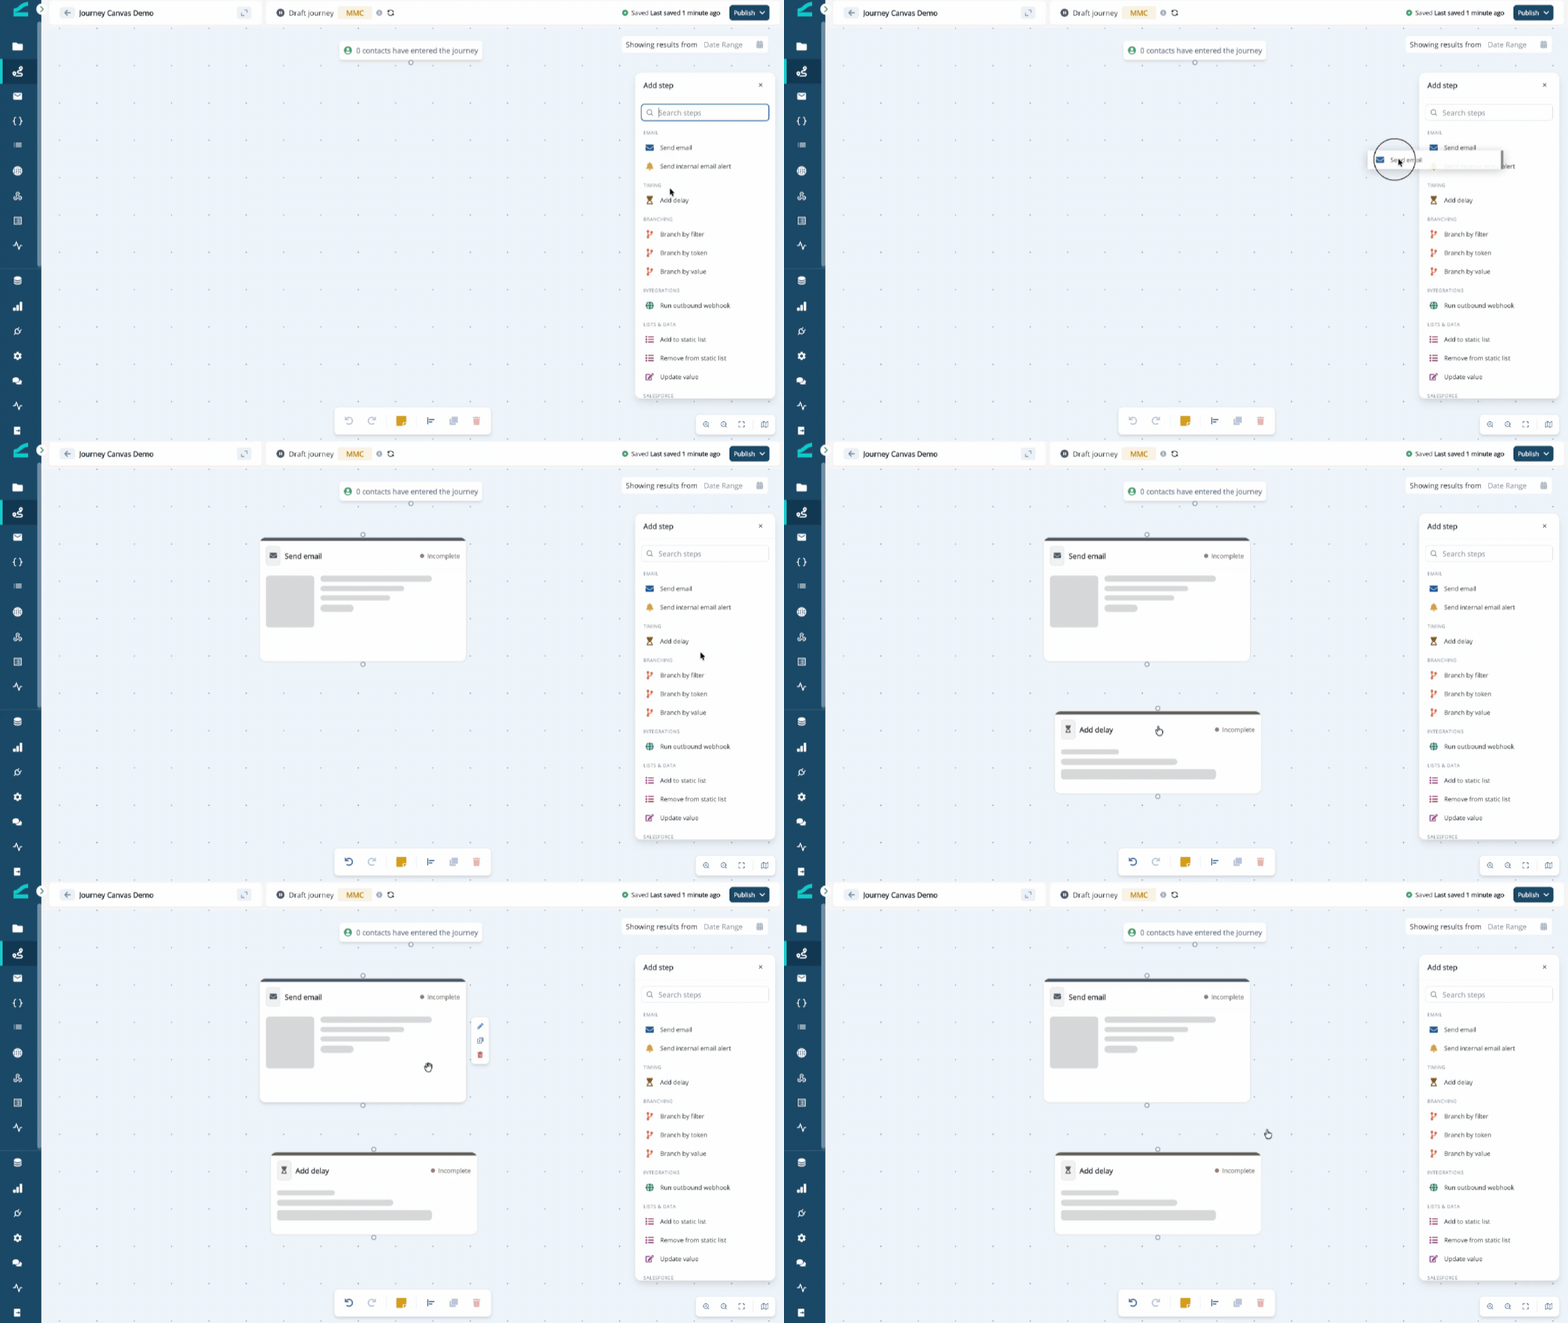
1. Open the **Add step** panel on the right.
2. **Drag** a step from the panel onto the canvas and drop it where you want it. Or **click** a step in the panel to drop it at the center of the view.
3. The new step appears on the canvas, ready to configure.
You can edit the canvas only while a journey is unpublished or paused. Published, running journeys open in read-only mode — you can pan, zoom, and copy steps, but not change them. To edit a live journey, pause it first (see **Pausing and Editing Active Journeys**).
## Add a Flow Step
1. Open the **Add step** panel on the right.
2. **Drag** a step from the panel onto the canvas and drop it where you want it. Or **click** a step in the panel to drop it at the center of the view.
3. The new step appears on the canvas, ready to configure.
 ## Connect Flow Steps
Connections define the order contacts move through your journey.
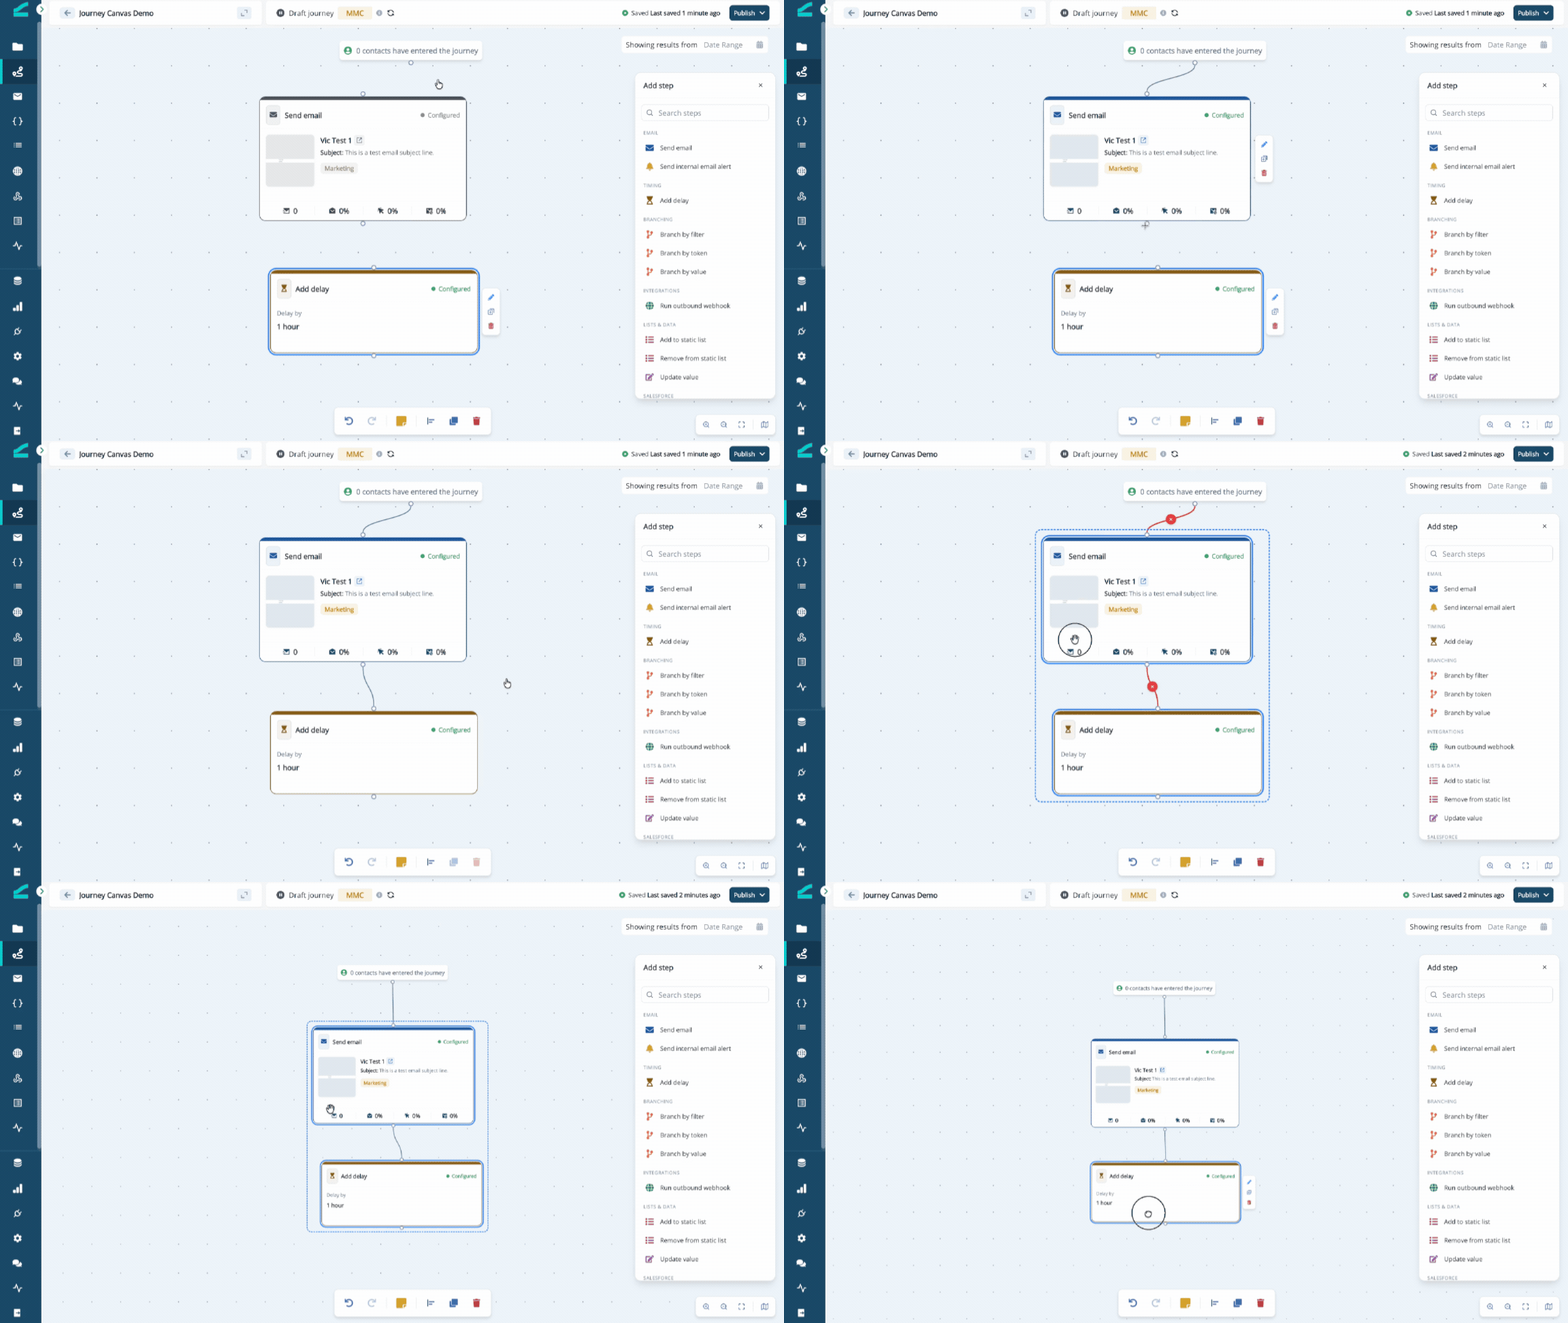
1. Hover over the step you want to connect *from*. A small round **handle** appears at the bottom of the step.
2. **Drag** from that handle to the **handle at the top** of the step you want to connect *to*.
3. Release to create the connection. The cursor shows a crosshair while you drag.
Branching steps (such as **Branch by filter**) have a separate handle for each path, so you can wire each branch to a different next step.
Connections can't cross a nested-journey boundary. To connect a step inside a container to one outside it, wire the container's exit handle to the outer step instead.
## Connect Flow Steps
Connections define the order contacts move through your journey.
1. Hover over the step you want to connect *from*. A small round **handle** appears at the bottom of the step.
2. **Drag** from that handle to the **handle at the top** of the step you want to connect *to*.
3. Release to create the connection. The cursor shows a crosshair while you drag.
Branching steps (such as **Branch by filter**) have a separate handle for each path, so you can wire each branch to a different next step.
Connections can't cross a nested-journey boundary. To connect a step inside a container to one outside it, wire the container's exit handle to the outer step instead.
 ## Select and Move Steps
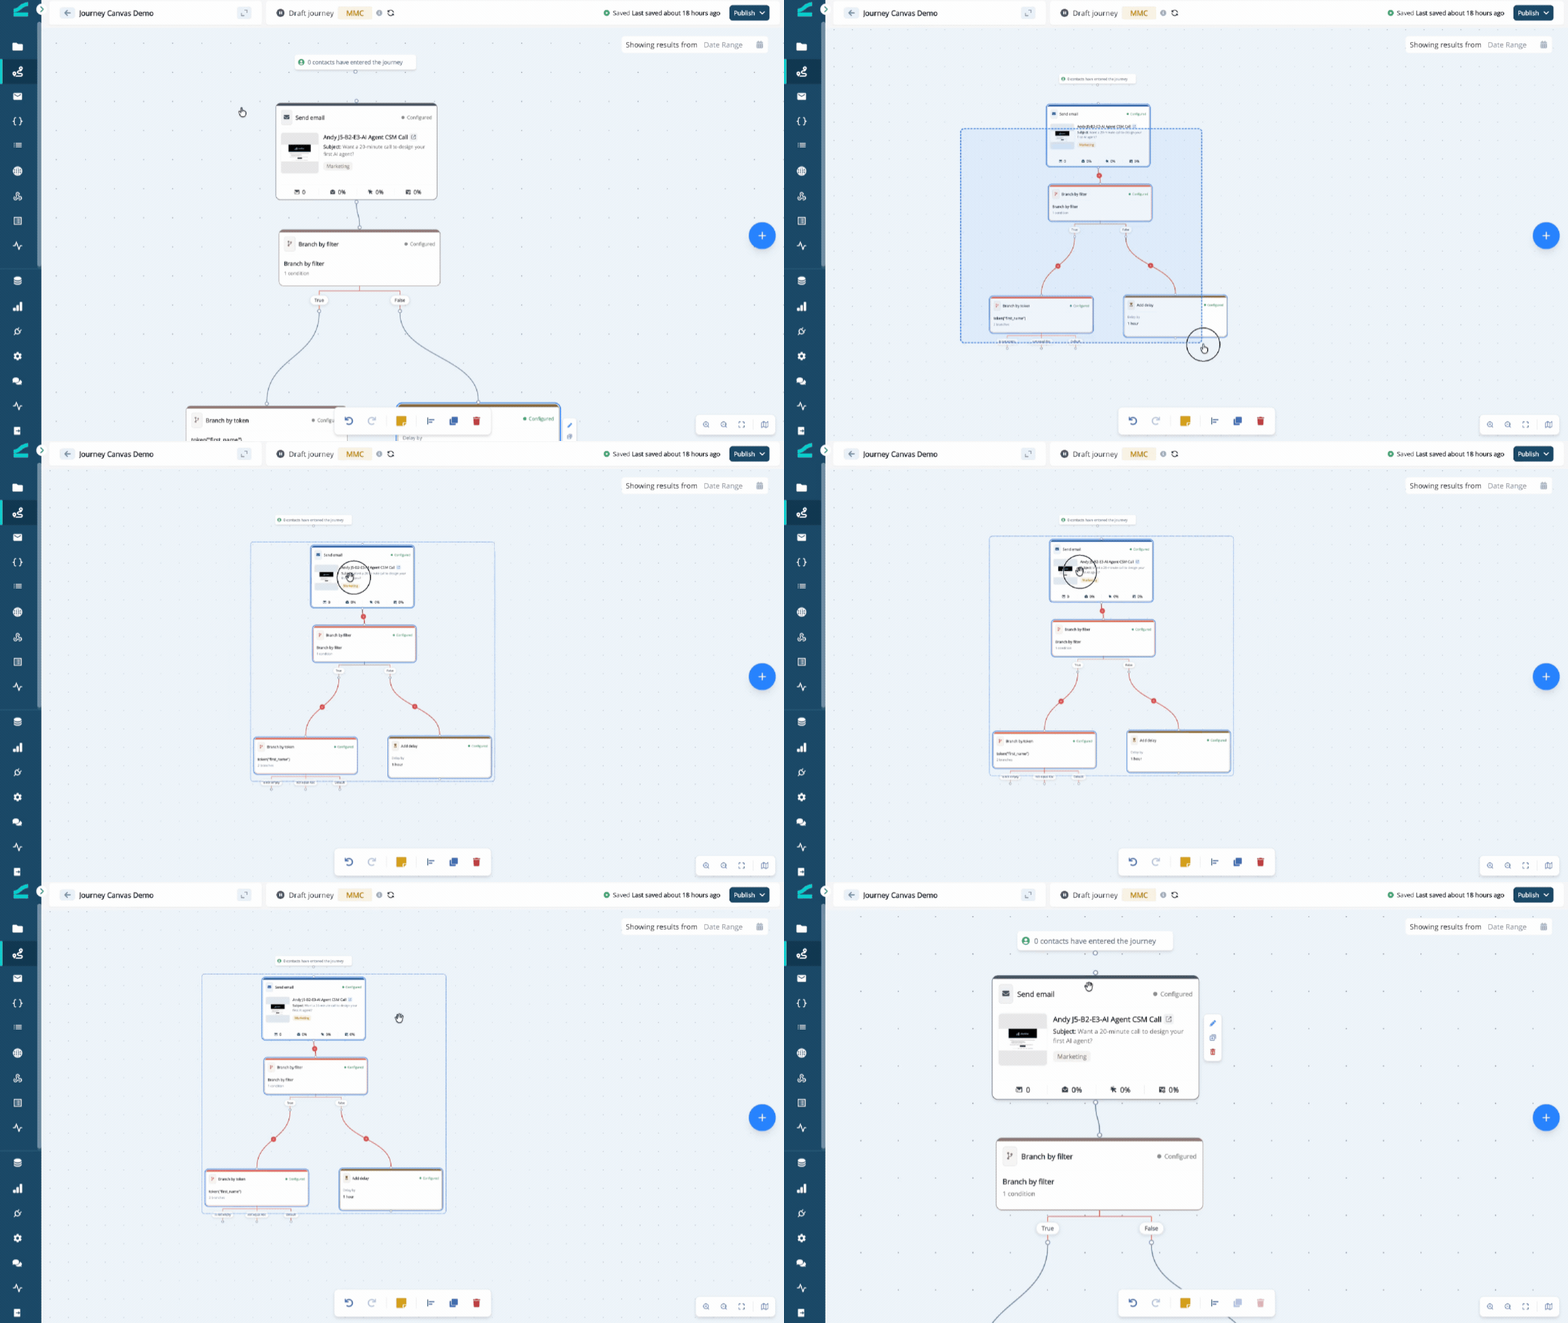
* **Select** a step by clicking it. A colored ring shows it's selected.
* **Select multiple** steps by holding **Shift** and clicking each one, or by dragging a selection box (marquee) across the canvas.
* **Move** selected steps by dragging any one of them — the whole selection moves together — or by **nudging with the arrow keys**.
* **Deselect** everything by pressing **Esc**.
When one or more steps are selected, a small toolbar appears at the bottom center showing the count (for example, **3 nodes**) with quick **Copy** and **Delete** actions.
## Select and Move Steps
* **Select** a step by clicking it. A colored ring shows it's selected.
* **Select multiple** steps by holding **Shift** and clicking each one, or by dragging a selection box (marquee) across the canvas.
* **Move** selected steps by dragging any one of them — the whole selection moves together — or by **nudging with the arrow keys**.
* **Deselect** everything by pressing **Esc**.
When one or more steps are selected, a small toolbar appears at the bottom center showing the count (for example, **3 nodes**) with quick **Copy** and **Delete** actions.
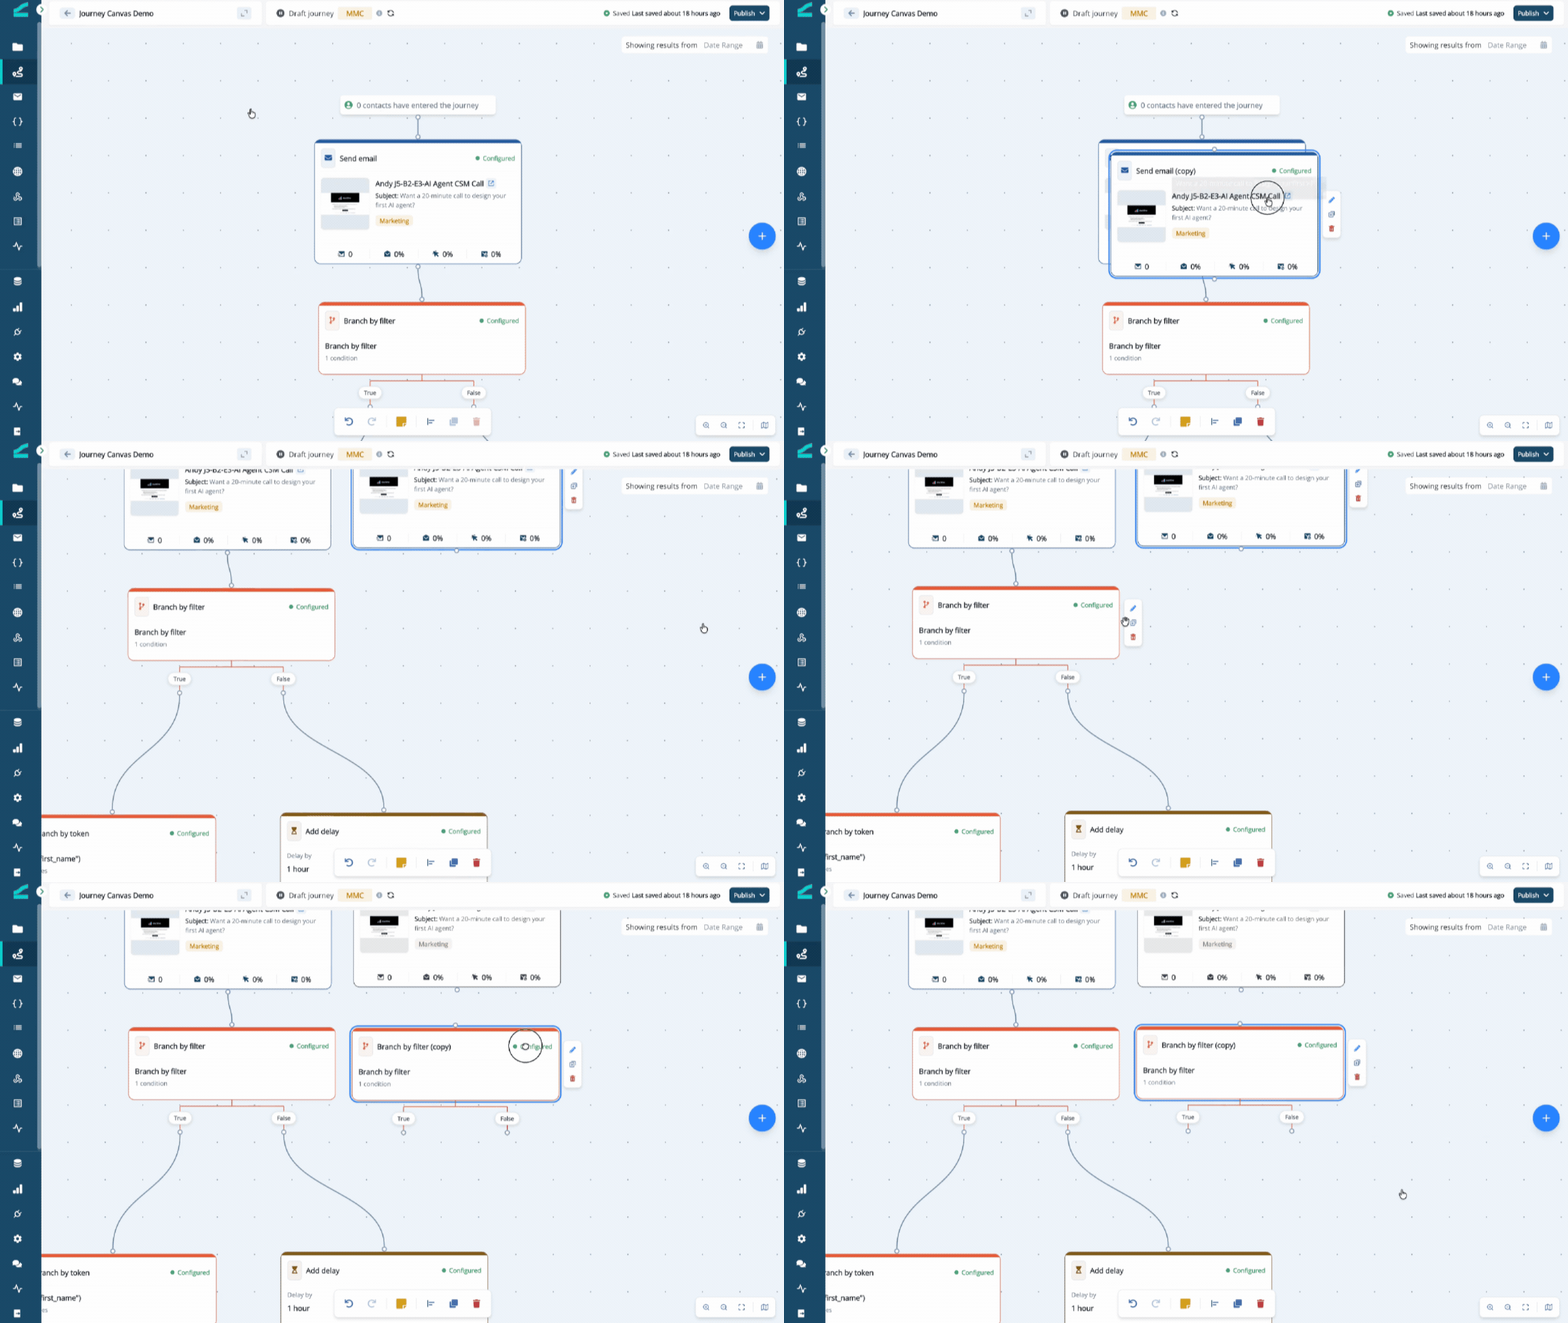
 ## Duplicate a Step
1. Hover over the step you want to copy.
2. In the step toolbar that appears, click the **duplicate** icon.
3. A copy appears just below and to the right of the original, with the same configuration.
## Duplicate a Step
1. Hover over the step you want to copy.
2. In the step toolbar that appears, click the **duplicate** icon.
3. A copy appears just below and to the right of the original, with the same configuration.
 ## Copy and Paste Steps
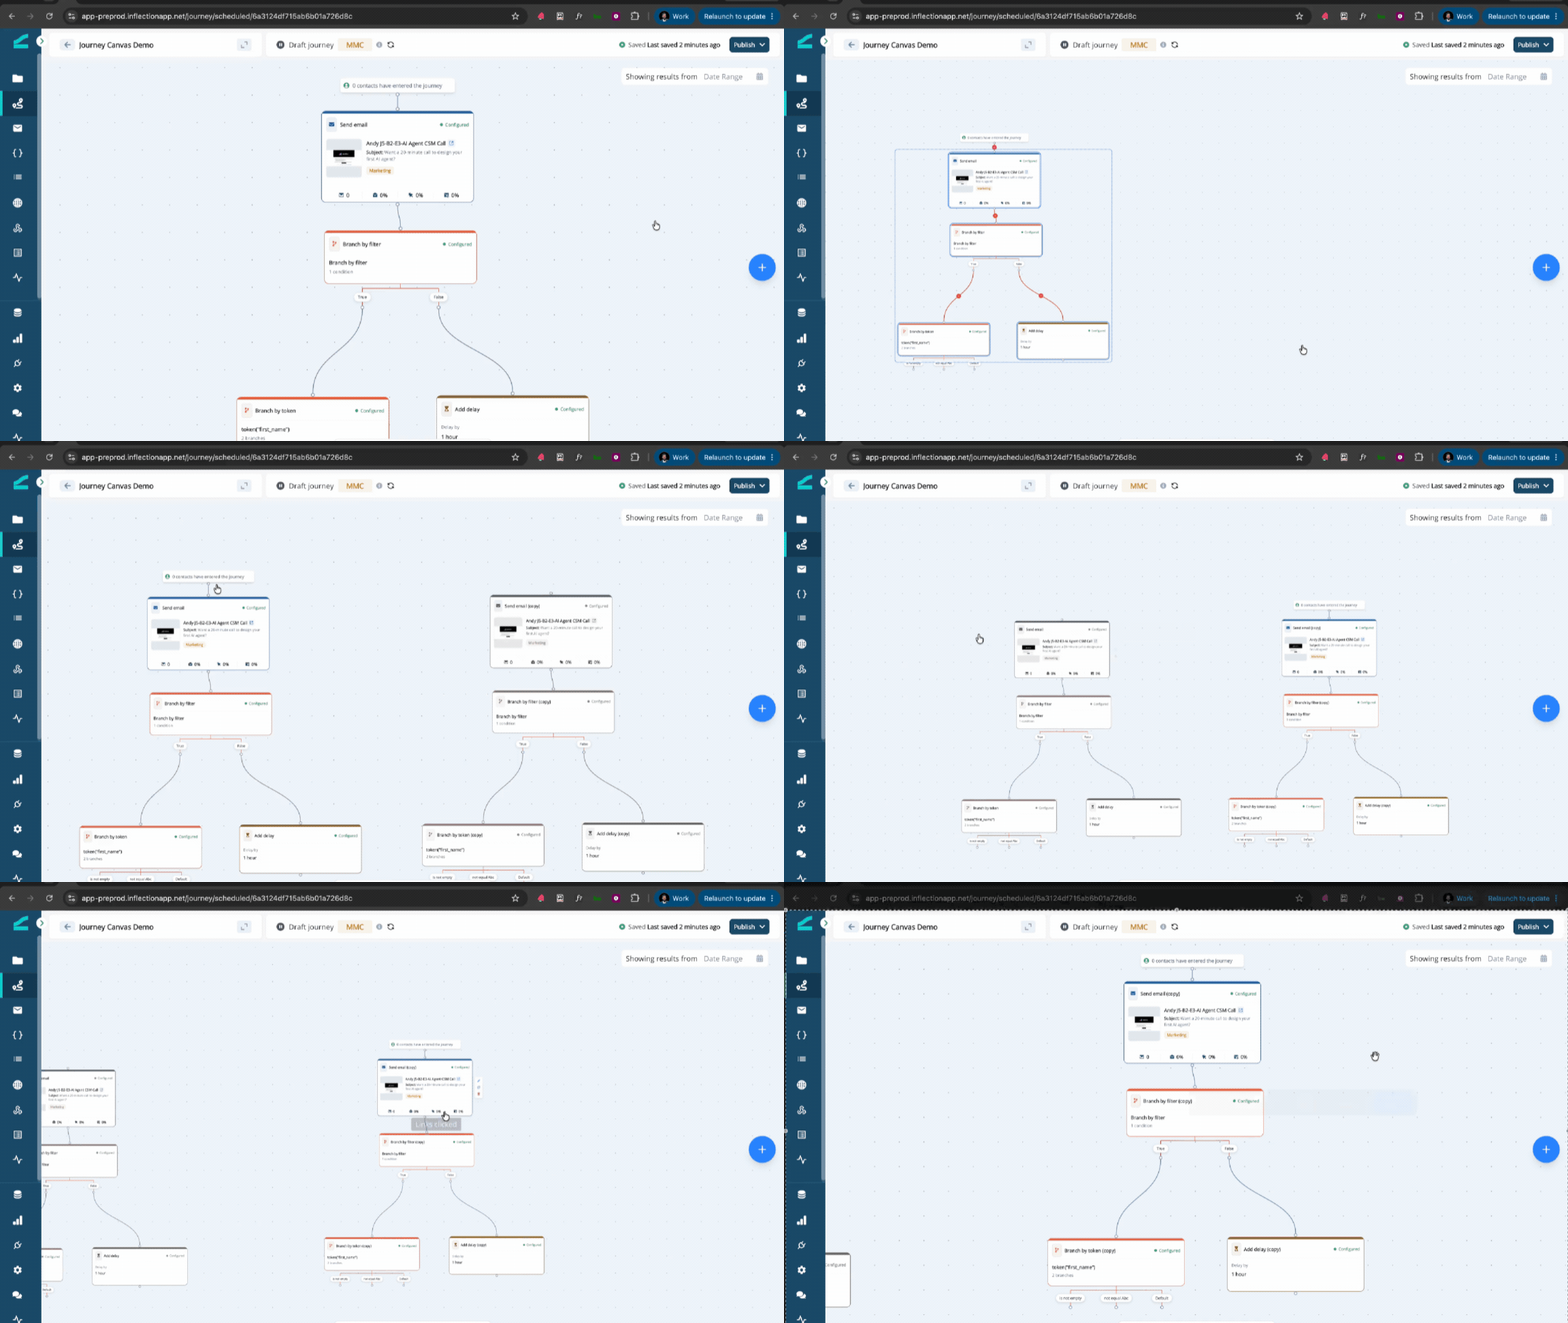
Copy and paste lets you reuse one or many steps — even across different journeys.
1. Select one or more steps.
2. Press **Cmd+C** (Mac) or **Ctrl+C** (Windows) to copy.
3. Press **Cmd+V** / **Ctrl+V** to paste. Pasted steps appear slightly offset from the originals.
When you copy multiple steps, the connections *between* them are copied too, so a pasted group keeps its internal structure. To move a group of steps into another journey, copy them in one journey and paste them into another.
## Copy and Paste Steps
Copy and paste lets you reuse one or many steps — even across different journeys.
1. Select one or more steps.
2. Press **Cmd+C** (Mac) or **Ctrl+C** (Windows) to copy.
3. Press **Cmd+V** / **Ctrl+V** to paste. Pasted steps appear slightly offset from the originals.
When you copy multiple steps, the connections *between* them are copied too, so a pasted group keeps its internal structure. To move a group of steps into another journey, copy them in one journey and paste them into another.
 ## Undo and Redo
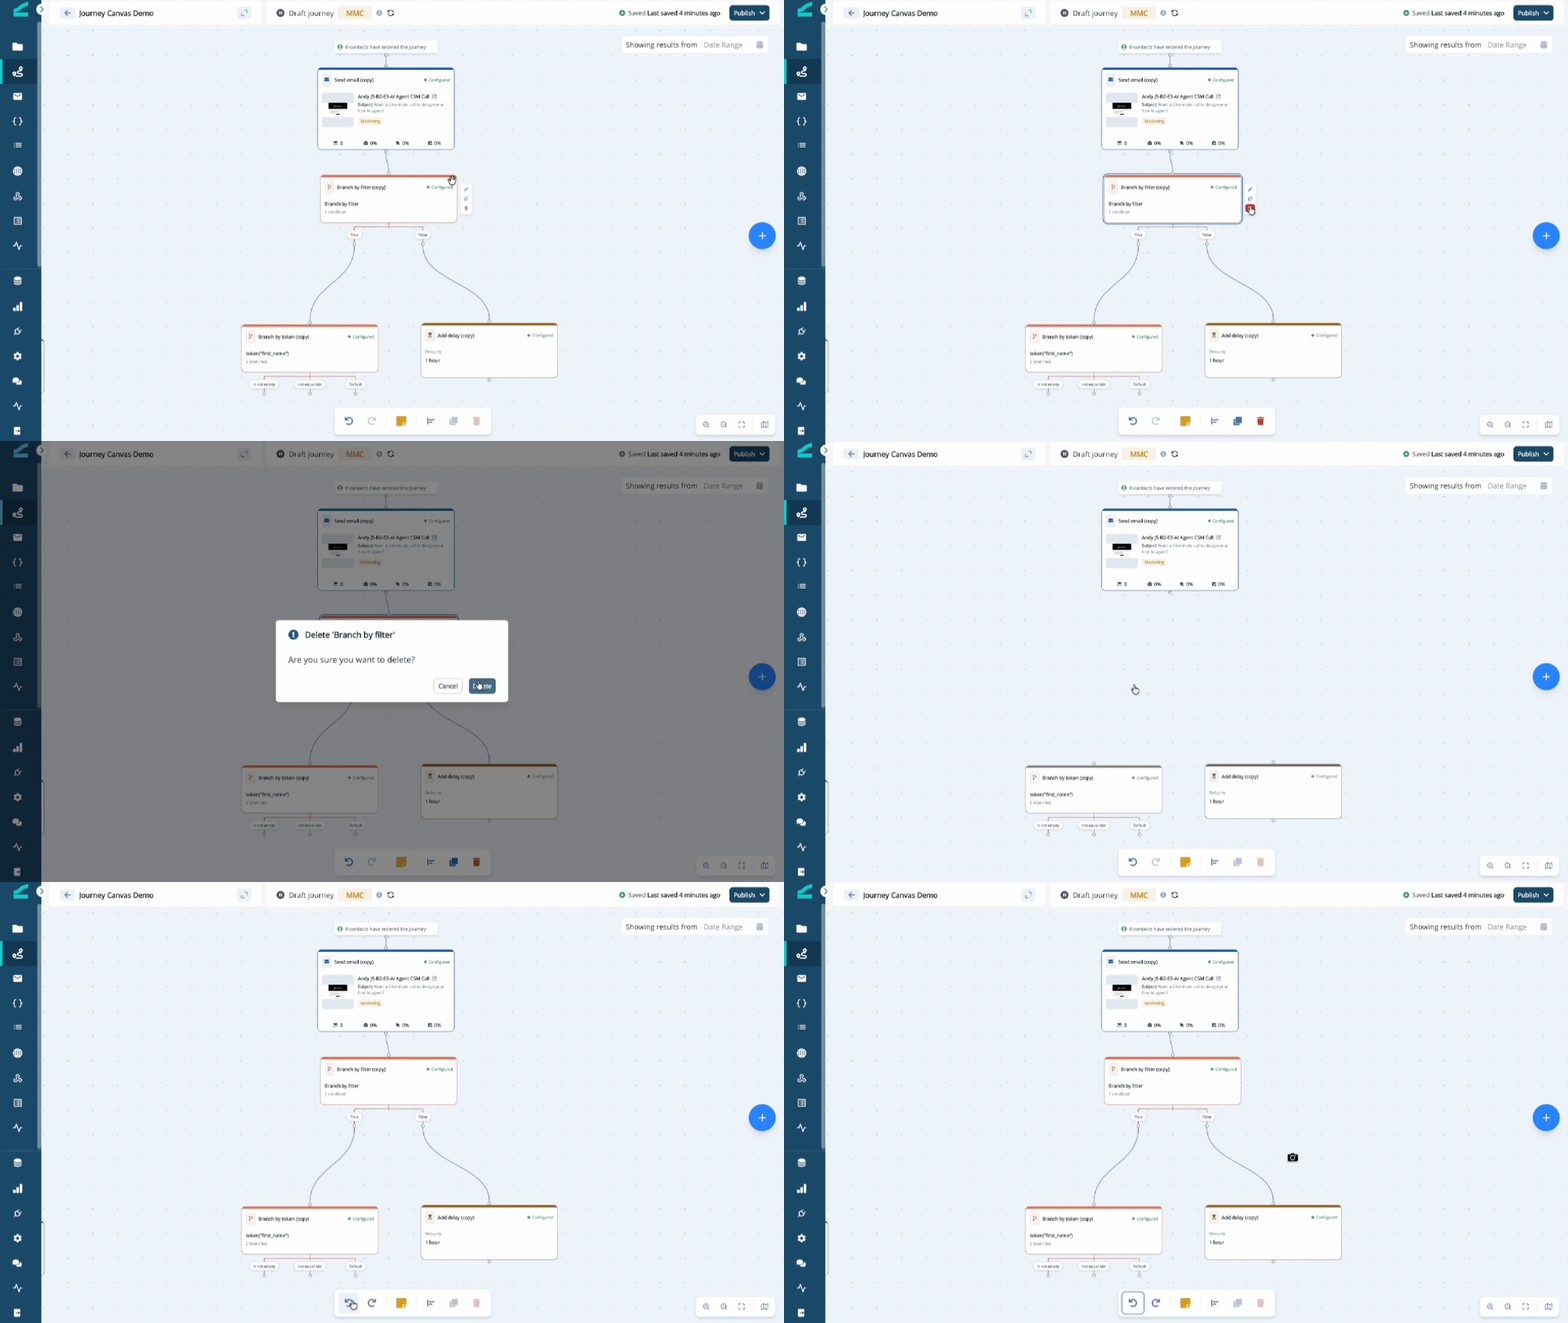
Every canvas change can be undone.
* Click **Undo** in the toolbar, or press **Cmd+Z** / **Ctrl+Z**.
* Click **Redo**, or press **Cmd+Shift+Z** / **Ctrl+Shift+Z**.
If the journey changed since your last action (for example, another editor made an edit), undo may not apply. You'll see a brief message and the canvas will refresh to the latest saved state.
## Undo and Redo
Every canvas change can be undone.
* Click **Undo** in the toolbar, or press **Cmd+Z** / **Ctrl+Z**.
* Click **Redo**, or press **Cmd+Shift+Z** / **Ctrl+Shift+Z**.
If the journey changed since your last action (for example, another editor made an edit), undo may not apply. You'll see a brief message and the canvas will refresh to the latest saved state.
 ## Tidy Up (Auto-Arrange)
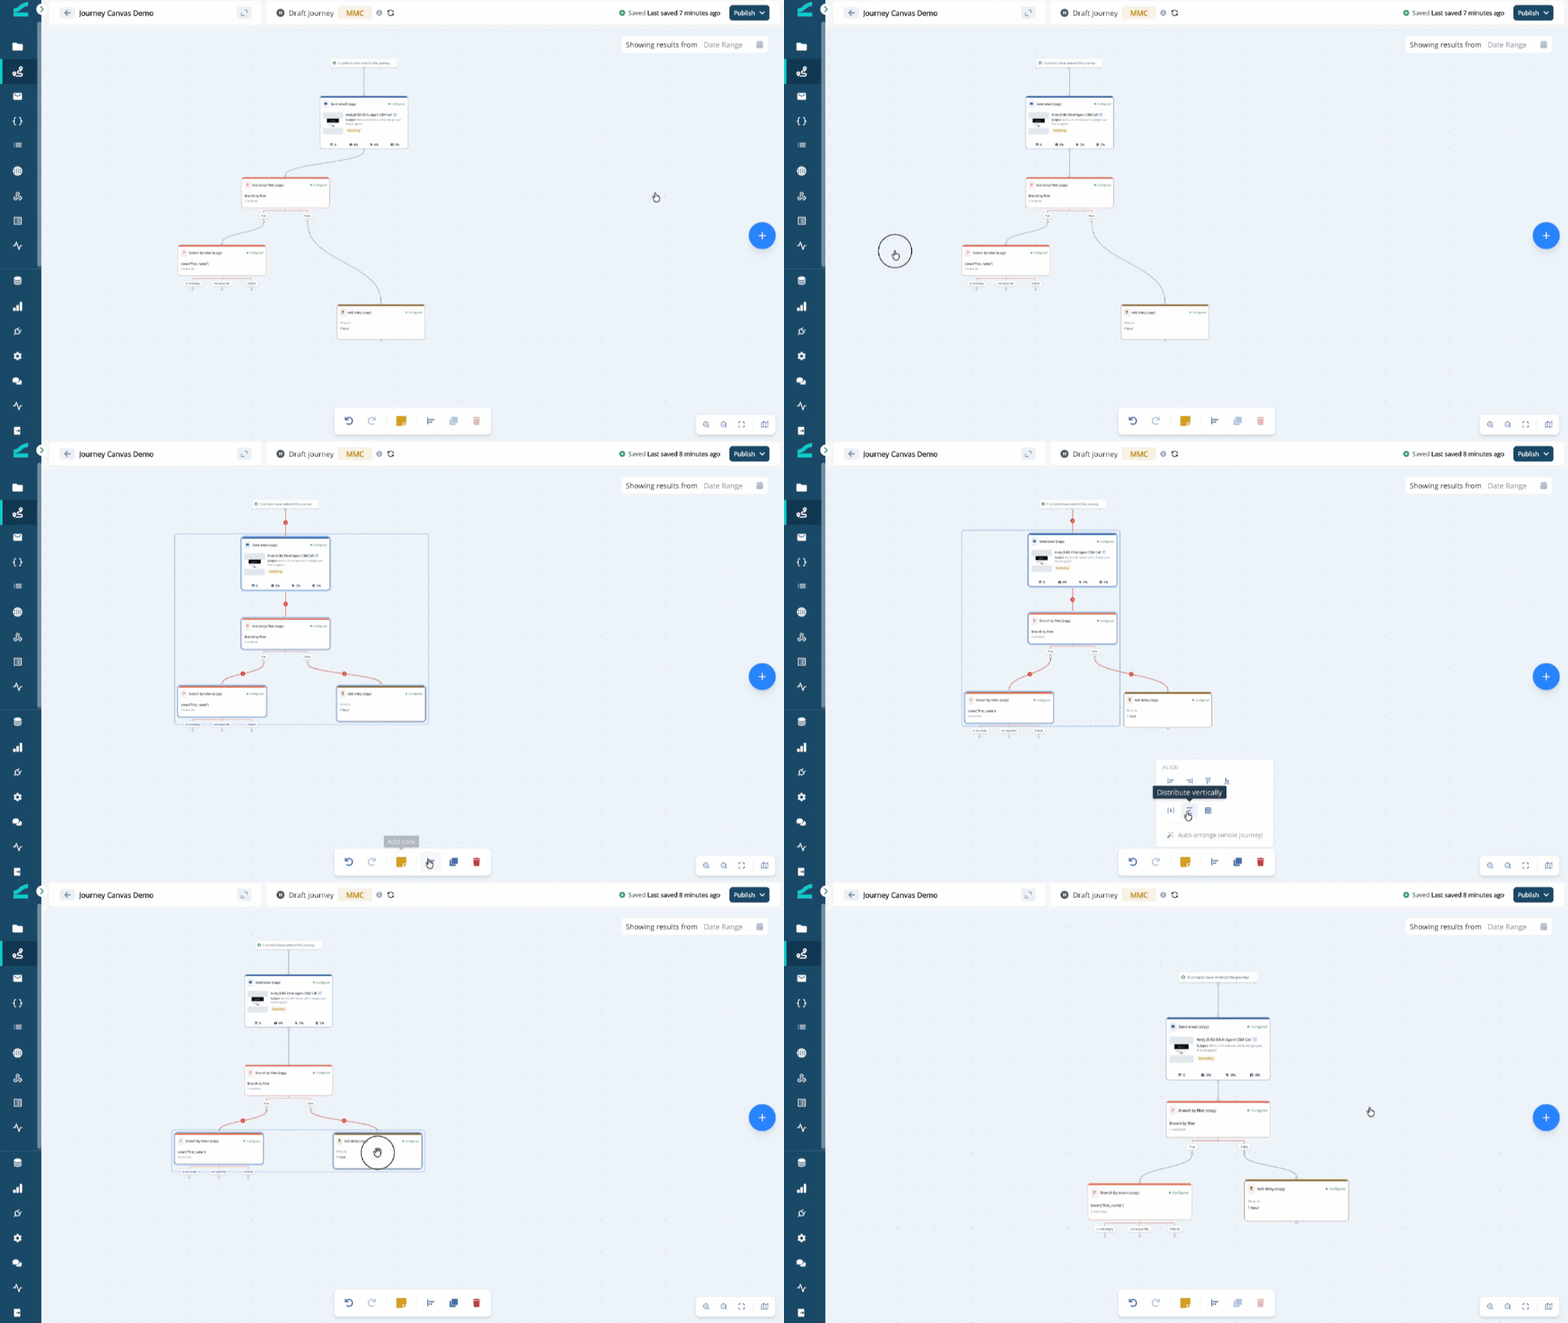
Click **Tidy Up** or Align actions in the toolbar to automatically arrange your steps into a clean, readable layout. Tidy up re-flows the whole canvas — including the contents of any nested journeys — and recenters the view. Align is applied only on selected nodes
## Tidy Up (Auto-Arrange)
Click **Tidy Up** or Align actions in the toolbar to automatically arrange your steps into a clean, readable layout. Tidy up re-flows the whole canvas — including the contents of any nested journeys — and recenters the view. Align is applied only on selected nodes
 ## Add a Sticky Note
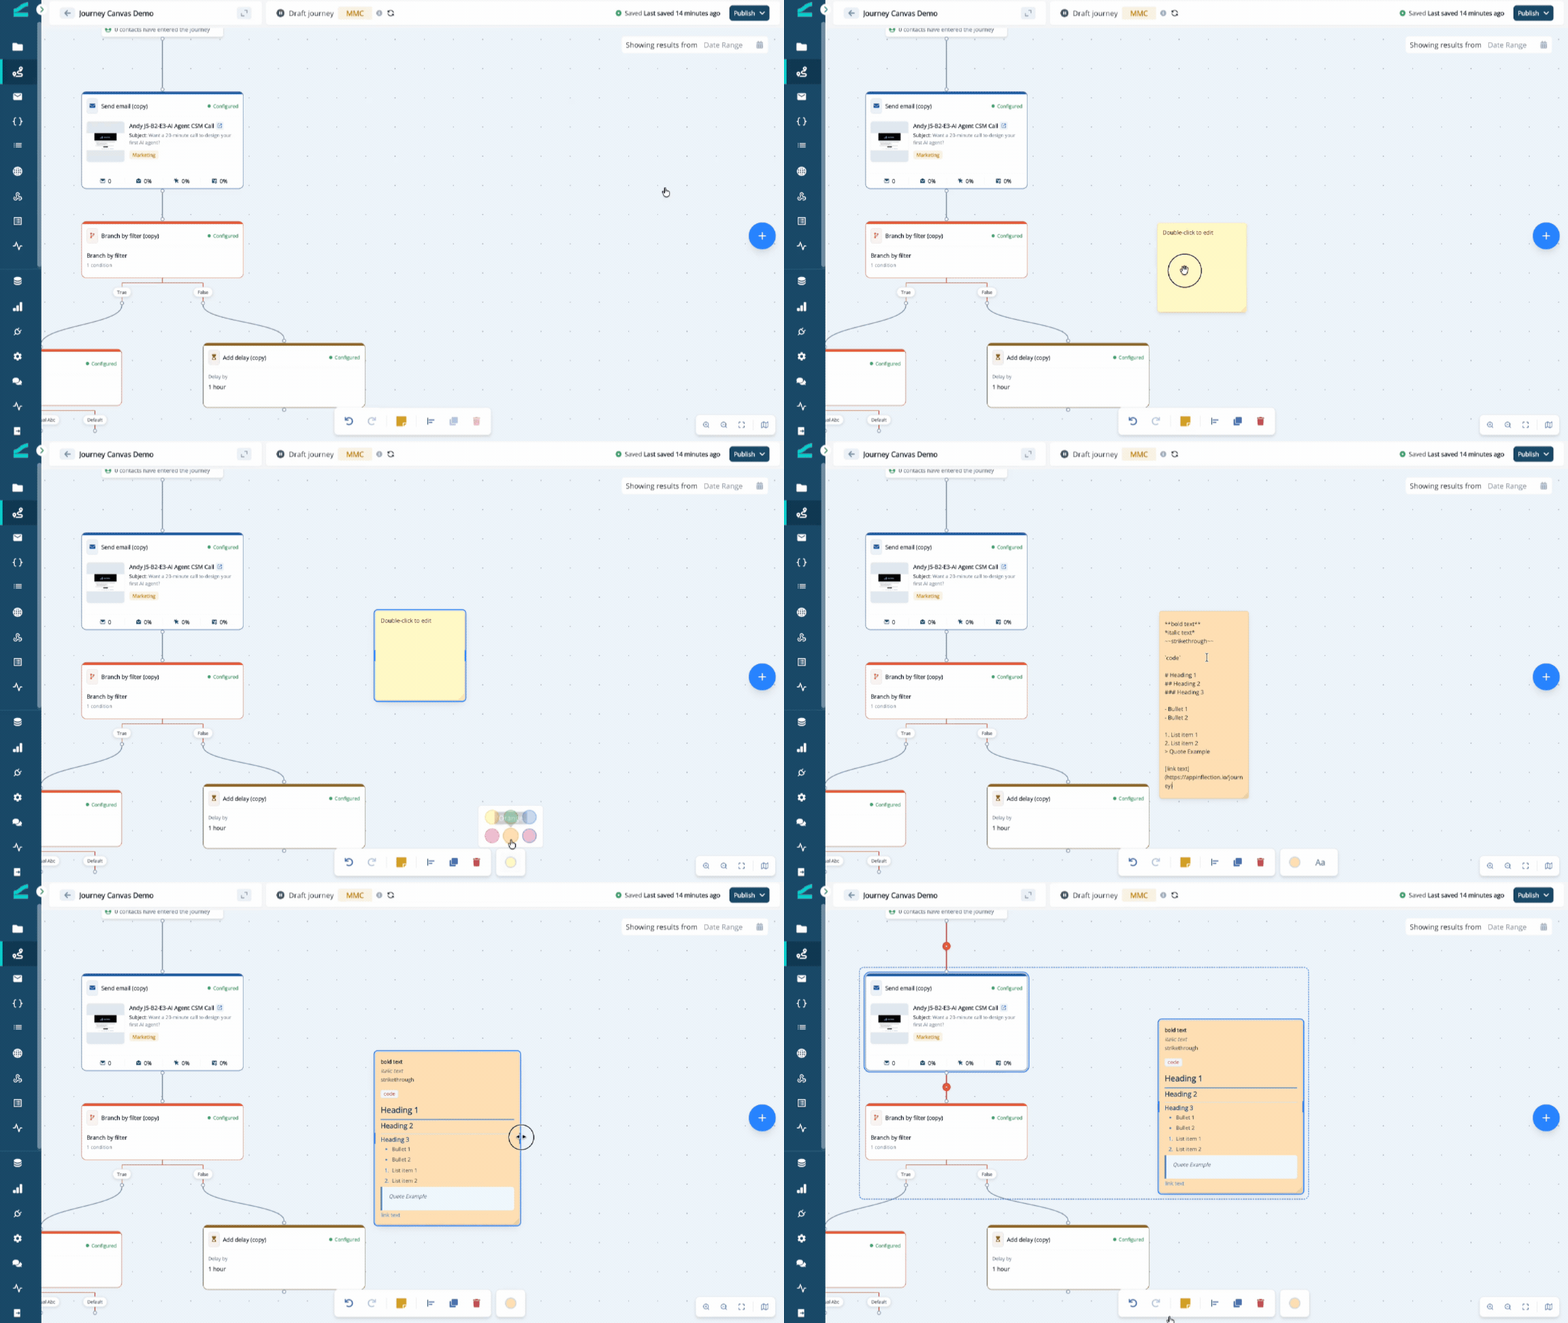
Sticky notes let you leave context for yourself and your teammates on the canvas. They don't affect how the journey runs.
1. Click **Add note** in the toolbar. A note appears at the center of the view.
2. **Double-click** the note to type. Click away to save.
3. Drag the note's corners to resize it.
## Add a Sticky Note
Sticky notes let you leave context for yourself and your teammates on the canvas. They don't affect how the journey runs.
1. Click **Add note** in the toolbar. A note appears at the center of the view.
2. **Double-click** the note to type. Click away to save.
3. Drag the note's corners to resize it.
 ## Delete Steps and Connectors
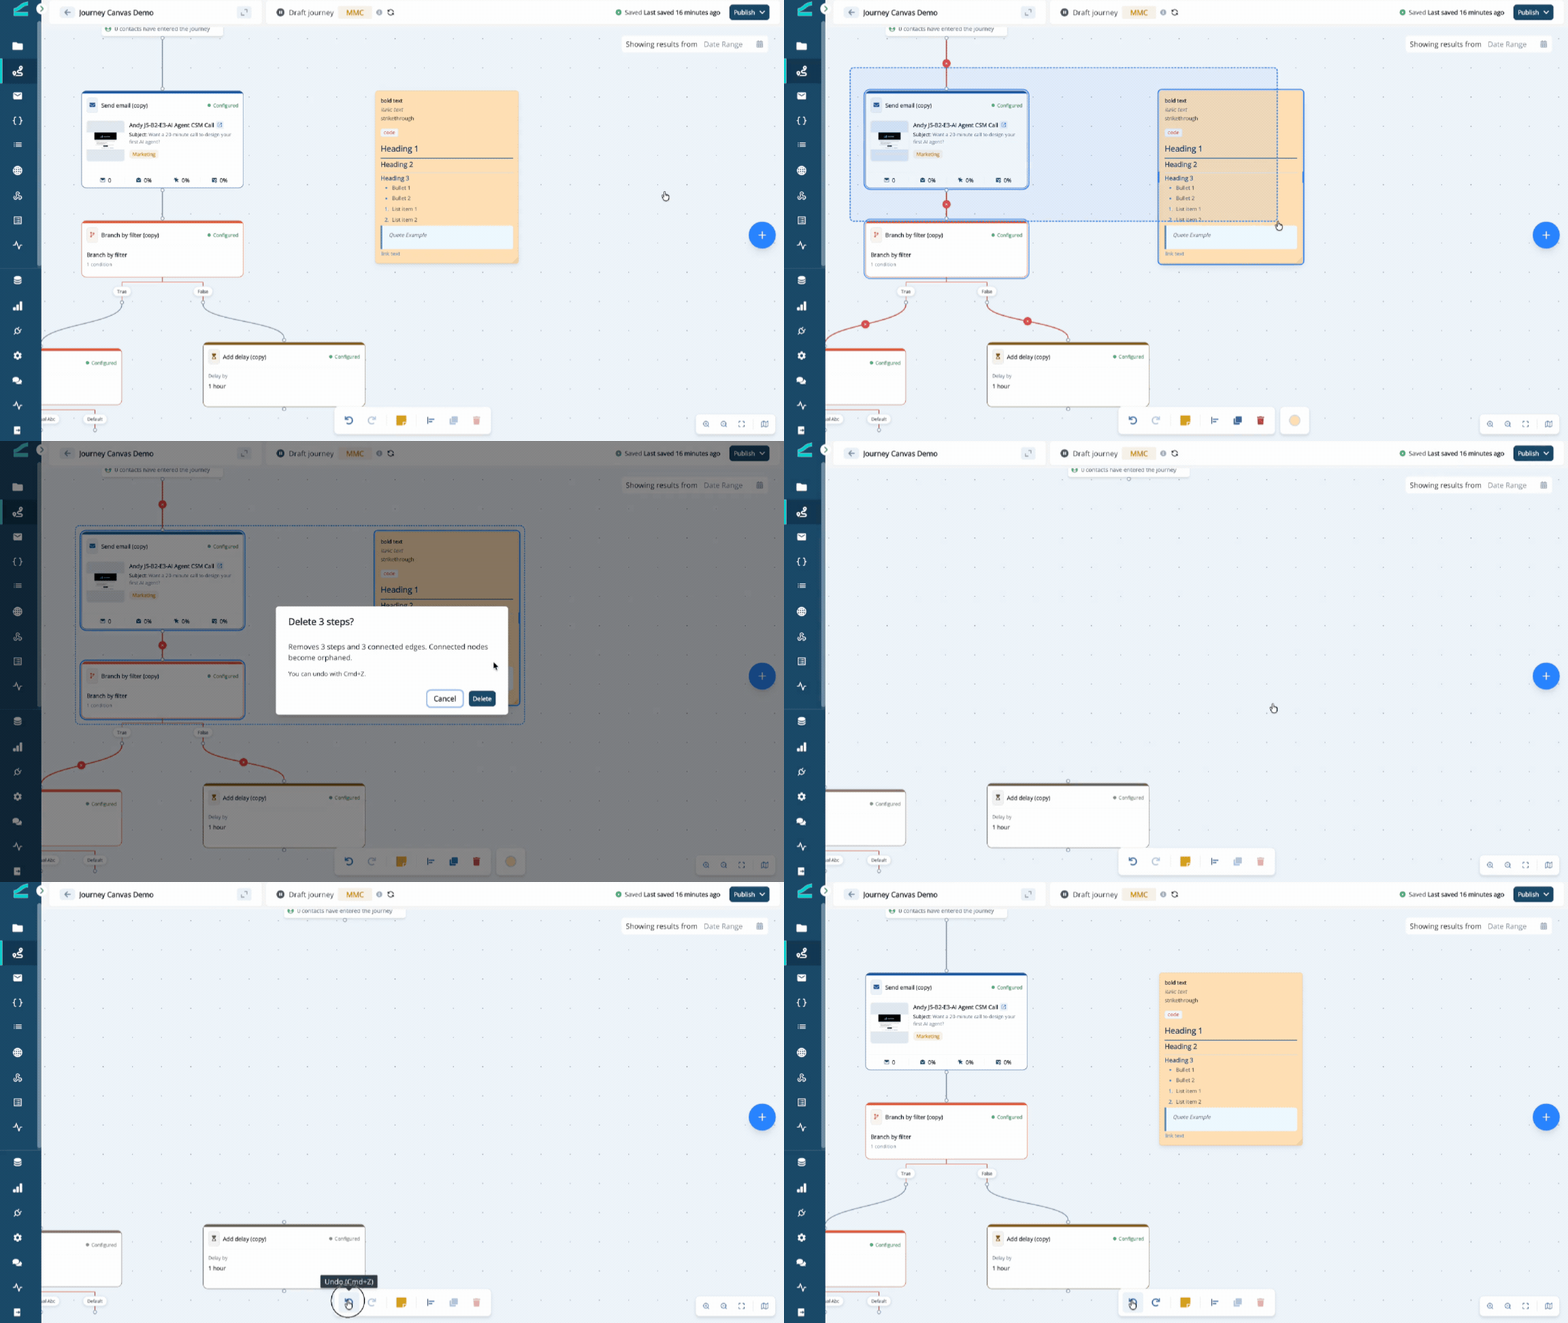
You can delete a single step, a connector, or several steps at once:
* **A step:** hover over it and click the **delete** icon in its toolbar, or select it and press **Delete** / **Backspace**.
* **A connector:** select it and press **Delete** / **Backspace**. Connectors delete without a prompt — undo with **Cmd+Z** if needed.
* **Multiple steps:** select them and press **Delete** / **Backspace**.
Deleting a step opens a confirmation. If contacts are currently sitting at that step, the confirmation warns you how many — deleting may cause those contacts not to complete the journey.
Deleting a step can leave the steps that followed it disconnected ("orphaned"). Reconnect them after deleting. You can undo a delete with **Cmd+Z**.
## Delete Steps and Connectors
You can delete a single step, a connector, or several steps at once:
* **A step:** hover over it and click the **delete** icon in its toolbar, or select it and press **Delete** / **Backspace**.
* **A connector:** select it and press **Delete** / **Backspace**. Connectors delete without a prompt — undo with **Cmd+Z** if needed.
* **Multiple steps:** select them and press **Delete** / **Backspace**.
Deleting a step opens a confirmation. If contacts are currently sitting at that step, the confirmation warns you how many — deleting may cause those contacts not to complete the journey.
Deleting a step can leave the steps that followed it disconnected ("orphaned"). Reconnect them after deleting. You can undo a delete with **Cmd+Z**.
 ## Keyboard Shortcuts
| Action | Mac | Windows |
| ----------------------------------- | ------------------- | ------------------- |
| Delete selected steps or connectors | Delete or Backspace | Delete or Backspace |
| Undo | Cmd+Z | Ctrl+Z |
| Redo | Cmd+Shift+Z | Ctrl+Shift+Z |
| Copy | Cmd+C | Ctrl+C |
| Paste | Cmd+V | Ctrl+V |
| Move selected steps | Arrow keys | Arrow keys |
| Deselect all | Esc | Esc |
**Additional resources**
* [Journey Canvas](/journeys/journey-flow-steps)
## Keyboard Shortcuts
| Action | Mac | Windows |
| ----------------------------------- | ------------------- | ------------------- |
| Delete selected steps or connectors | Delete or Backspace | Delete or Backspace |
| Undo | Cmd+Z | Ctrl+Z |
| Redo | Cmd+Shift+Z | Ctrl+Shift+Z |
| Copy | Cmd+C | Ctrl+C |
| Paste | Cmd+V | Ctrl+V |
| Move selected steps | Arrow keys | Arrow keys |
| Deselect all | Esc | Esc |
**Additional resources**
* [Journey Canvas](/journeys/journey-flow-steps)