

Overview
Data normalization helps you maintain clean, consistent contact data across your organization. By mapping inconsistent source values (like “US”, “United States”, “USA”, and “U.S.A.”) to a single standardized target, you ensure reliable reporting, accurate audience segmentation, and effective personalization - without manual data cleanup.- Source field: The contact field containing raw, inconsistent data (e.g.,
country). - Output field: The contact field where normalized values are written. This can be the same as the source field (overwrite), or a different field.
- Normalized value: A clean, standardized value that one or more source values map to (e.g., “United States”).
- Source value: A raw value from your data that maps to a normalized value (e.g., “US”, “USA”, “U.S.A.”). Source values are case-insensitive. “usa” and “USA” are treated as the same value. Click the Tt icon to view all case variants in your data.
- Unmapped values: Source values that have not yet been assigned to any normalized value. Unmapped values are kept as-is, their original value is preserved unchanged
- Backfill: Applying normalization to existing historical records, not just new incoming data.
Field Eligibility
Field Eligibility
email, id, first_name, and last_name. Other default string fields like company_name and title are eligible.Navigate to Database → Data Normalization → Available Fields to see which fields are eligible. Fields that cannot be normalized display an explanation of why.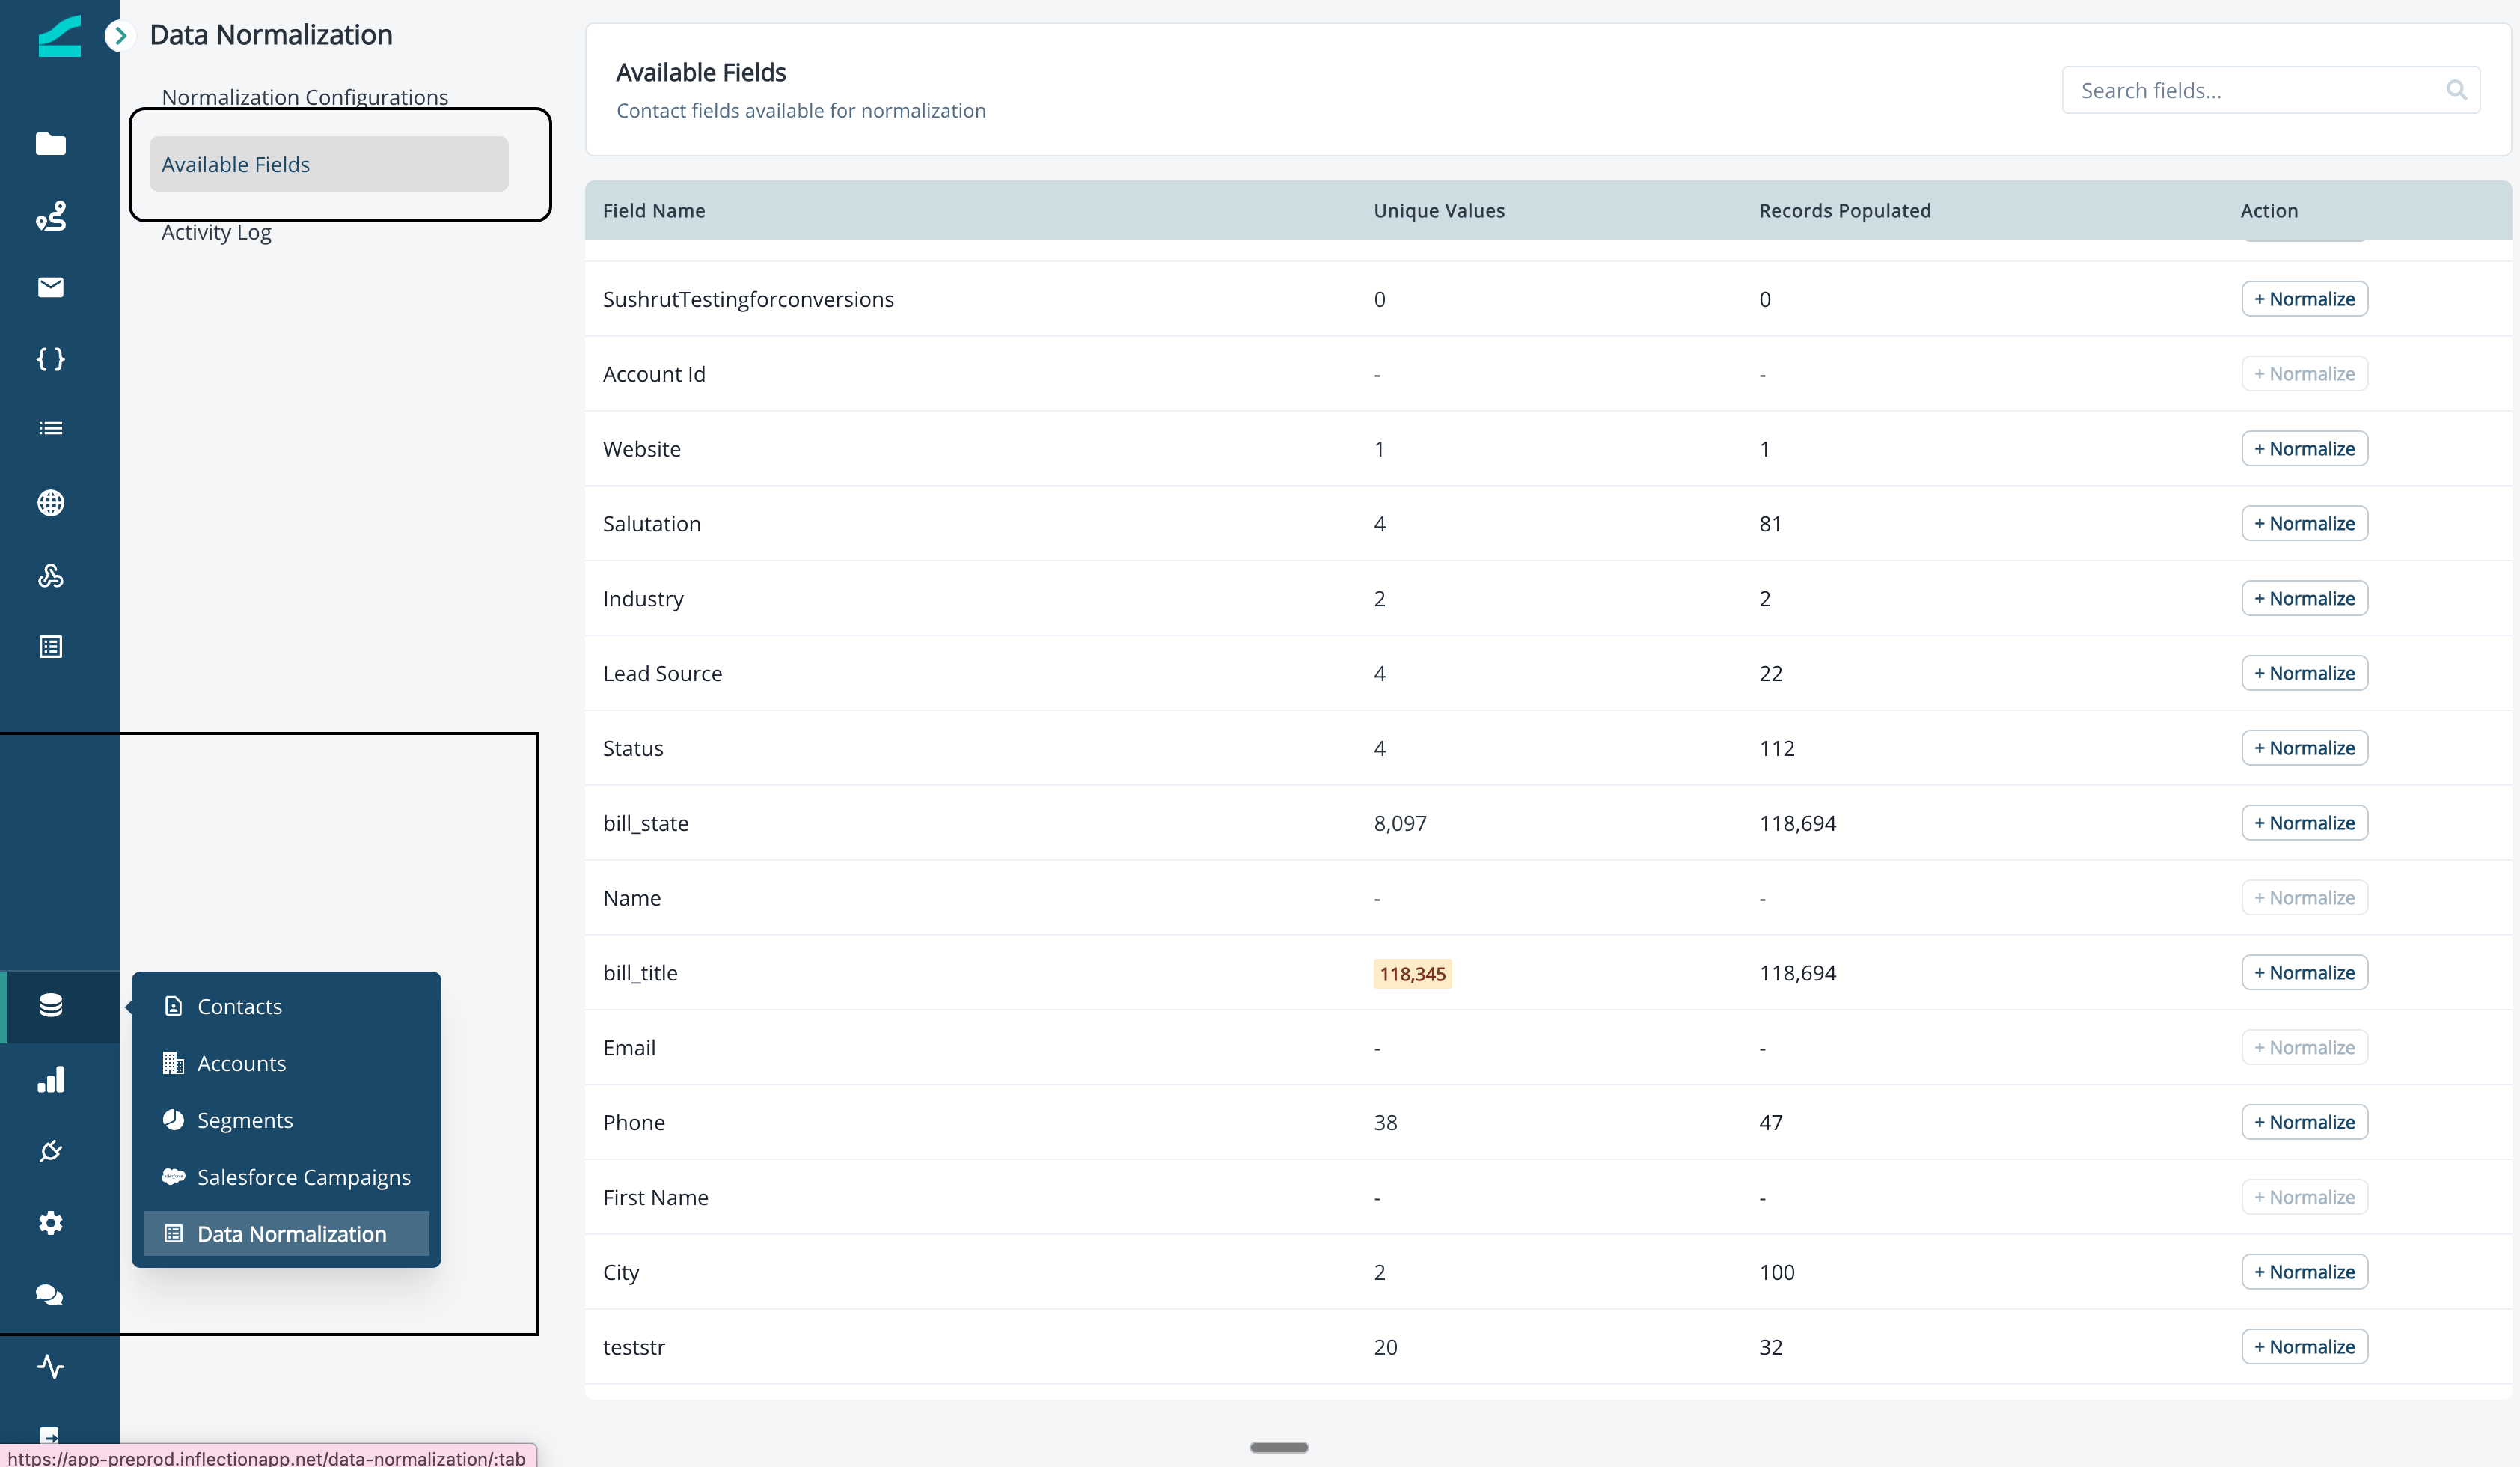
Create a Normalization Configuration
Create a Normalization Configuration
Step 1: Mapping Guidance
Step 1: Mapping Guidance
- Navigate to Database → Data Normalization → Available Fields.
- Click Normalize next to the field you want to configure.
-
Configure how the AI-powered mapping engine should generate initial mappings. Both options below are optional, can be used independently or together, and the combined input must stay under 10,000 characters.
- Let AI decide: Provide optional instructions to guide the AI (e.g., “Use 2 letter ISO codes for Country”). The AI analyzes your instructions alongside the existing source values and suggests groupings. If you don’t provide instructions, the AI generates mappings based on patterns in your data.
- Use my own list: Provide your own target normalized values by typing or pasting them directly, or by uploading a CSV file (max 3 MB). If the source field has a linked Salesforce picklist, the picklist values are automatically loaded as your target list. The AI then maps your source values to the values in your list.
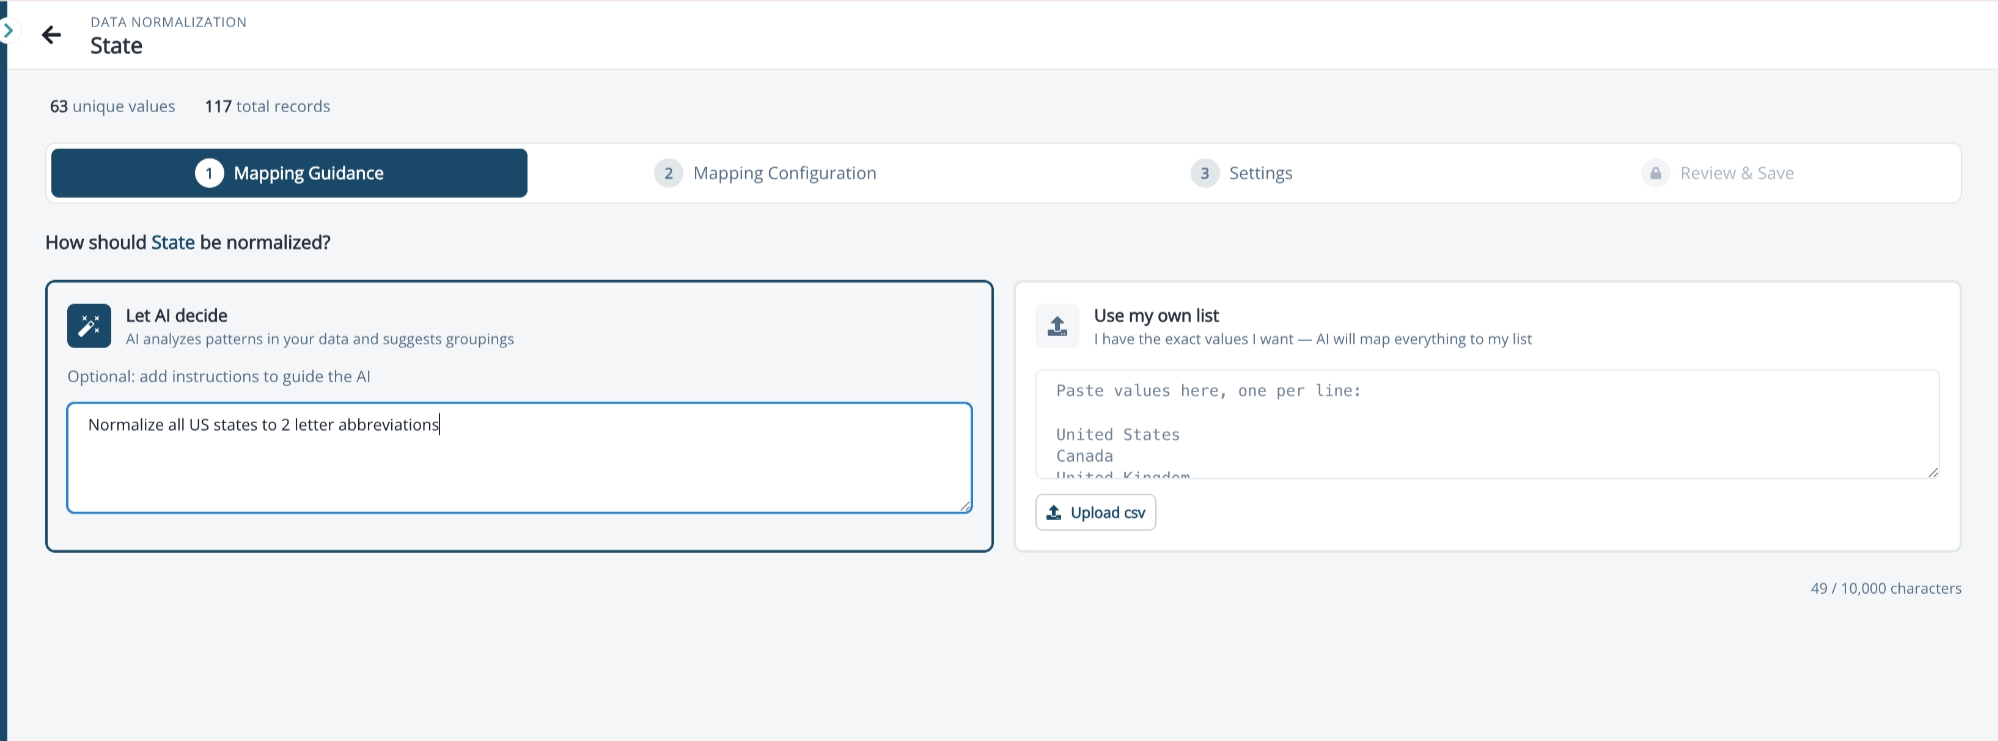
- Click Generate Mappings to run the AI mapping.
Step 2: Mapping Configuration
Step 2: Mapping Configuration
- A table of normalized values (left column) with their source values (right column), each showing a record count
- An Unmapped Values section at the bottom showing source values the AI could not confidently assign
- A header showing total unique values, total records, and a count of values still to review
Review and approve mappings
Each normalized value group shows a count of values “to review”. These are AI-generated mappings that you haven’t yet confirmed. Click Approve on a group to confirm its mappings, or click Approve All in the header to approve every group at once.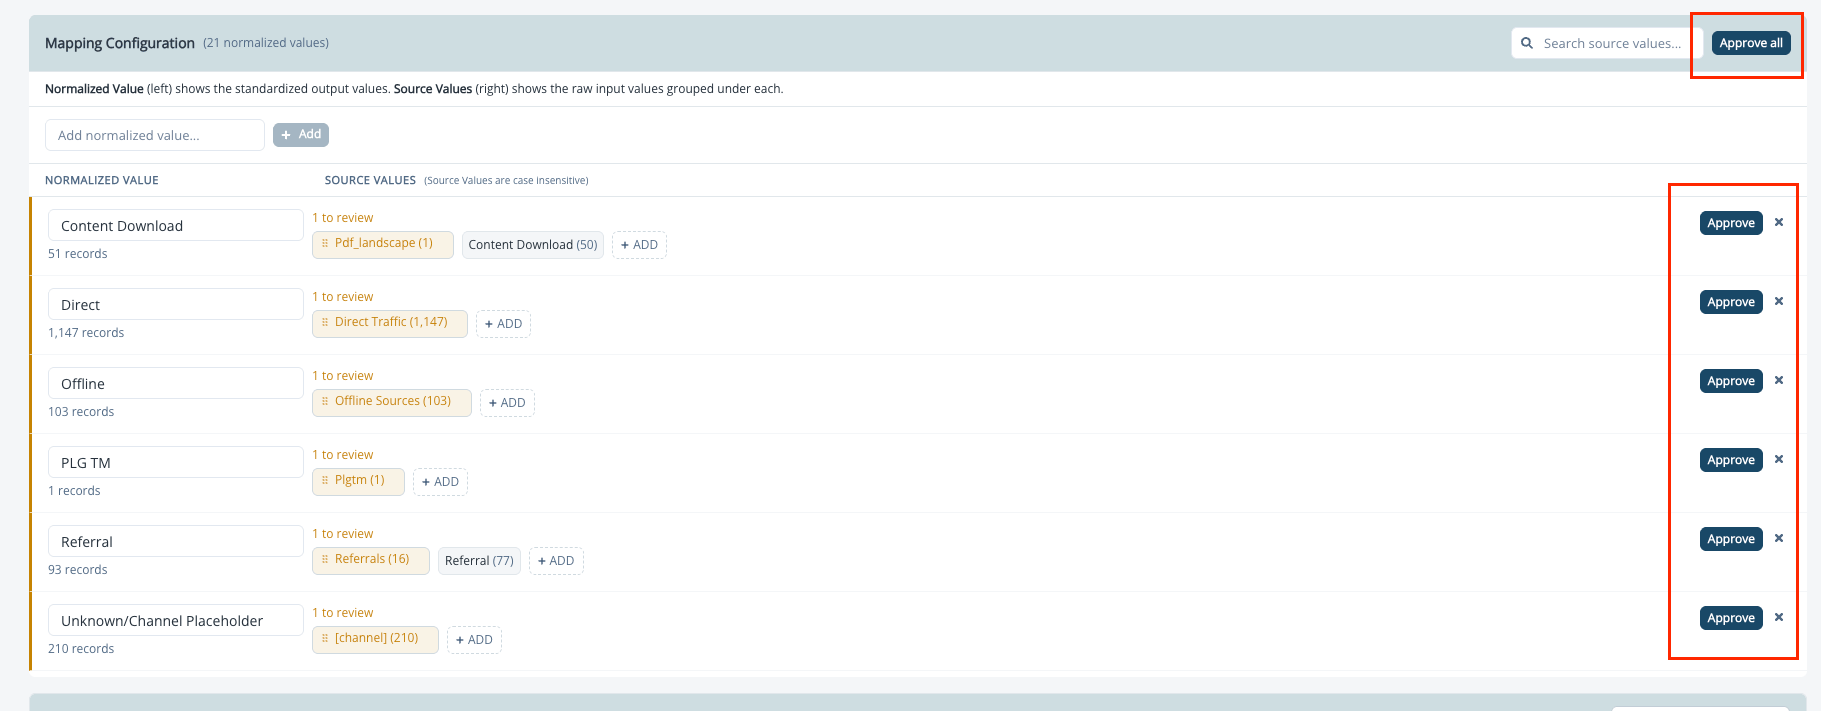
Edit mappings
-
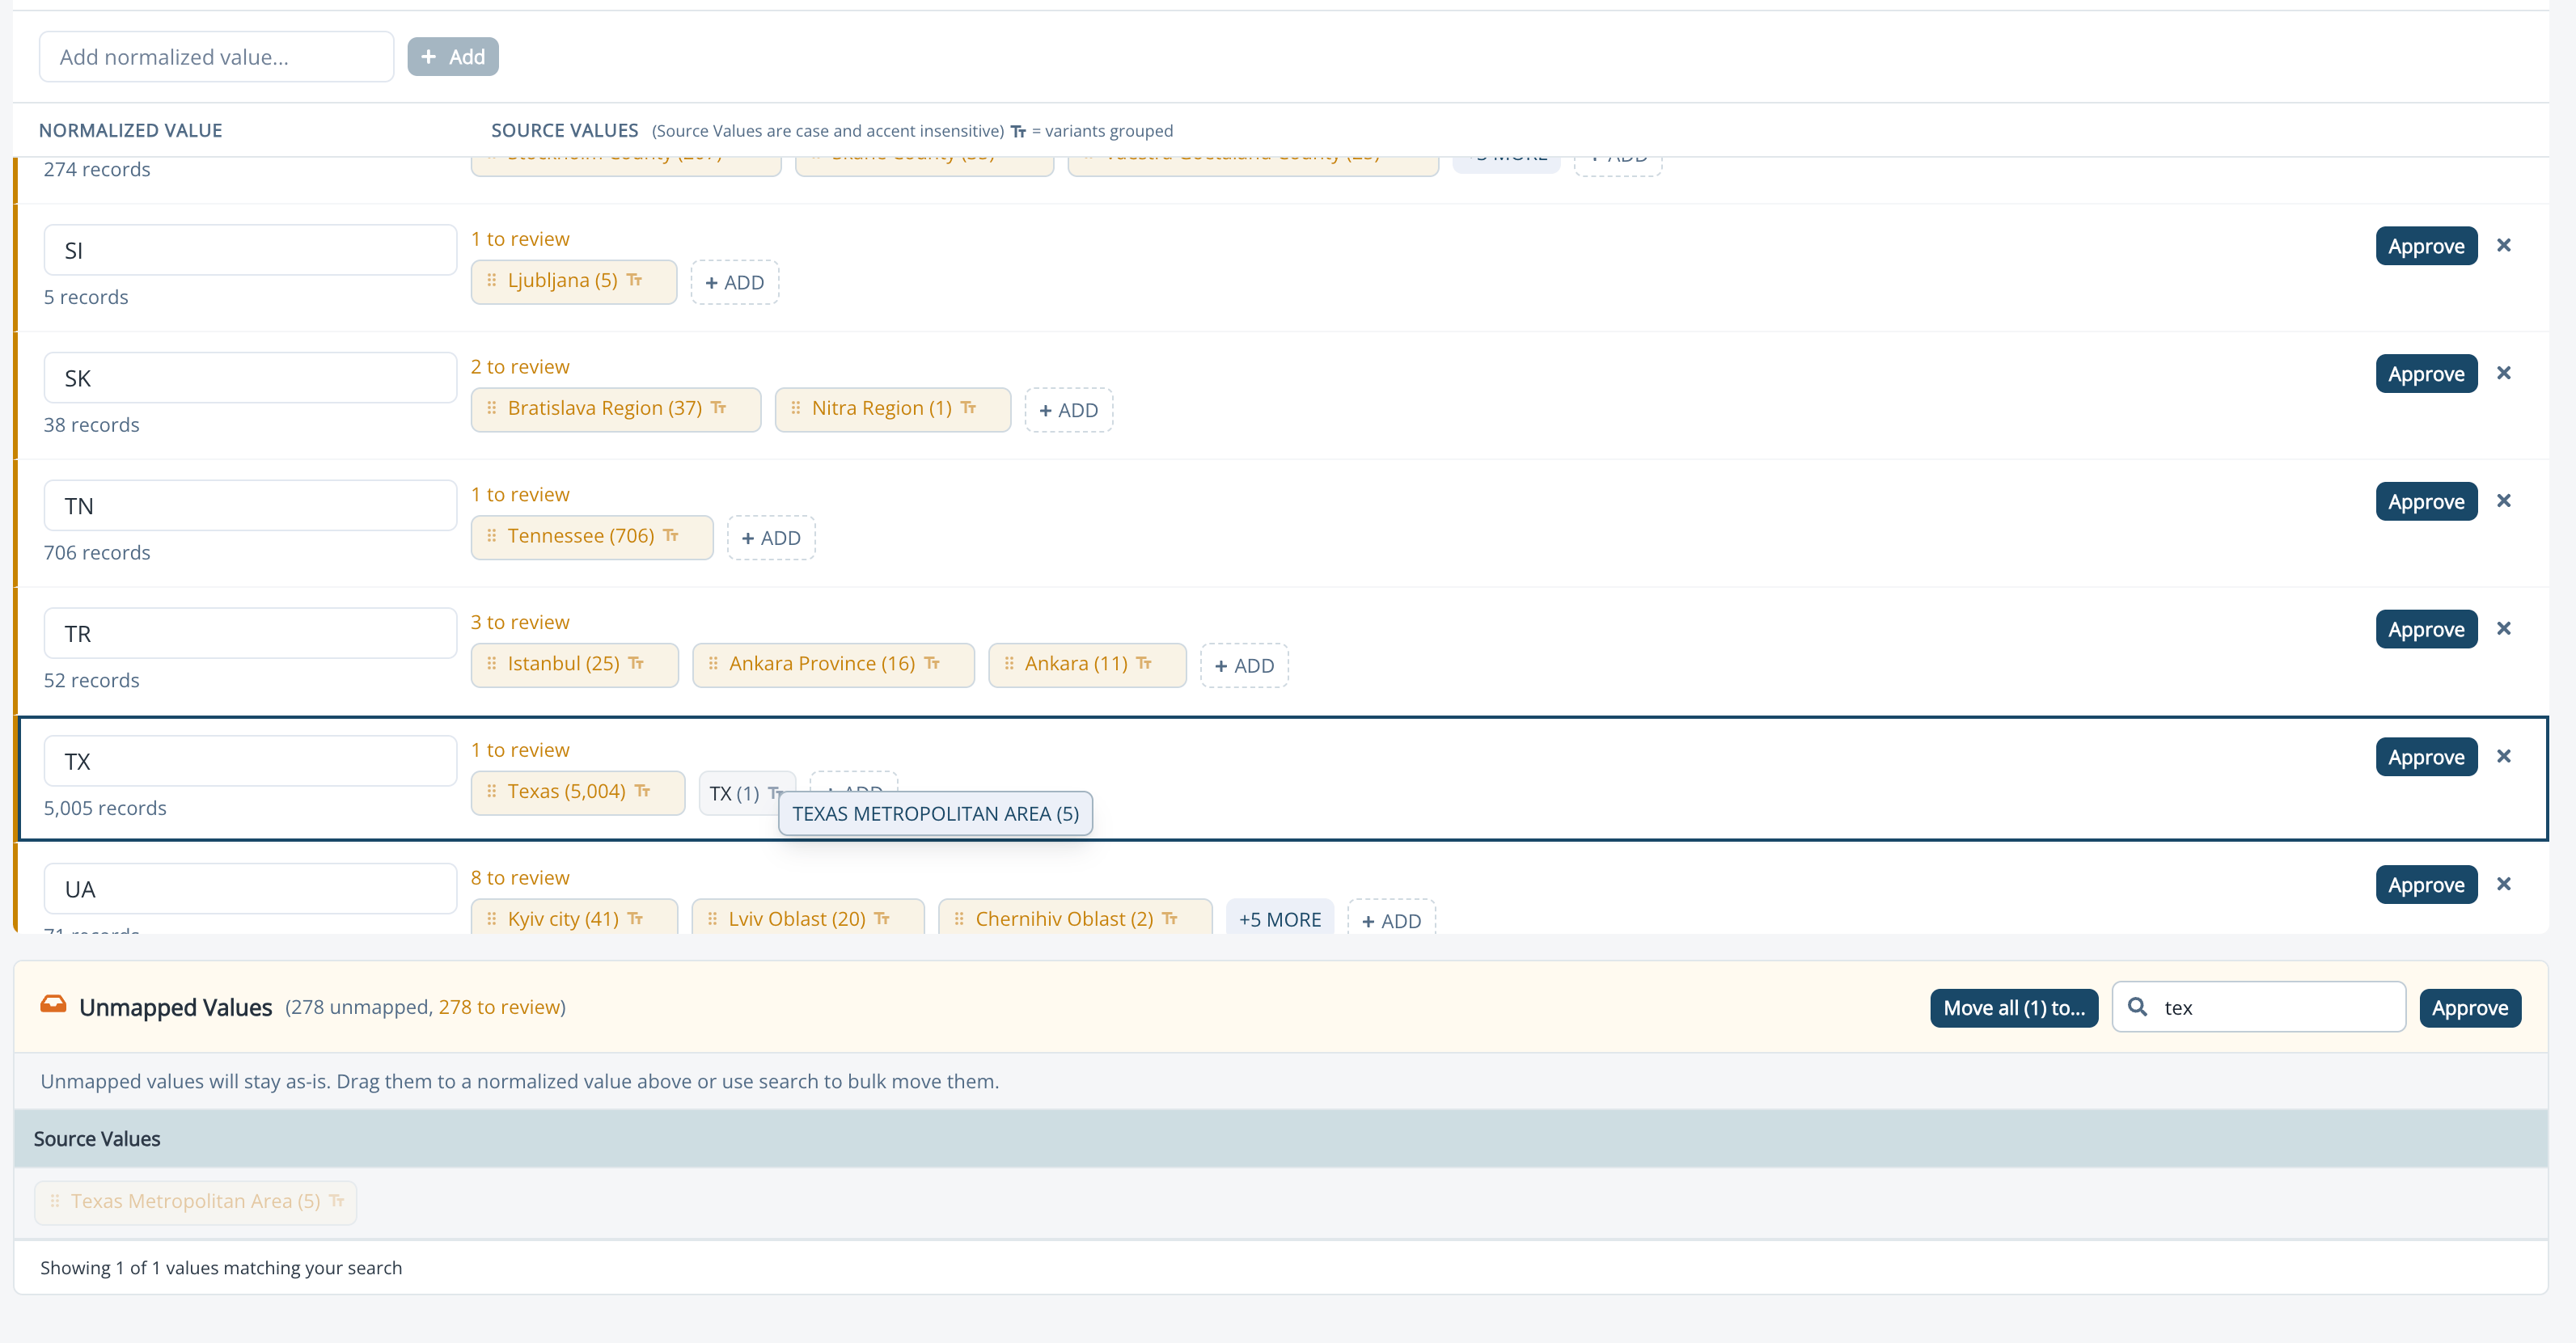
Drag and drop: Drag a single source value from one group to another, or from the unmapped section into a group.
-
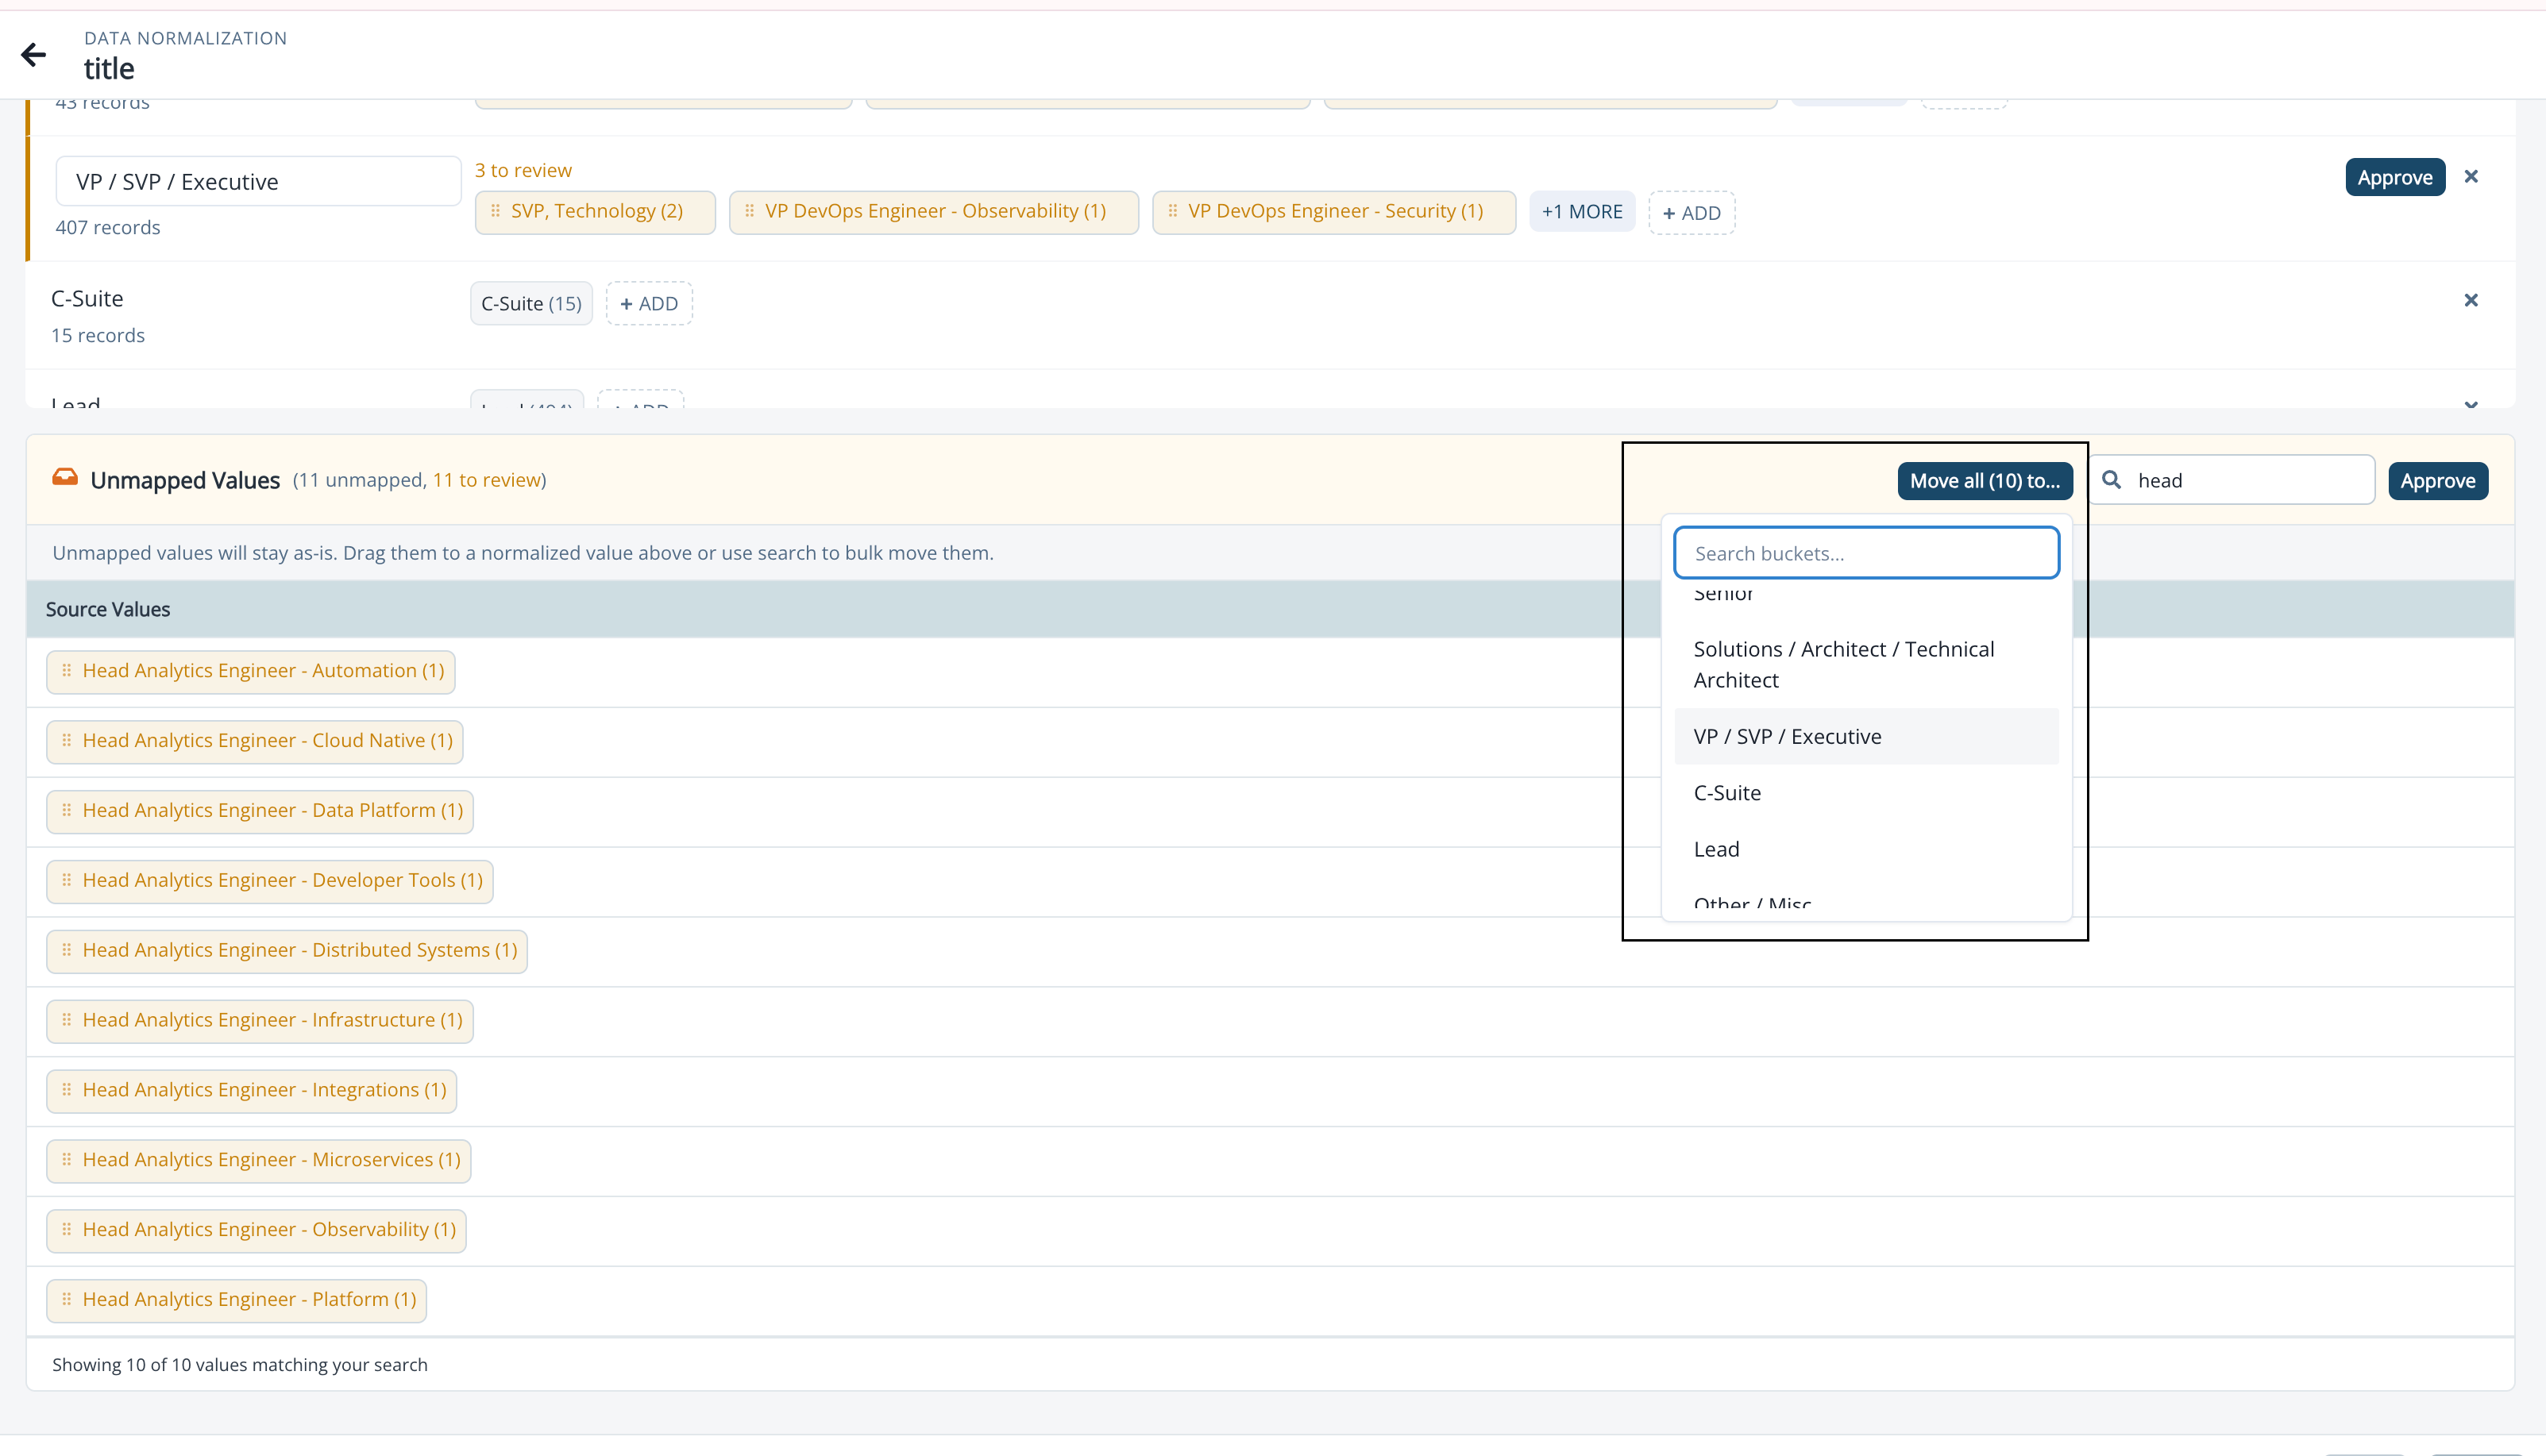
Bulk move from unmapped values: Use the search bar in the Unmapped Values section to filter values (e.g., typing “was” shows all unmapped values containing “was”). A “Move all (N) to…” button appears with the count of matching results.
Click it to see a searchable list of existing normalized value groups, then select a destination, all matching values move to that group at once.
-
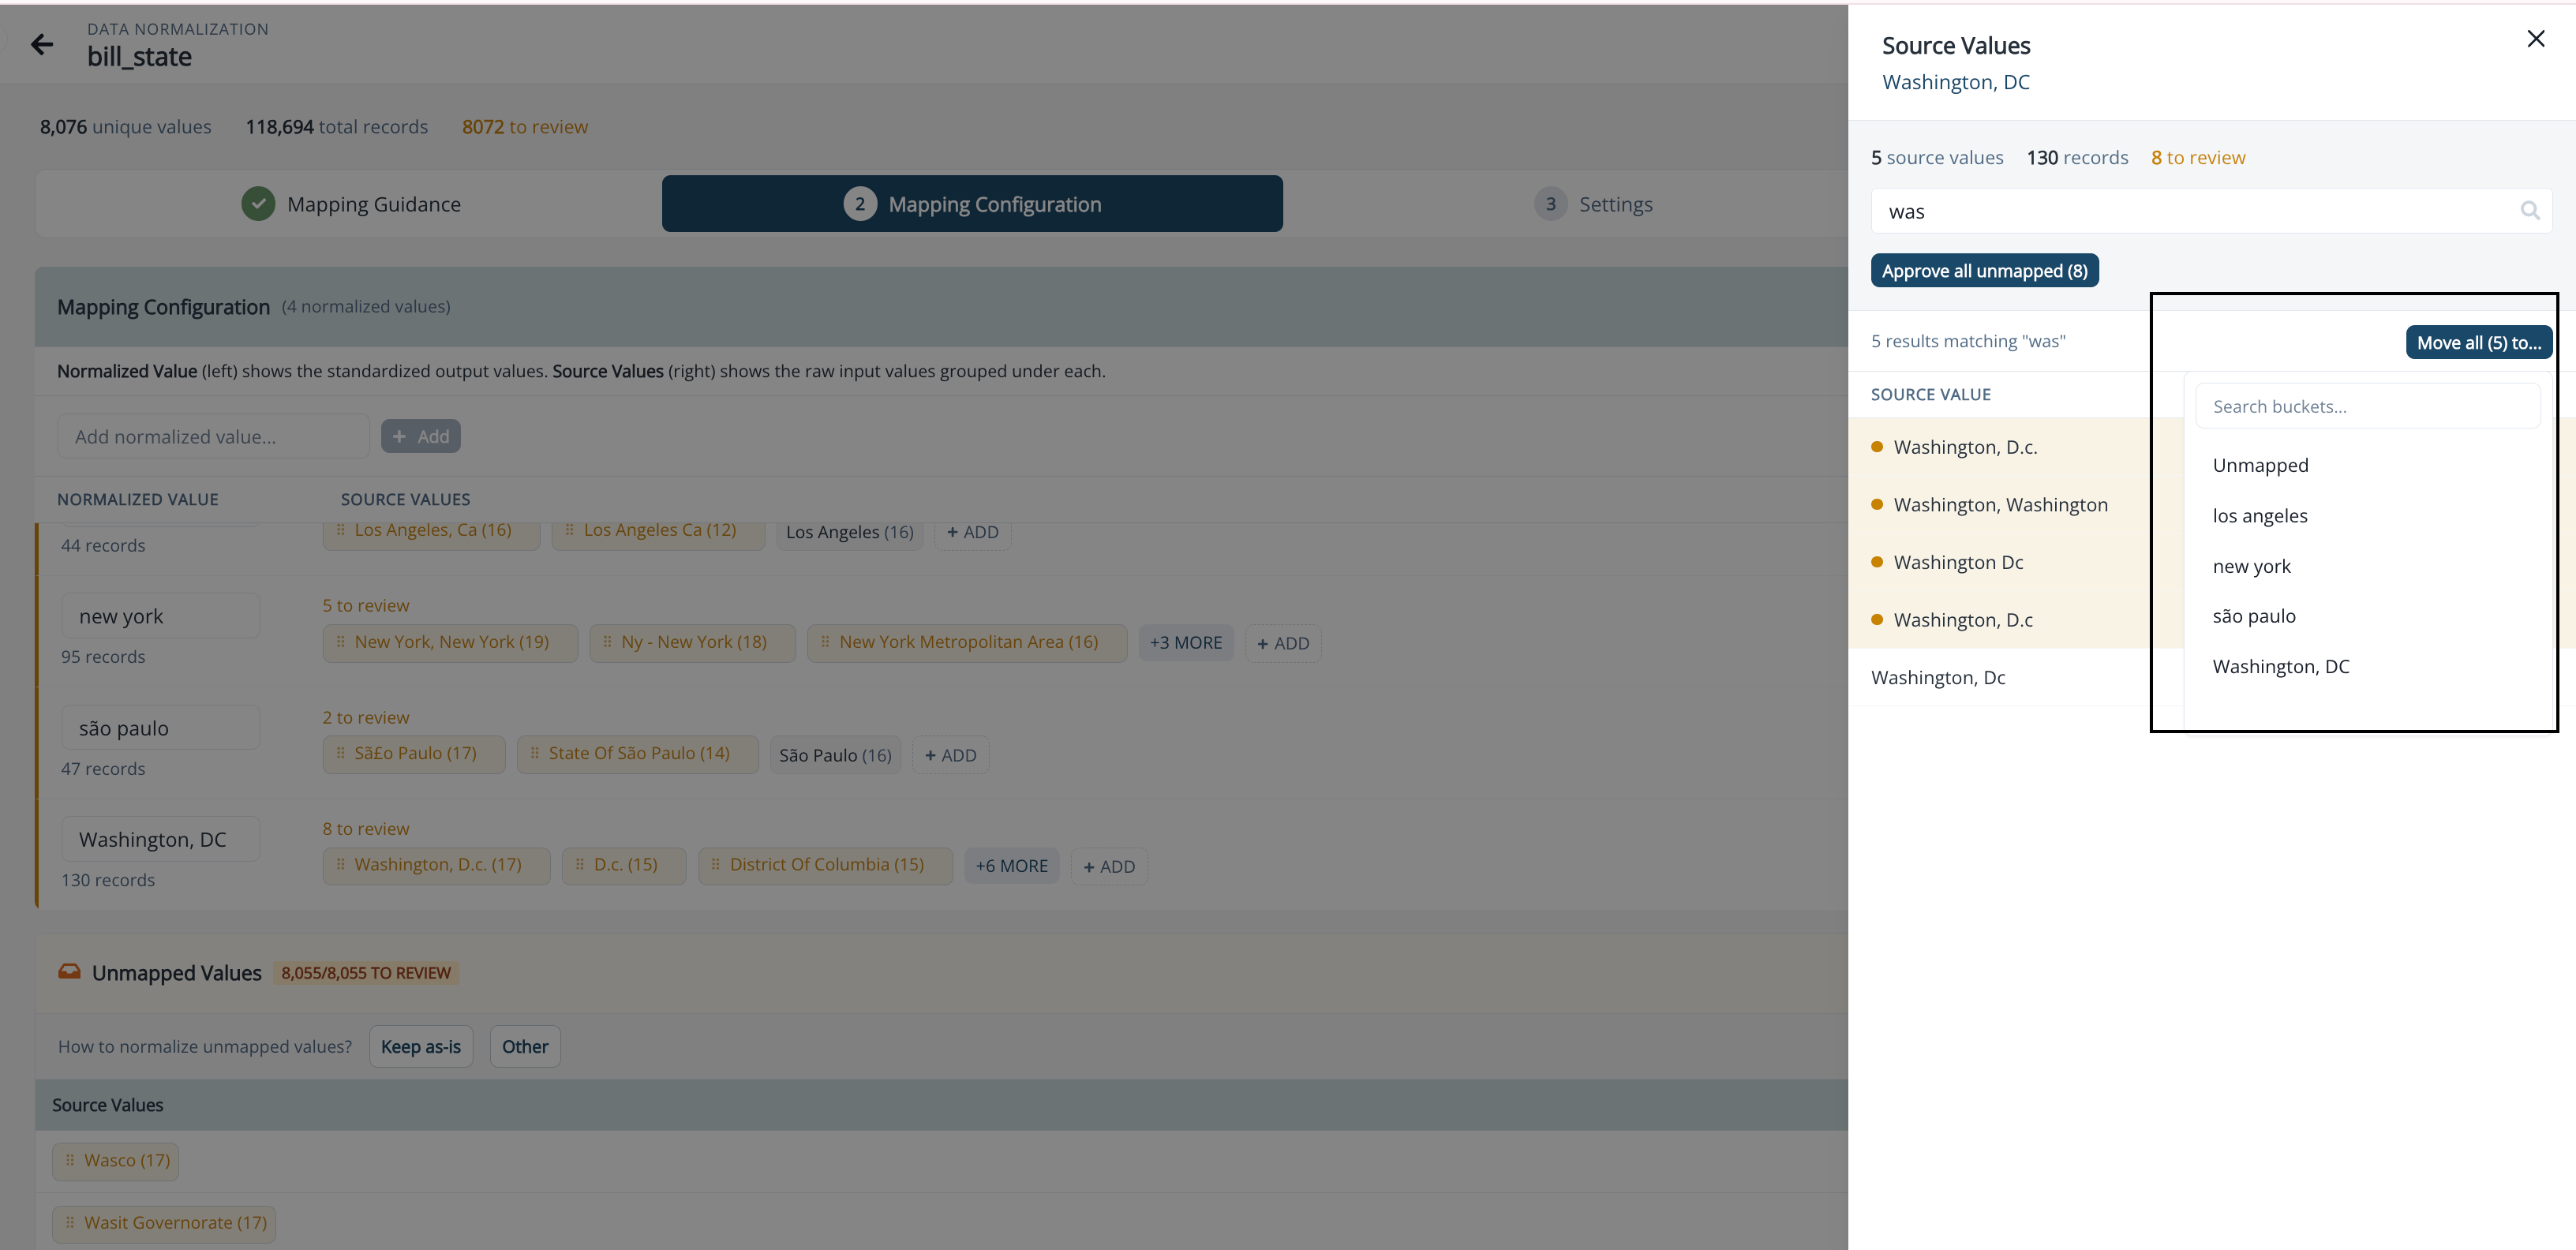
Bulk move within a normalized value group: When a group has more than 3 source values, click +N MORE to open the Source Values drawer for that group. Use the search bar in the drawer to filter values, then click “Move all (N) to…” to select a different normalized value group or Unmapped as the destination.
- Add a source value to a group: Click + Add next to any group’s source values to manually type in a new source value.
- Add a new normalized value: Use the “Add normalized value…” input at the top of the mapping table and click + Add to create a new empty group, then drag or bulk-move values into it.
-
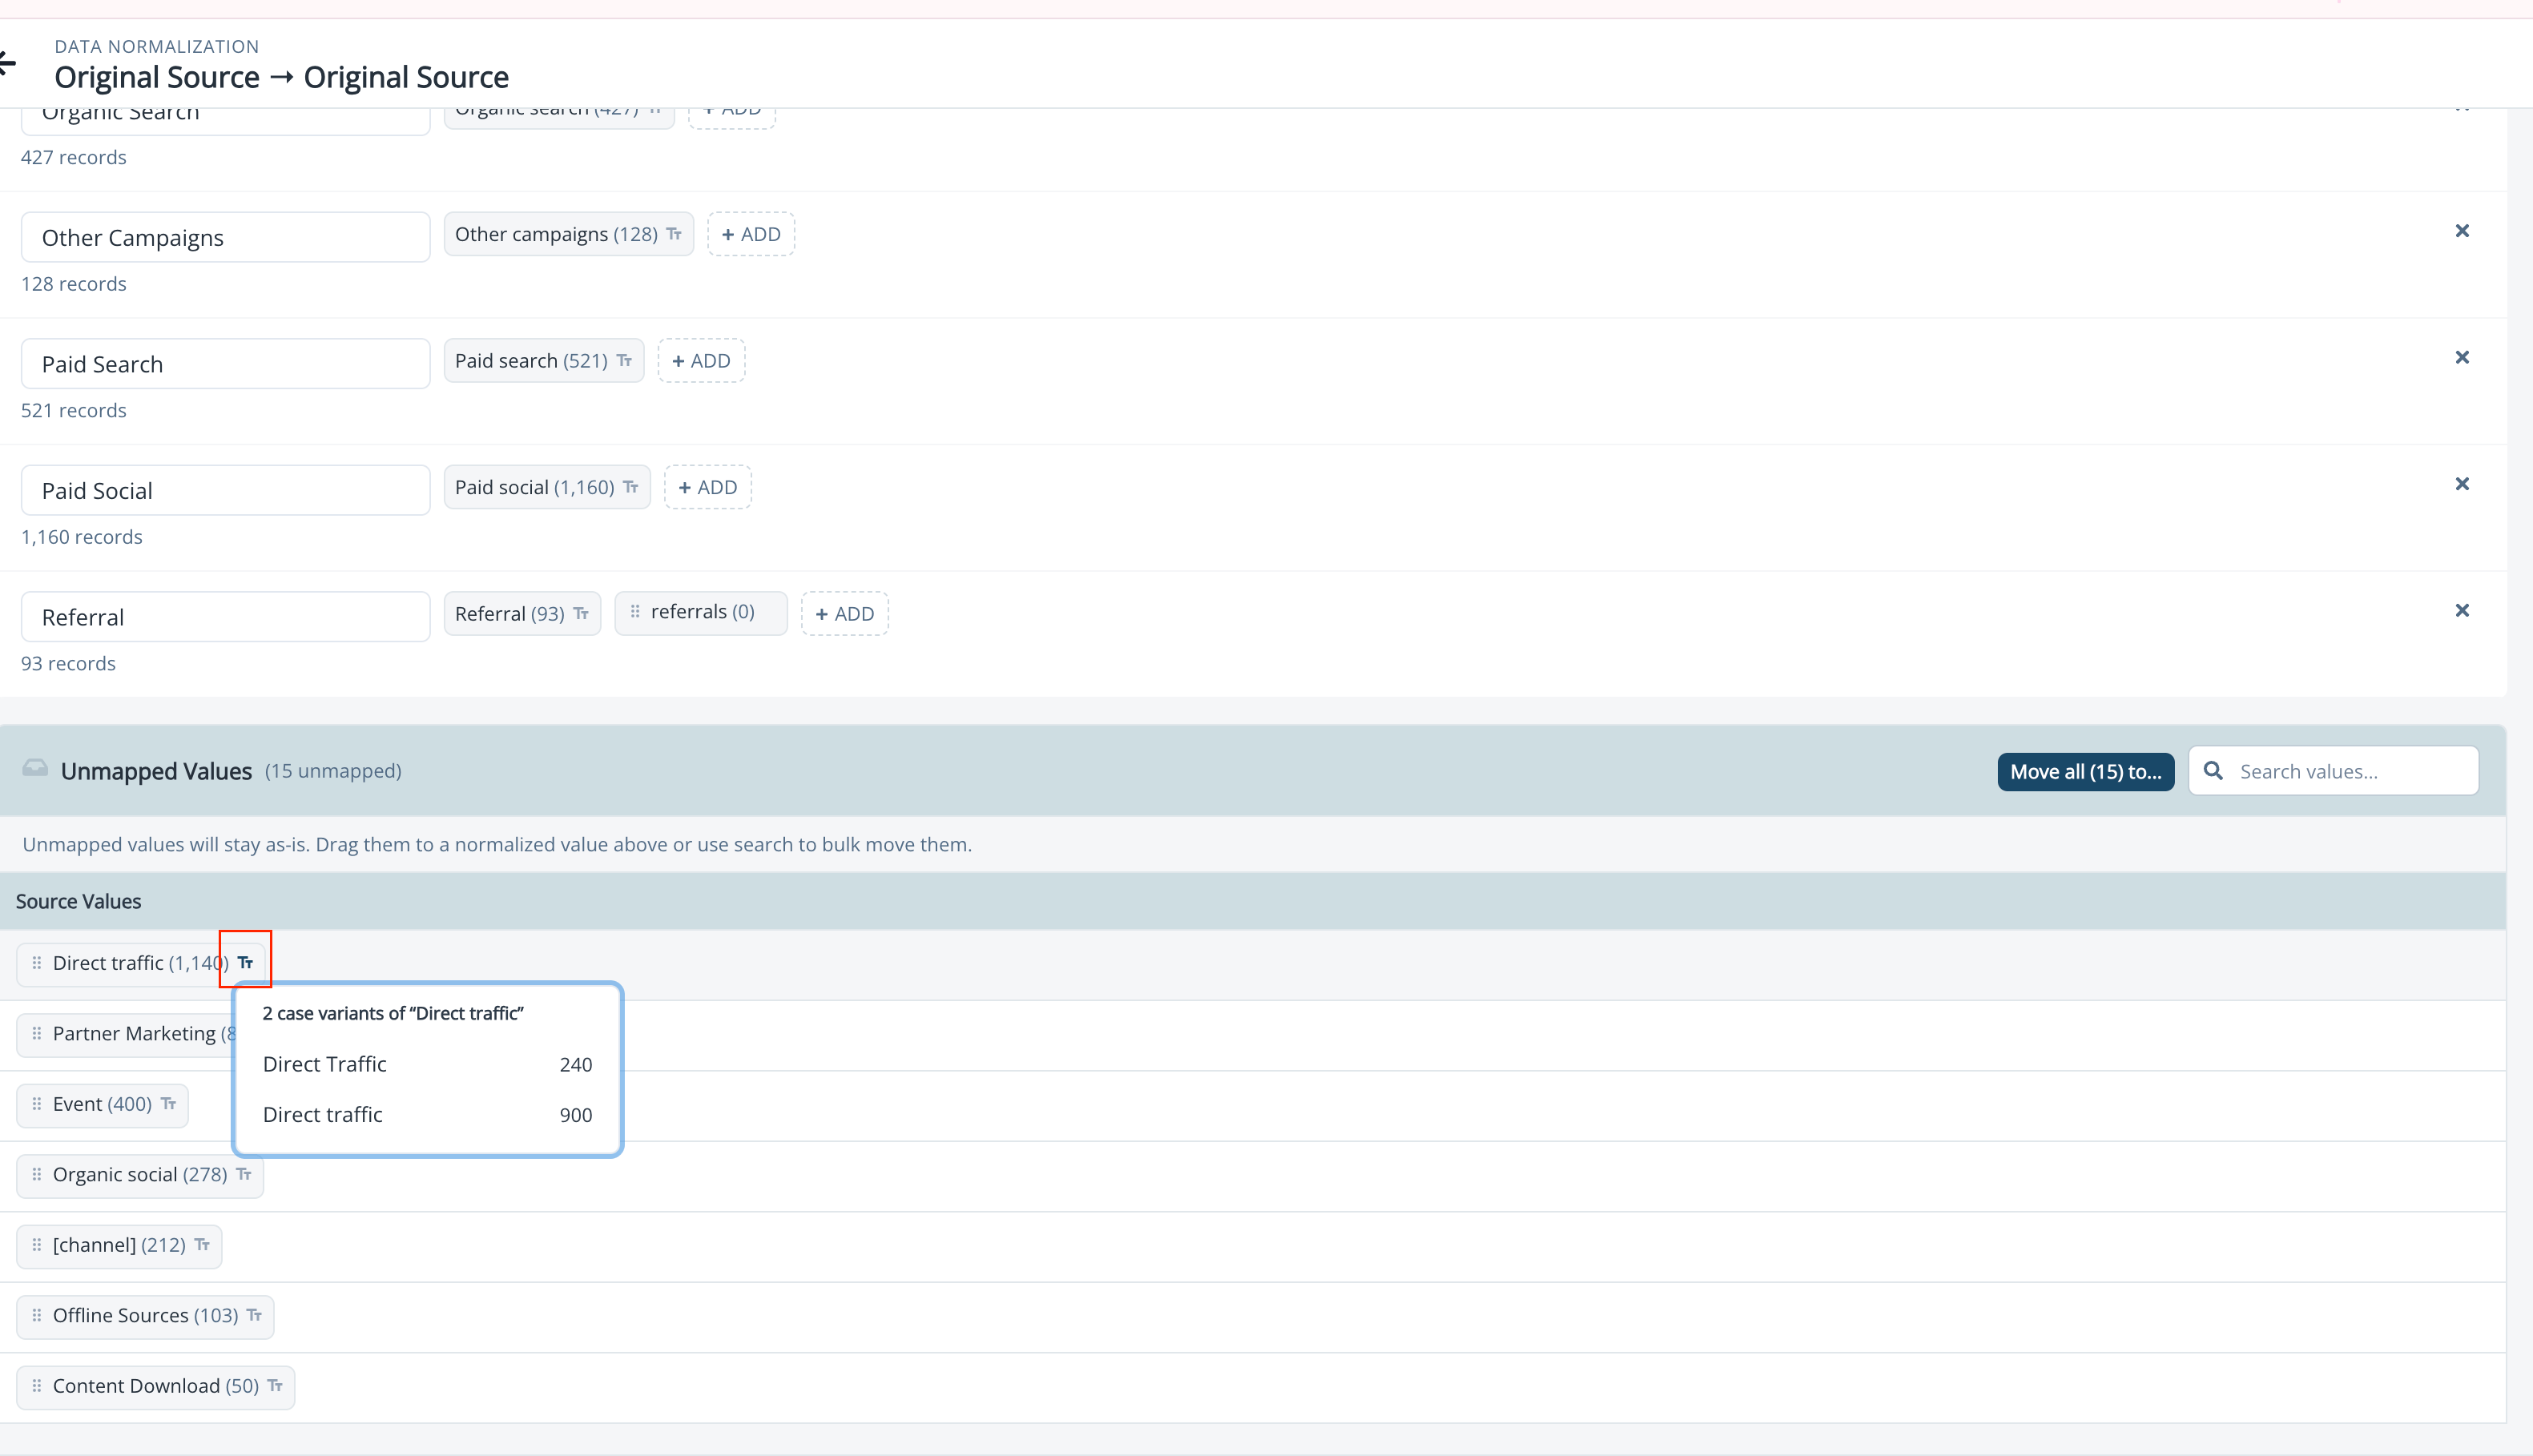
View case variants: Click the Tt icon next to a source value to see all the different case variations that exist in your data (e.g., “Google”, “google”, “GOOGLE”). Source values are still matched case-insensitively, you cannot map different casings to different buckets but this lets you see exactly what forms appear in your raw data.
- Remove a source value from a group: Click the X on a source value tag to move it back to unmapped.
- Remove an entire group: Click the X on the group row to move all its source values back to unmapped and delete the group.
Handle unmapped values
Before you can save, all unmapped values must be resolved. Values you don’t want to assign to a specific normalized value are automatically kept as-is the original value is preserved unchanged in the output field. You can click Approve to confirm them in bulk.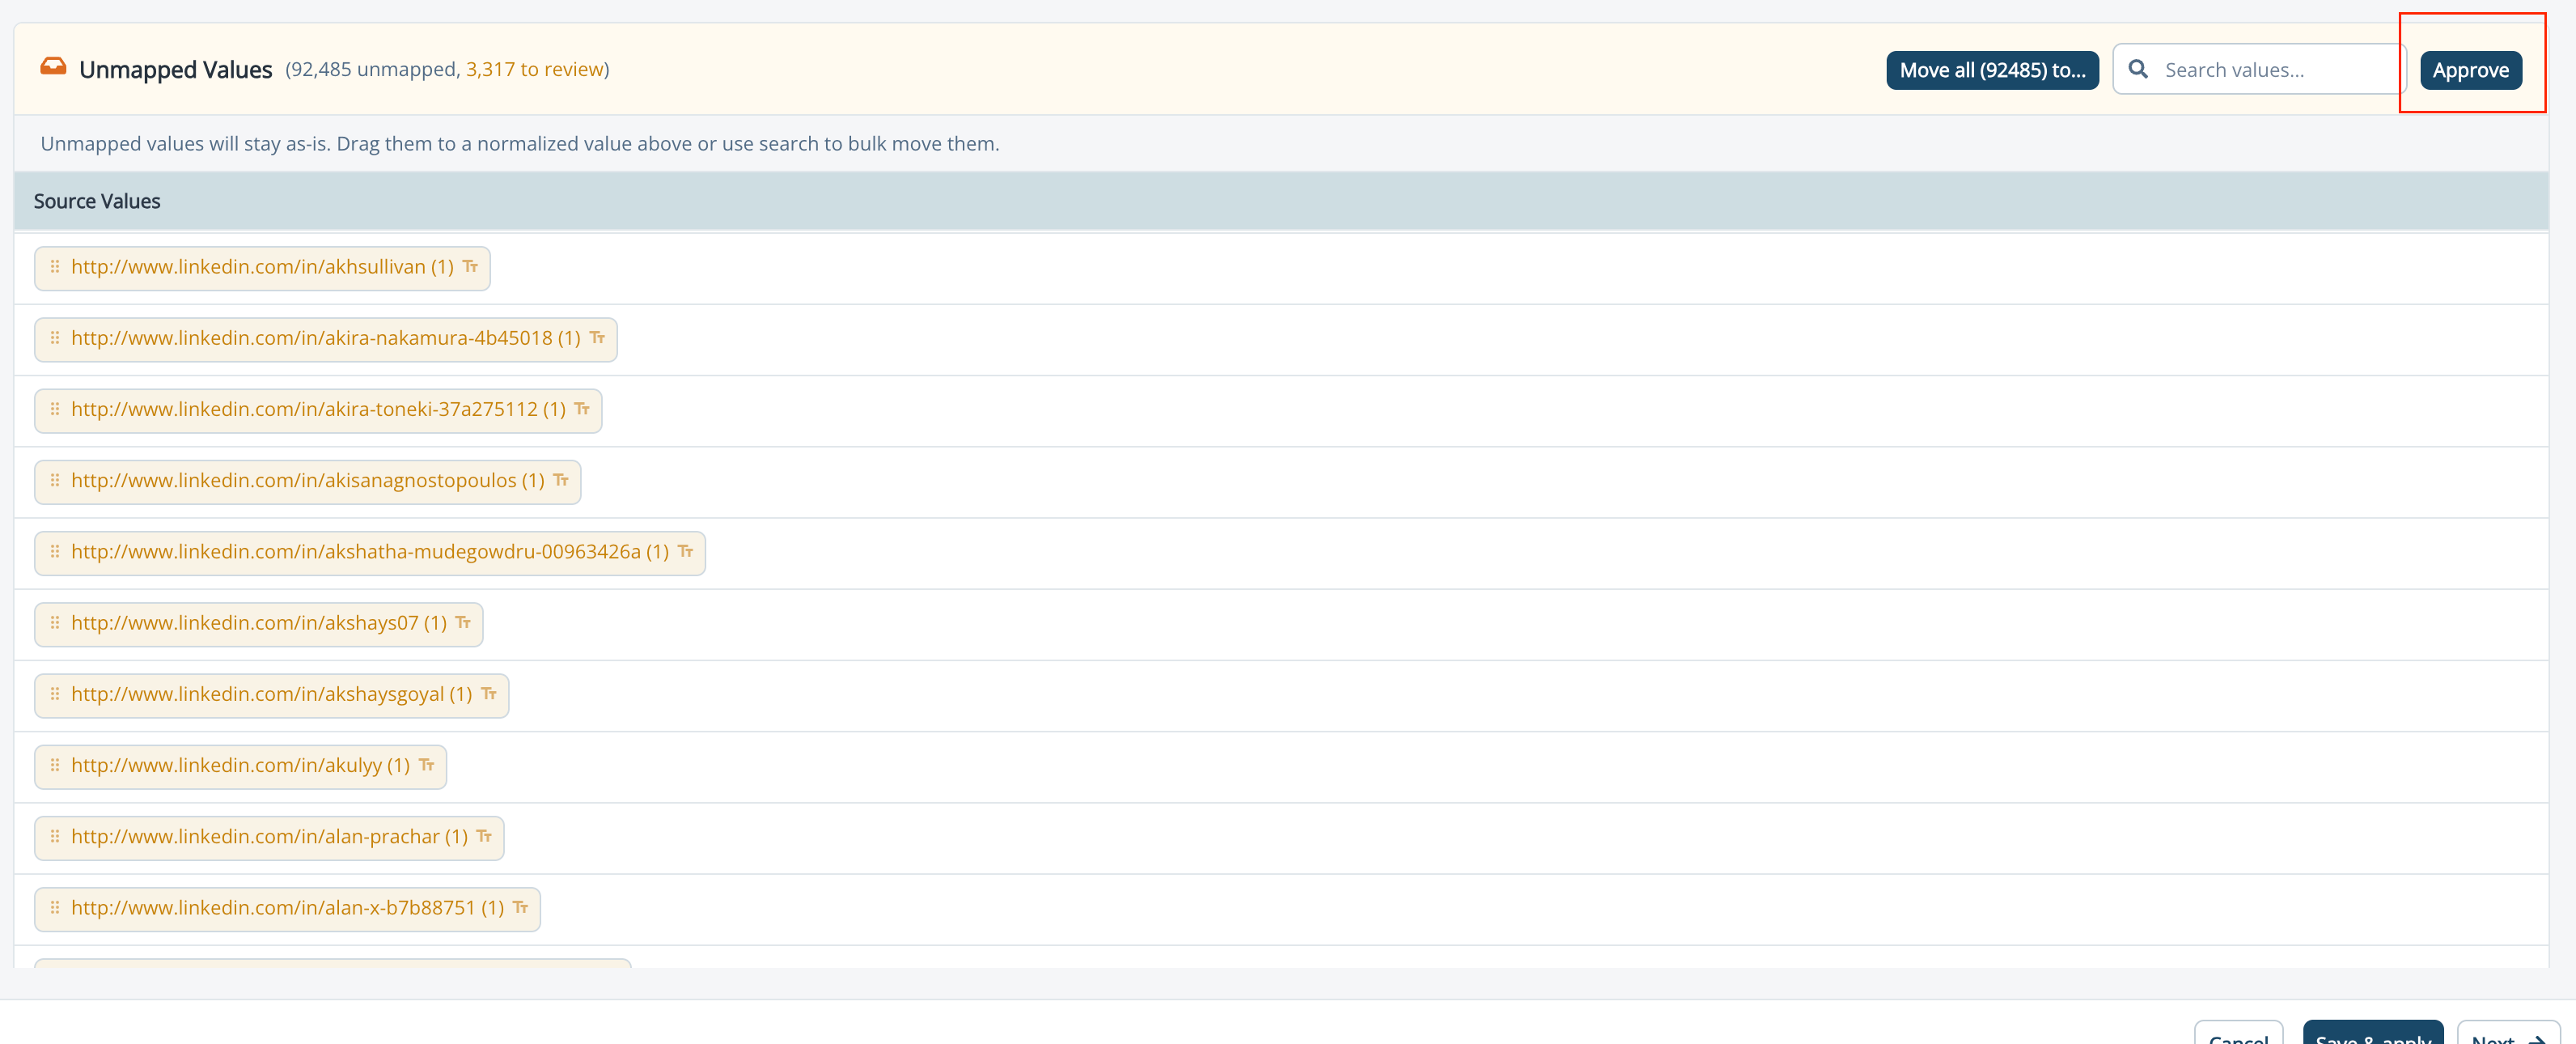
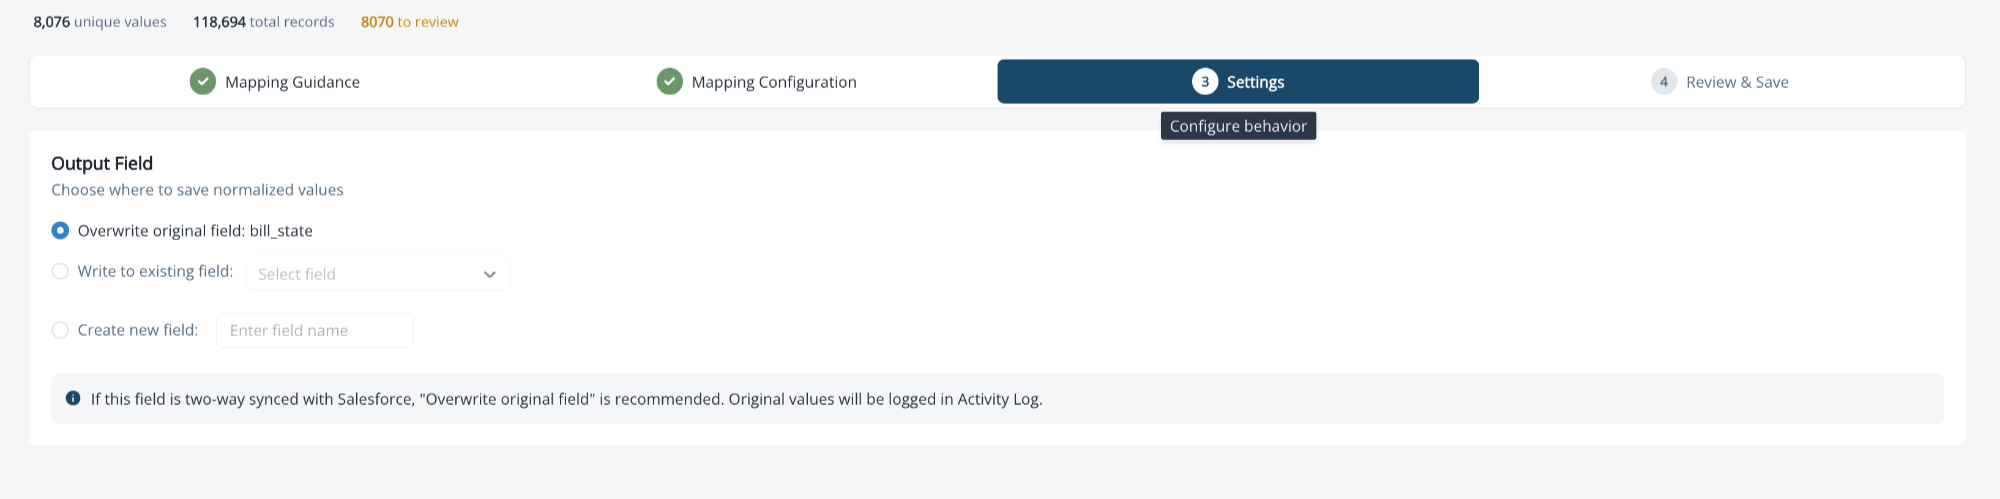
Step 3: Settings
Step 3: Settings
- Overwrite original field: Replace the source field values with normalized values. Note that this overwrites the raw data; if you want to preserve the original values, use one of the options below instead.
- Write to existing field: Select a different contact field as the output.
-
Create new field: Create a new custom contact field directly from this screen. The field is created as a Contact Field in Inflection
Step 4: Review & Save
Step 4: Review & Save
- Total normalized values and source values
- Output field selection
- Count of Unmapped values kept as-is
- Apply going forward only: Only normalize new incoming data. Existing records remain unchanged.
- Backfill historic values: Apply normalization to all existing records. This runs in the background and may take some time. You’ll see a “backfill started” entry in the Normalization Activity Log, and a “backfill completed” entry when it finishes.
Manage Existing Configurations
Manage Existing Configurations
Handle New Unmapped Values
Handle New Unmapped Values

- Click on the configuration with unmapped values.
- Review the new unmapped values in the Mapping Configuration step.
- Drag them into existing groups, create new normalized values, bulk-move them, or keep them as-is.
- Save your changes.
Edit a Configuration
Edit a Configuration
- Navigate to Database → Data Normalization → Normalization Configurations.
- Click on the configuration you want to edit.
- The edit flow has three steps: Mapping Configuration, Settings, and Review & Save (the Mapping Guidance step is skipped since mappings already exist).
- Modify mappings as needed: add new normalized values, reassign source values, or approve new mappings.
- Click Save & Apply and choose your backfill preference.
Normalization Activity Log
Normalization Activity Log
- Configuration created: Logged when a new normalization configuration is saved.
- Configuration updated: Logged with the source and output field names and details of what changed.
- Backfill started: Logged when a backfill process begins.
- Backfill completed: Logged when the backfill process finishes.
- Timestamp (date and time)
- Actor (user name or “System” for automated changes)
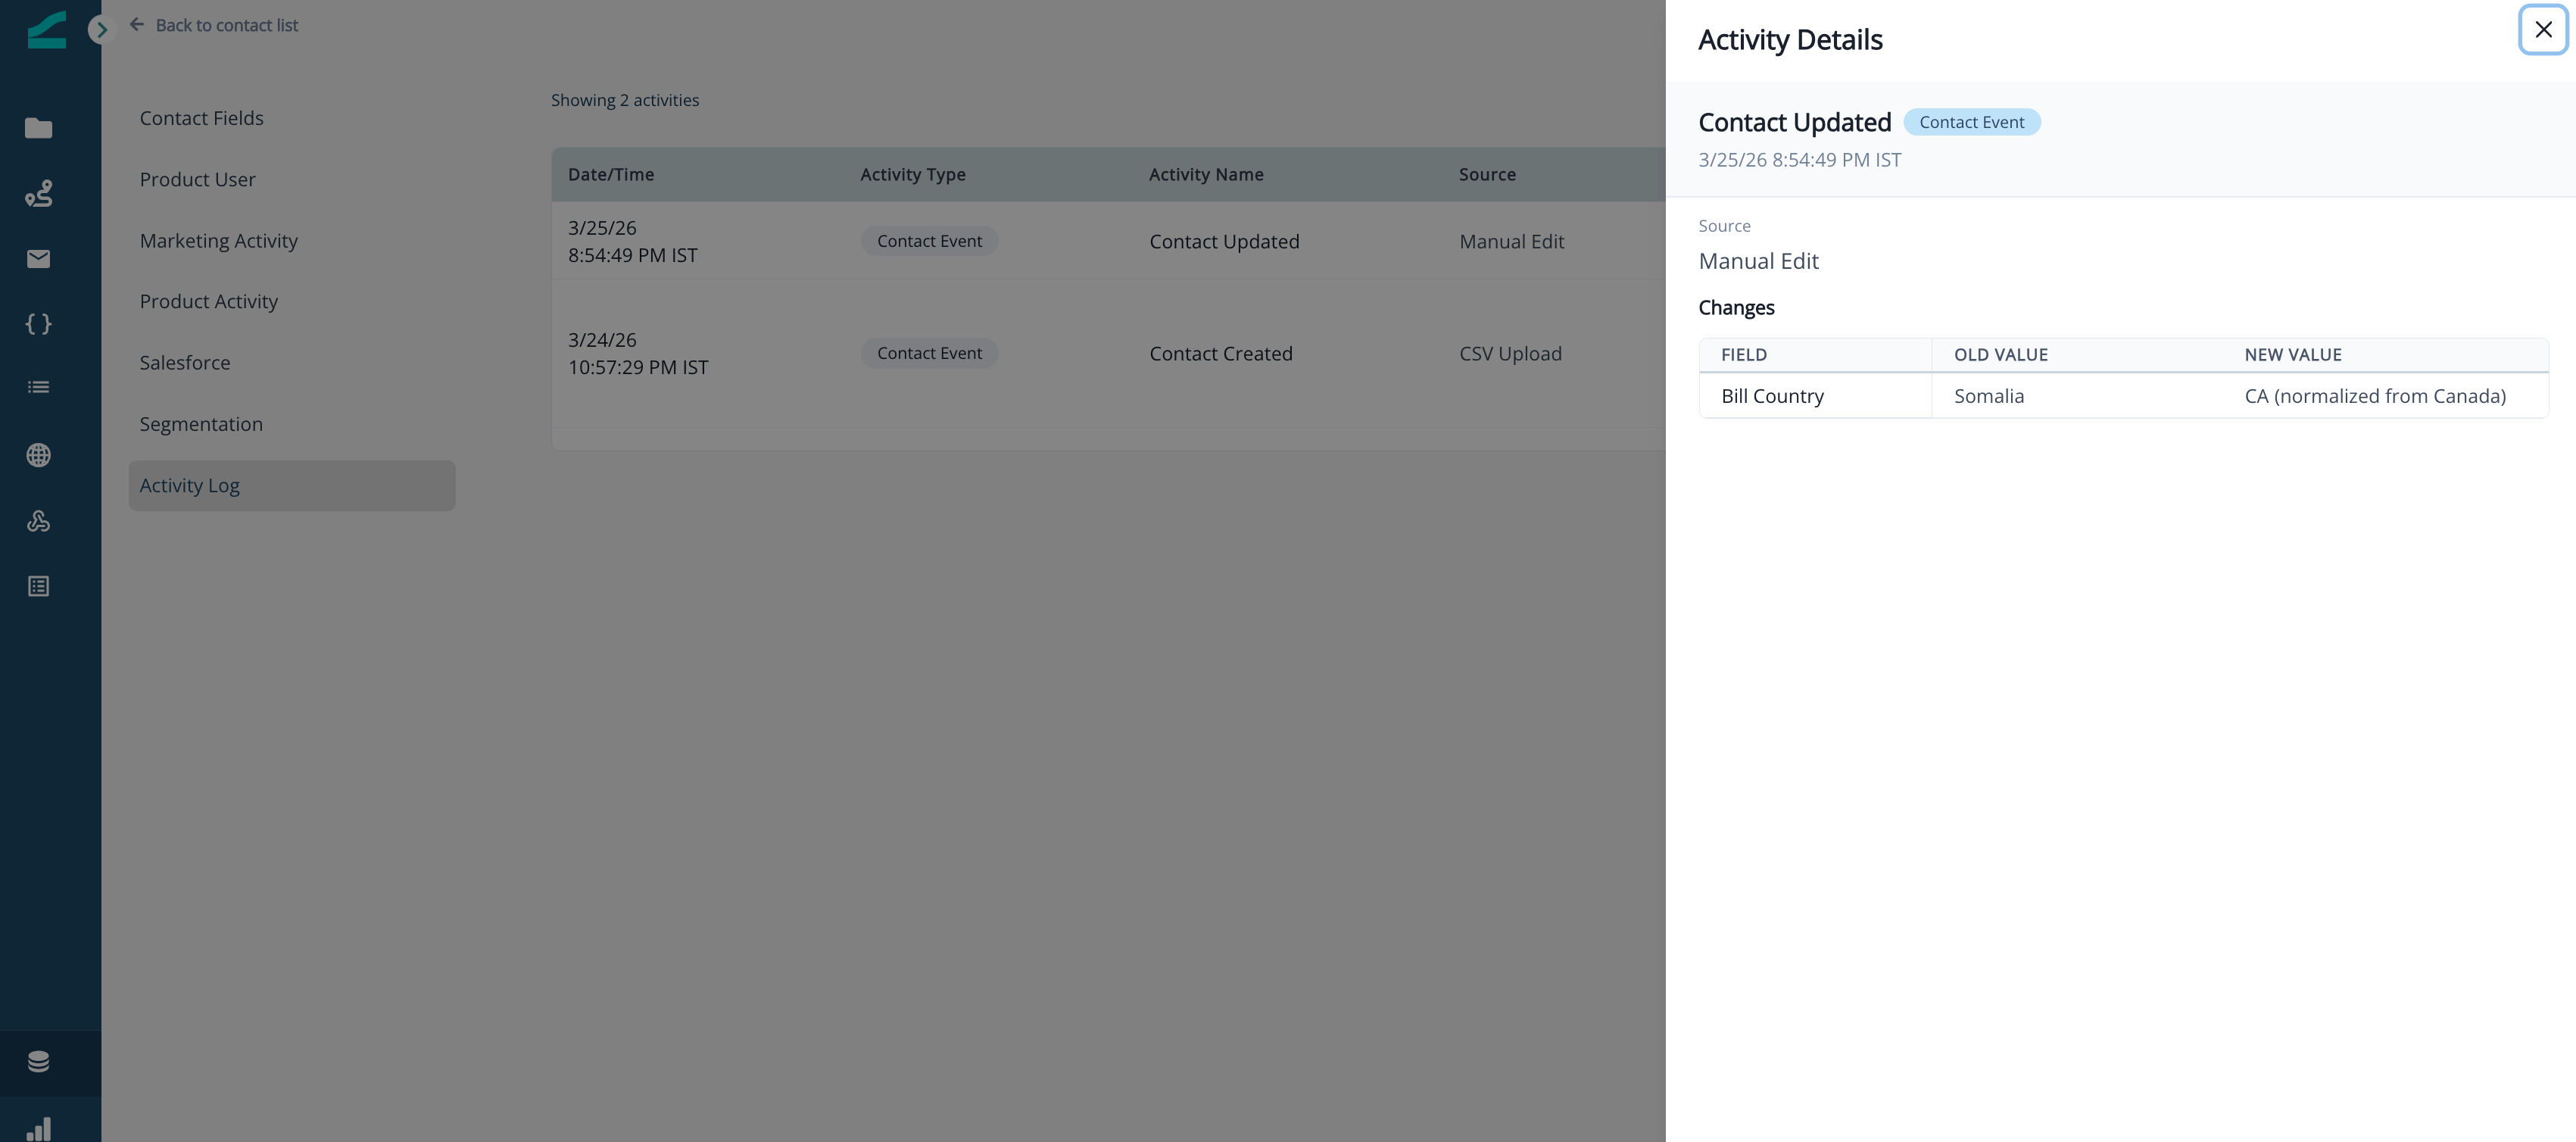
Contact Activity Log
Contact Activity Log
Best Practices
Best Practices
- Start with high-impact fields: Focus on fields used in reporting and segmentation first, like job title, company name, or industry.
- Leverage Salesforce picklists for fields synced from Salesforce to keep both systems aligned.
- Review new unmapped values regularly: New source values appear as your data grows. Periodic review ensures your normalization stays current.
- Iterate on your prompt: AI mapping is non-deterministic. If the initial results aren’t right, go back and refine your prompt or add more specific instructions, then regenerate.
- Preserve raw data when needed: If you want to keep the original source values intact, write normalized values to a separate output field rather than overwriting the source field.
- Reach out for high-cardinality fields: If your field has a very large number of unique values, contact your Customer Success team for guidance. They can involve the Inflection team to help plan the best approach.
Frequently Asked Questions
Which fields can I normalize?
Which fields can I normalize?
email, id, first_name, and last_name are restricted. Other default string fields like company_name and title can be normalized.Are source values case-sensitive?
Are source values case-sensitive?
Can I normalize a field to itself?
Can I normalize a field to itself?
What happens if I try to move a normalized value into another group?
What happens if I try to move a normalized value into another group?
What is the maximum file size for CSV uploads?
What is the maximum file size for CSV uploads?
What happens to existing data when I create a new configuration?
What happens to existing data when I create a new configuration?
Can I undo normalization?
Can I undo normalization?
What if the AI mapping doesn't look right?
What if the AI mapping doesn't look right?
Can I bulk-move unmapped values?
Can I bulk-move unmapped values?
My field has a lot of unique values. What should I do?
My field has a lot of unique values. What should I do?
How quickly are new incoming values normalized?
How quickly are new incoming values normalized?
Can other entities besides Contact be normalized?
Can other entities besides Contact be normalized?
Can I add a source value to a group manually?
Can I add a source value to a group manually?
How do I know when a backfill is done?
How do I know when a backfill is done?
Where can I see normalization changes on a specific contact?
Where can I see normalization changes on a specific contact?