

We recommend limiting webhook submissions to 1,000 requests/minute. If you need higher throughput, reach out to your customer success team.
Key concepts
- Connection provider: The external system sending data to Inflection (for example, Zapier, a webinar tool, or a custom integration).
- Inbound webhook connection: The authenticated connection between Inflection and your provider, with its own endpoint URL, field mapping, and lifecycle state.
- Group: A subset of submissions within a connection, split by a field you choose (see Group submissions).
Step 1: Set Up an Inbound Webhook Connection
Creating a connection is a full-page, two-step flow: Endpoint setup → Map fields. There is no third step.- From the Inbound Webhooks list, click Create.
- In the Connection provider panel, select Generic Inbound Webhook.
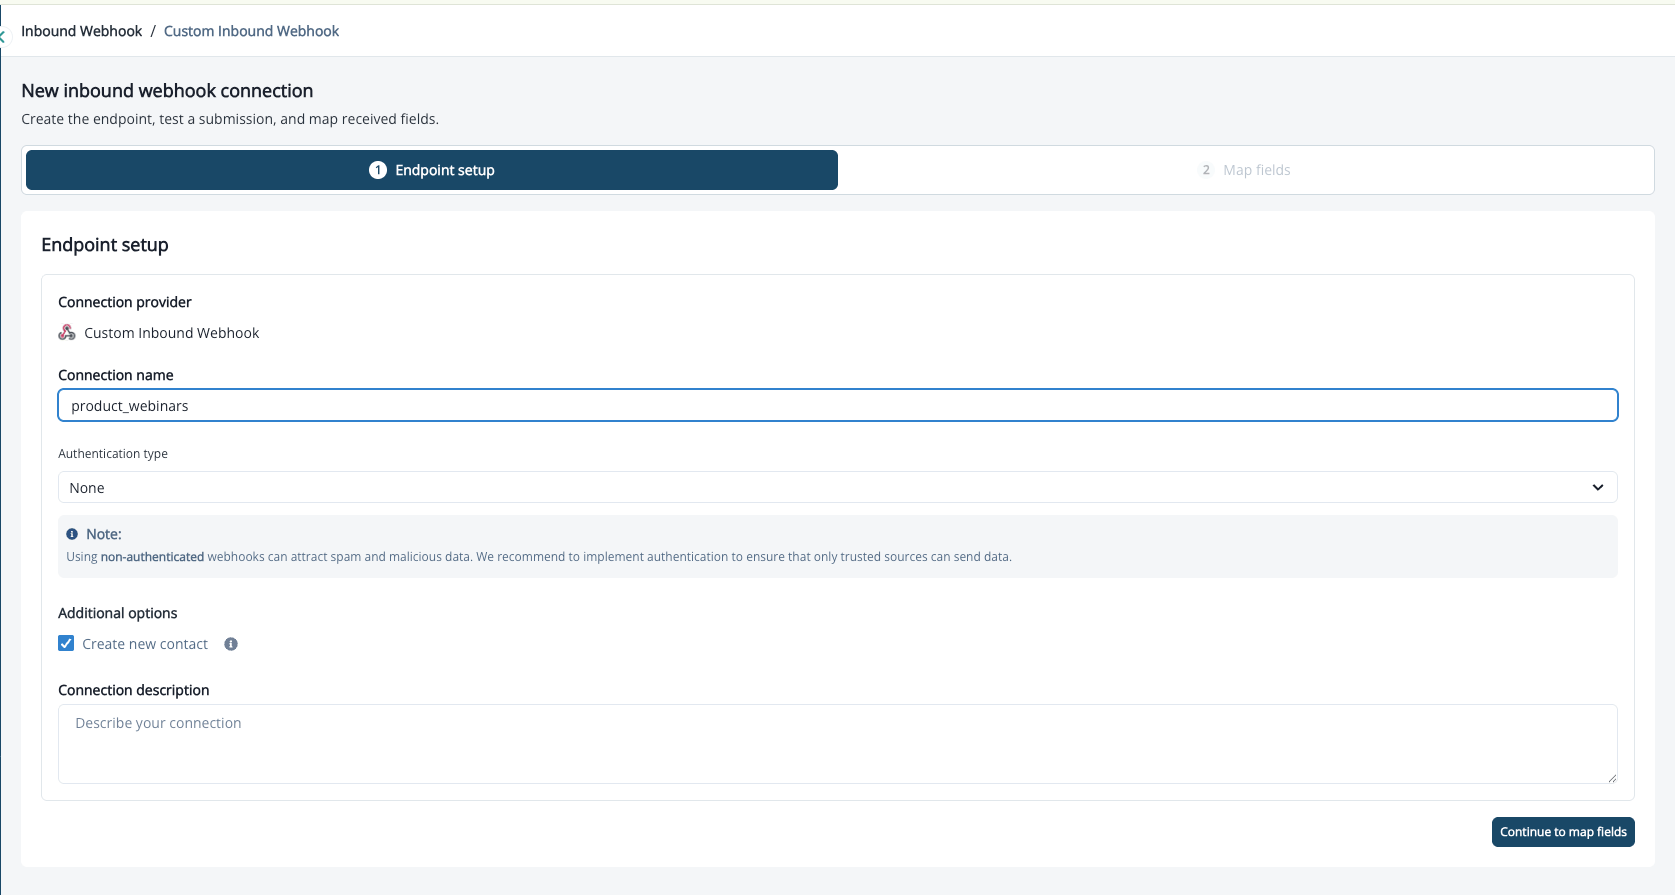
- On the Endpoint setup step, fill in the connection details:
- Connection name (required). If you leave it empty, you’ll see Connection name should not be empty.
- Authentication - choose the method that matches your security needs. While “No Auth” is available, we strongly recommend Basic Auth or API Key to prevent spam and unauthorized access.
- Description (optional).
- Create contact option - sets whether a new contact is created when an email address that isn’t already in Inflection is received.
- Click Continue to map fields.
Authentication
Select the authentication option that matches your security requirements. Using No Auth can expose your webhook to spam and malicious data - Basic Auth or API Key is strongly recommended. No Auth No authentication. Anyone with the webhook URL can send data.Not recommended. Risk of spam or malicious data.
- Credentials are hidden after setup. Copy and store them securely.
- To reset: Click Reset Password from the connection page and enter a new password. Update the password in your third-party system.
- Configure in your third-party tool using one of the following methods:
- Option 1 - Custom Header: Key:
Authorization/ Value:Bearer <YOUR_API_KEY> - Option 2 - Bearer Token: Paste the API key directly into the “Token” or “Authorization” field in your integration settings.
- Option 1 - Custom Header: Key:
- To reset: Click Refresh API Key under Authentication Details. Update the API key in your third-party system.
Credentials are hidden after setup. If you reset credentials, update your third-party system immediately. The webhook URL remains unchanged. Once the connection is created, the authentication method cannot be changed.
Step 2: Map Fields and Group Submissions
The Map fields step gives you everything you need to point your provider at Inflection and describe the payload it sends.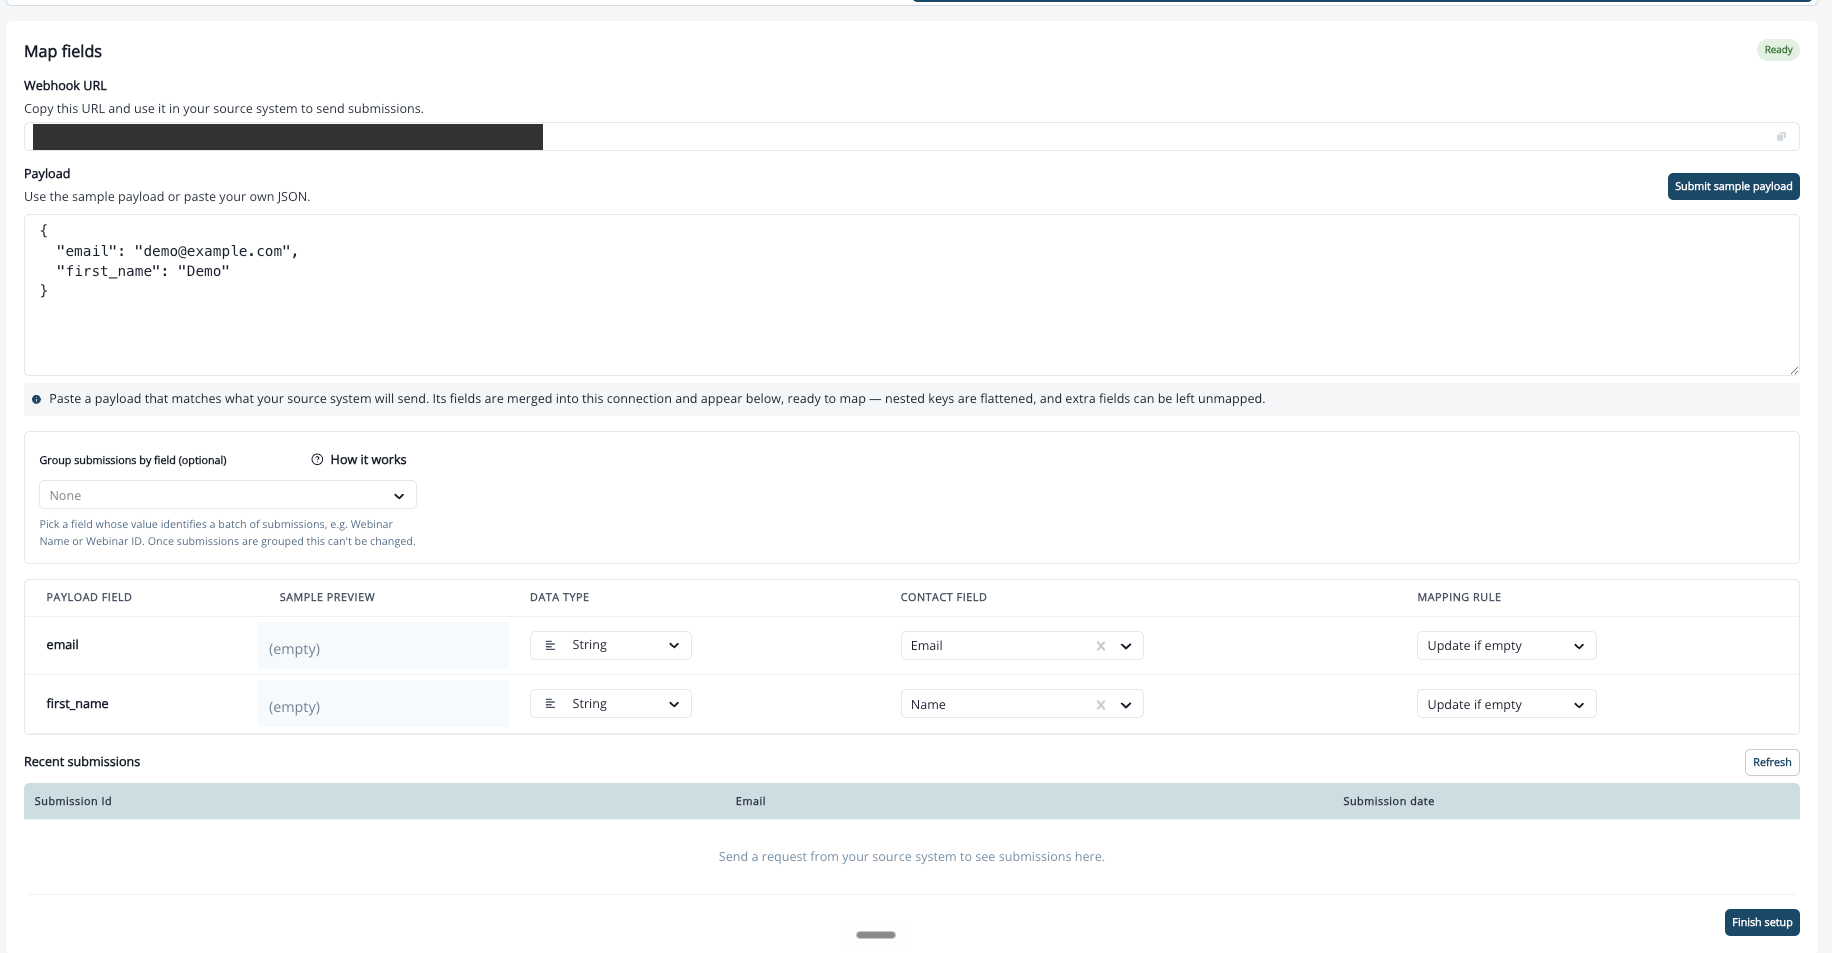
- Copy the endpoint from the Webhook URL block using its copy control, then configure it (with any credentials) in your third-party tool.
-
In the Payload textarea, either paste your own JSON or use the sample that’s prefilled for you:
The helper text reads “Use the sample payload or paste your own JSON.” If the JSON is invalid, you’ll see Enter a valid JSON object before submitting.
- Click Submit sample payload. On success you’ll see Payload received. Fields are ready to map. and the detected fields populate the mapping table.
Nested JSON objects arrive flattened using dot notation. For example,
{"props": {"company": "Acme"}} appears as the field props.company.- Map the detected fields to contact properties. The field-mapping table lists every field detected in your payload. It has four columns:
- Click Save mapping to persist your mapping. You must map the Email contact field before you can continue - if it isn’t mapped, you’ll see Map the Email contact field before continuing.
Group Submissions
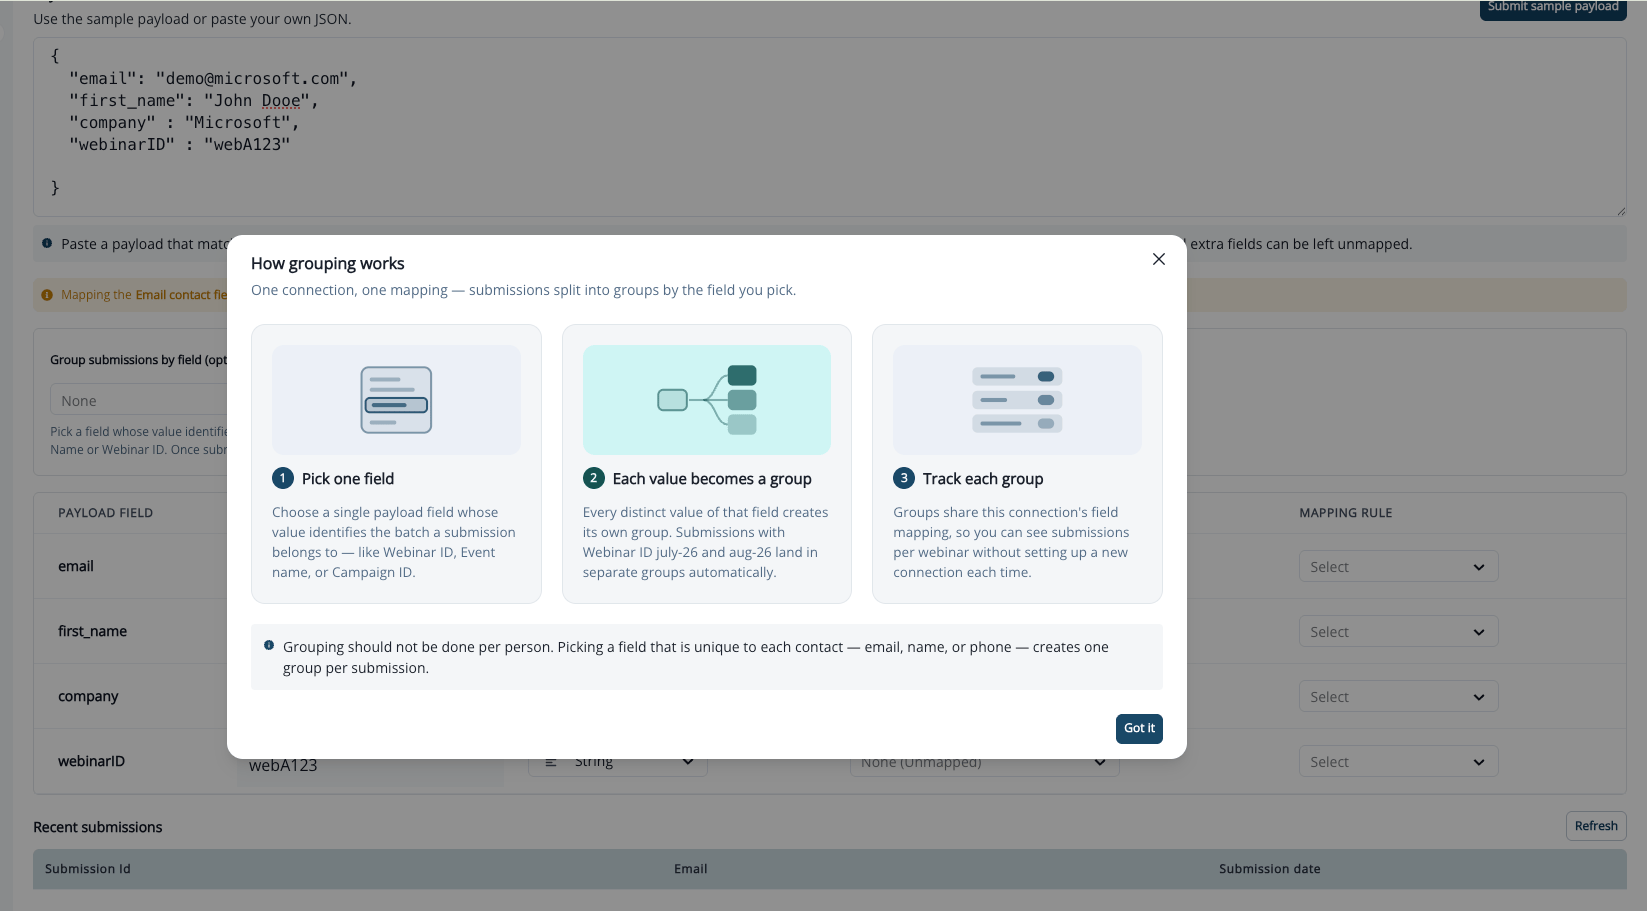
You can split a connection’s submissions into groups based on a field in the payload - useful when one endpoint receives data for several sources (for example, one row per webinar).- Use the Group submissions by field (optional) control to pick the grouping field.
- The How it works link opens a How grouping works explainer.
Connection Detail Page
Each connection opens as a single scrolling page. At the top are two badges:- A lifecycle badge (see Lifecycle actions).
- A readiness badge (see the states below).
- Connection Details card - lists Type, Create Contact, Last Activity, Authentication, Date Created, and Processing Lane (Real-time or Bulk - see Processing Lanes).
- Endpoint URL - with a copy control.
- Connection Health - includes a View submission errors action.
- Groups table - columns Group, Submissions, Errors, and actions, plus a Refresh control. If no groups exist yet, it shows a Default group placeholder row.
Readiness States
The readiness badge tells you how far along the connection is:Lifecycle Actions
The lifecycle badge shows the connection’s current state - a connection is Active while it is processing incoming data. Use the lifecycle actions to control whether a connection is processing incoming data:- Pause - Confirmation reads “Pausing stops incoming data processing until this connection is resumed.” The confirm button is Pause sync. While paused, incoming POSTs are rejected, not queued.
- Resume - Sets a paused connection back to Active. Applies immediately, with no confirmation dialog.
- Disable - Confirmation reads “Once disabled, this connection will no longer process incoming data.” Once disabled, a connection cannot be self-resumed.
Lifecycle actions and editing are available to Admins and Editors. They’re hidden from Viewers.
Delete a Connection
Deletion is available to Admin users only, and it isn’t available from the list. To delete, open a group’s actions on the connection detail page and choose delete. If the group or connection is still referenced by journeys or dynamic lists, a modal blocks deletion and lists the blockers with links:The following journeys or audiences still reference these inbound webhooks. Remove every reference, then click Refresh.The confirm button reads Resolve dependencies to delete and stays disabled until every reference is removed. To free the connection for deletion:
- Open each blocking journey or audience from its link and remove the inbound webhook reference, then save.
- Return to the modal and click Refresh.
- When no references remain, the block clears and you can delete the connection.
Removing a reference changes how that journey or dynamic list behaves. Confirm the reference is no longer needed before you remove it.
Processing Lanes
Every inbound webhook connection is assigned to a processing lane - either Real-time or Bulk. Processing lanes isolate your webhook traffic so that high-volume submissions on one connection don’t slow down another.How processing lanes work
- Each customer gets two separate lanes for processing webhook data. One connection’s traffic cannot congest the other lane.
- There is no difference in processing speed between the two lanes. Both Real-time and Bulk process submissions at the same rate. The names refer to the intended use case, not to a speed difference.
- Use Real-time for connections where speed-to-lead matters (for example, demo-request forms or high-priority lead sources).
- Use Bulk for high-volume, batch-style data imports where you want to keep the traffic separate from your real-time connections.
Default Assignments
Existing connections are automatically assigned a default lane:
You can change a connection’s lane at any time from the Connection Details card on the connection detail page.
Changing a Connection’s Lane
- Open the connection’s detail page and open its settings for editing.
- Under Processing lane, select one of the two options:
- Real-time - recommended for form submissions and low-to-moderate volume.
- Bulk - recommended for automations and high-volume sources.
- Click Save.

Use Inbound Webhooks in Journeys
You can use webhook submissions as audience filters or branching criteria:- Navigate to Journeys → Create New Journey.
- Add a condition: Performed a Marketing Activity → Inbound webhook sync.
Examples for Inbound Webhook Setup
General purpose enterprise automation platform Zapier Social lead generation Linkedin Webinars Zoom Goldcast Enrichment Clearbit Clay Data sync with CRMs/MAPs Marketo Hubspot Forms Formsite TypeformInbound Webhooks FAQs
Why are the lanes called Real-time and Bulk?
Why are the lanes called Real-time and Bulk?
The names describe the intended use case, not a speed difference. Both lanes process data at the same rate. “Real-time” is meant for connections where you want fast, isolated processing (like lead-capture forms), and “Bulk” is for high-volume imports you want to keep on a separate lane. The key benefit is traffic isolation - one lane’s load cannot affect the other.